Table of Contents
Advertisement
Quick Links
Advertisement
Table of Contents

Related Manuals for LifeFitness TREADMILL DESK


Summary of Contents for LifeFitness TREADMILL DESK
- Page 1 TREADMILL DESK Operation Manual 1001371-0001 Rev AA...
- Page 2 132 Nathan Road Sales/Marketing Email: Tsimshatsui, Kowloon marketing.benelux@lifefi tness.com HONG KONG Operating Hours: 9.00h-17.00h (CET) Telephone: (+852) 2891.6677 Fax: (+852) 2575.6001 Service Email: HongKongEnquiry@lifefi tness.com Sales/Marketing Email: * Also check www.lifefitness.com for local representation or distributor/dealer ChinaEnquiry@lifefi tness.com Operating Hours: 9.00h-18.00h...
-
Page 3: Table Of Contents
SERVICE & TECHNICAL DATA 8.1 TROUBLESHOOTING 8.2 PREVENTIVE MAINTENANCE TIPS 8.3 HOW TO ADJUST AND TENSION THE WALKING BELT ON THE TREADMILL DESK 8.4 TRACKING (CENTERING) A NEW WALKING BELT 8.5 USING AND TESTING THE SAFETY STOP PULL CORD 8.6 HOW TO OBTAIN PRODUCT SERVICE... - Page 4 Before using this product, it is essential to read this ENTIRE operation manual and ALL installation instructions. It describes equipment setup and instructs members on how to use it correctly and safely. Avant d’utiliser ce produit, il est indispensable de lire ce manuel d’utilisation dans son INTÉGRALITÉ, ainsi que TOUTES les instructions d’installations.
- Page 5 Treadmill Desk See “Specifi cations” in this manual for product specifi c features. Statement of Purpose: The Treadmill Desk is an exercise machine that enables users to walk in place on a moving surface. Life Fitness STRONGLY recommends seeing a physician for a complete medical exam before undertaking an exercise program, particularly if the user has a family history of high blood pressure or heart disease, is over the age of 45, smokes, has high cholesterol, is obese, or has not exercised regularly in the past year.
-
Page 6: Safety Instructions
The Treadmill Desk has immobilization lockout software. Activate the soft- ware lockout when the Treadmill Desk is not in use. Refer to Immobilizing the Treadmill Desk in Section 3 for information on how to immobilize the Treadmill Desk. Keep the instructions out of the reach of children. - Page 7 Keep the power cord away from heated surfaces. Do not pull the equipment by the power cord or use the cord as a handle. Do not run the power cord on the fl oor under or along the side of the Treadmill Desk. Refer to last assembly step for proper power cord routing.
-
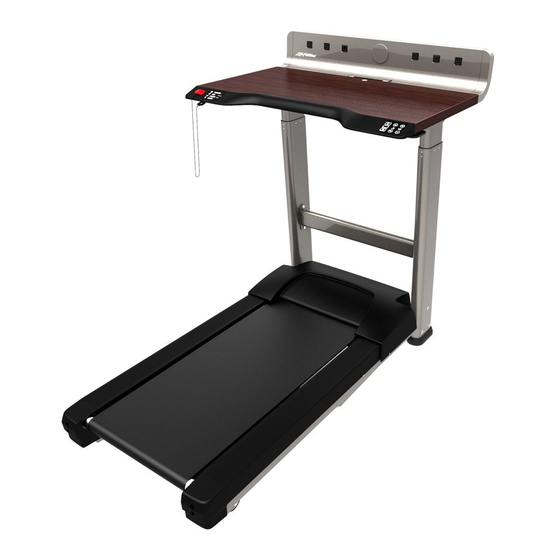
Page 8: Treadmill Desk Illustration
TREADMILL DESK DESIGN ILLUSTRATION AC Power Supply RJ45 Desktop Table USB Port Integrated User Controls Palm Rest Monitor Mount (behind cover) Integrated Display Emergency Stop Lanyard Emergency Stop Magnet Walking Belt / Walking Deck Leveler... -
Page 9: Setup
If it will not fi t an electrical outlet, have a proper outlet installed by a qualifi ed electrician. Power Switch Located on the front panel at the base of the Treadmill Desk, the ON/OFF switch has two position - “I” (one) for ON and “0” (zero) for OFF. - Page 10 Electrical Requirements section. Then turn the Treadmill Desk on. Stand on the side rails of the Treadmill Desk and straddle the belt. To start the belt, press the GO key, then press the SPEED UP arrow key until the Treadmill Desk reaches 2.0 mph/ 3.2 kph.
- Page 11 The Treadmill Desk may now be moved on its front platform wheels by raising the back of the product and pushing / pulling. Do not attempt to move the Treadmill Desk by pushing or pulling on the deck, uprights, or desktop.
-
Page 12: Integrated Console Display & User Controls
INTEGRATED CONSOLE DISPLAY & USER CONTROLS The integrated display is located on the left hand side of the desktop ledge and shows the following session data: Time: Current session duration Speed: Current speed Distance: Distance walked Steps: Number of steps taken 2:30:30 20.30 23000... - Page 13 User Controls The user controls are located on the right hand side of the desktop ledge and control the following basic operations of the Treadmill Desk: PAUSE STOP GO: Press to begin moving the belt at 0.3 mph and start a session.
-
Page 14: Back Ledge Connection & Attachment Options
BACK LEDGE CONNECTION & ATTACHMENT OPTIONS The Back Ledge of the Treadmill Desk provides the user with several connection and attachment options. USB Ports (Quantity: 2) Max Power 2.1 Amps AC Power Receptacles (Quantity: 3) Note: Total power for back ledge connections is 3 Amps 120 Volts. -
Page 15: Ergonomics
Here are some tips to help you maintain the best neutral posture while at the Treadmill Desk: 1. Chest should always remain open with shoul- ders back and the upper arms should be kept close to the body. -
Page 16: Settings & Diagnostics Menu
SETTINGS & DIAGNOSTICS MENUS Entering Settings Menu Press and hold down the STOP key and SPEED DOWN ARROW key for three plus seconds. The display will beep consecutively three times and display the text “SEt” in the Time Window. Press the GO key to enter the UNITS and MAXIMUM SPEED setting. Press the PAUSE key to toggle between UNITS and MAXIMUM SPEED. -
Page 17: Service & Technical Data
You may be in “Energy Saver Mode”. Press the GO button to see if the user controls turn on. Check to see if the Treadmill Desk is plugged in and if the ON/OFF switch is on. If the The Treadmill Desk does not... -
Page 18: Preventive Maintenance Tips
N’utilisez pas l’appareil tant que les pièces défectueuses n’ont pas été réparées ou remplacées. The following preventive maintenance tips will keep the Treadmill Desk operating at peak performance: IMPORTANT: TURN the Treadmill Desk OFF and UNPLUG PRIOR to PERFORMING ANY MAINTENANCE! Inspect the power cord. -
Page 19: How To Adjust And Tension The Walking Belt On The Treadmill Desk
(four quarter-turns per side). 3. Set the Treadmill Desk at 2.0-mph (3.2 kph) and get on to make sure the belt no longer slips. Also, check the walk- ing belt’s tracking. If the walking belt drifts to the left or right see Tracking (Centering) an Existing or New Walking Belt. -
Page 20: Tracking (Centering) A New Walking Belt
Customer Support Services. 8.5 Using and Testing the Safety Stop Pull Cord During operation of the Treadmill Desk, the lanyard on the Safety Stop pull cord should be attached to an item of the user’s clothing. While the Treadmill Desk is ON and the console display is active remove the Safety Stop pull cord from the Treadmill Desk. -
Page 21: Specifications
7 years, frame 3 years motor, mechanical and electrical parts 1 year labor & wear parts PHYSICAL DIMENSIONS (ASSEMBLED OUT OF BOX) Length Width Height Weight Treadmill Desk 71 in. 40 in. 49 in. 279 lbs. (180.3 cm) (101.6 cm) (124.46 cm) -
Page 22: Warranty
WARRANTY 7 Years 3 Years 1 Year • Drive Motor • Labor • Frame • Electrical Parts • Wear Parts (walking belt, drive belt, deck, rollers) • Mechanical Parts USER MANUAL: WHAT IS COVERED: It is VERY IMPORTANT THAT YOU READ THE MANUAL before This Life Fitness commercial product (“Product”) is warranted to operating the Product.
Need help?
Do you have a question about the TREADMILL DESK and is the answer not in the manual?
Questions and answers