Table of Contents
Advertisement
Advertisement
Table of Contents

Subscribe to Our Youtube Channel
Related Manuals for ACME Thunderstruck LP-2304


Summary of Contents for ACME Thunderstruck LP-2304
- Page 1 LP-2304...
-
Page 2: Table Of Contents
Menu 1. Safety Instructions ..........................2 2. Technical Specifications ........................3 3. Installation and Connection ......................4 4. How to set the unit ...........................5 4.1 Rear Panel ............................5 4.2 Main Function..........................6 5. How to control the unit ........................12 6. DMX512 configuration ........................13 7. DMX512 Connection........................15 8.Troubleshooting ..........................16 9. -
Page 3: Safety Instructions
1. Safety Instructions Please read the instruction carefully which includes important information about the installation, usage and maintenance. WARNING Please keep this User Manual for future consultation. If you sell the fixture to another user, be sure that they also receive this instruction booklet. ... -
Page 4: Technical Specifications
1. Bolt each clamp to the Omega holder with screw and lock nut through the hole in the holder. 2. Faster the omega holders on the bottom of the base by inserting quick-lock fasteners into the holes of the base and tighten fully clockwise. ... -
Page 5: Installation And Connection
Installation and Connection The unit should be mounted via its screw holes on the bracket. Always ensure that the unit is firmly fixed to avoid vibration and slipping while operating. Always ensure that the structure to which you are attaching the unit is secure and is able to support a weight of 10 times of the unit’s weight. Also always use a safety cable that can hold 12 times of the weight of the unit when installing the fixture. -
Page 6: How To Set The Unit
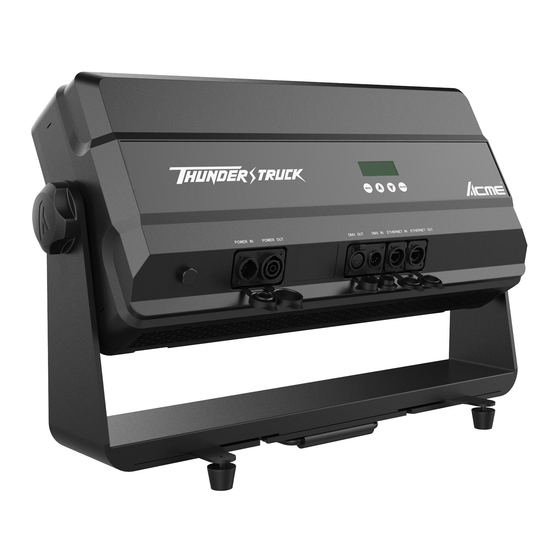
4. How to set the unit 4.1 Rear Panel Display: Show the various menus and the selected functions; ○ Button: ○ MENU To select the programming functions... -
Page 7: Main Function
DOWN To go forward in the selected functions To go backward in the selected functions ENTER To confirm the selected functions Breathable punishment ○ Power input/output ○ For DMX512 link, use 3/5-pin XLR plug cable to input DMX signal, and to link the next unit. DMX input/output: ○... - Page 9 DMX Setting Select the DMX Setting, press the ENTER button and the display will blink. Use the DOWN and UP button to change the DMX 512 address(001-512)or Elthernet Setup,In Elthernet Setup menu,fixture Elthernet parameter ,IP Address/Subnet Mask/Net(0-127)/Subnet(0-15)/Universe(0-15) Must be consistent with the value of the controller,Fixture receives the corresponding ArtNet signal control. Once the address has been selected, press the ENTER button to setup or exit menu mode without any change after 8 seconds automatically.
- Page 10 Optically Linear Square Law Inverse-Square Law S-Curve Mode 1(Optically Linear): The increase in light intensity appears to be linear as DMX value is increased. Mode 2(Square Law): Light intensity control is finer at low levels and coarser at high levels. Mode 3(Inverse Square Law): Light intensity control is coarser at low levels and finger at high levels.
- Page 11 Manual Test Select the Manual Mode, press the ENTER button to confirm. Use the UP and DOWN button to adjust the value for Red,Green,Blue,White, Intensity, Durate or Rate from 0~255, press the ENTER button to confirm. (DMX signal will be the first priority under Manual Mode.) Once selected, press the ENTER button to store.
- Page 12 Fault report : 1、Fan.Error 2、Temp.Errot RDM function table DMX START 0-512 MANUFAC TURER ACME DEVICE MODEL DESCRIPTION THUNDERSTRUCK DMX PERSONALITY DMX 4/4Channel( 8 bit) DMX 8/8Channel (16 bit) DMX 8/8 Channel DMX 52/52 Channel DMX12/1 Piexl DMX16/2V Piexl DMX16/2H Piexl...
-
Page 13: How To Control The Unit
5. How to control the unit 1. By DMX controller; No need to turn the unit off when you change the DMX address, as new DMX address setting will be affected at once. Turn on the unit, under the DMX signal , the LED will display the saved channel address (001-512). -
Page 14: Dmx512 Configuration
6. DMX512 configuration Channel Mode:... -
Page 17: Dmx512 Connection
7. DMX512 Connection Mode connection: 1. Connect the fixture together in a “daisy chain” by XLR plug cable from the output of the fixture to the input of the next fixture. The cable cannot be branched or split to a “Y” cable. Inadequate or damaged cables, soldered joints or corroded connectors can easily distort the signal and shut down the system 2. -
Page 18: Fixture Cleaning
B. Not responding to DMX controller 1. DMX LED should be on. If not, check DMX connectors, cables to see if link properly. 2. If the DMX LED is on and no response to the channel, check the address settings and DMX polarity. 3. - Page 20 Innovation, Quality, Performance...
Need help?
Do you have a question about the Thunderstruck LP-2304 and is the answer not in the manual?
Questions and answers