Table of Contents
Advertisement
Advertisement
Table of Contents

Related Manuals for Nautilus Bowflex VeloCore


Summary of Contents for Nautilus Bowflex VeloCore
- Page 1 A SSE M B LY / O WN ER ’S M A N UAL Workout with Other Fitness Apps This fitness machine has integrated Bluetooth connectivity ® which allows it to work with a number of fitness apps. For our latest list of supported apps, please visit: www.nautilus.com/partners...
-
Page 2: Table Of Contents
Schwinn are trademarks owned or licensed by Nautilus, Inc., registered or otherwise protected by common law in the U.S. and other countries. The Bluetooth ® word mark and logos are registered trademarks owned by Bluetooth SIG, Inc., and any use of such marks by Nautilus, Inc. is under license. Other trademarks are the property of their respective owners. -
Page 3: Important Safety Instructions
• Do not try to change the design or functionality of this machine. This could compromise the safety of this machine and will void the warranty. • If replacement parts are necessary use only genuine replacement parts and hardware supplied by Nautilus. Failure to use genuine replacement parts can cause a risk to users, keep the machine from operating correctly and void the warranty. - Page 4 SPECIFICATIONS • Maximum user weight limit: 147 kg (325 lbs.). Do not use if you are over this weight. • This machine is for home use only. Do not place or use the machine in a commercial or institutional setting. This includes gyms, corporations, work places, clubs, fitness centers and any public or private entity that has a machine for use by its members, customers, employees or affiliates.
-
Page 5: Safety Warning Labels / Serial Number
Safety Warning Labels and Serial Number SAFETY WARNING LABELS AND SERIAL NUMBER PARTS Lean lock warning/instructions WARNING! • Injury or death is possible if caution is not used while using this machine. • Keep children and pets away. • Read and follow all warnings on this machine. •... -
Page 6: Specifications
Specifications SPECIFICATIONS Maximum User Weight: 147 kg (325 lbs.) 16” monitor 16” monitor 22” monitor Machine Weight without Dumbbells: 67.6 kg (149 lb.) 69.1 kg (152.3 lb.) Approx. Screen Size (measured diagonally): 39.6 cm (15.6”) 54.6 cm (21.5”) Weight of Dumbbells (supplied in U.S./Canada): 2.7 kg (6 lbs.) 133.6 cm (52.6”) Total Surface Area (footprint) of equipment:... -
Page 7: Parts
Parts PARTS (X2) Item Description Item Description Frame Console (22” console option shown) Stabilizer, Front End Cap, Console Mast * Stabilizer, Rear Pedal, Left (L) Handlebar Pedal, Right (R) Handlebar Post Dumbbell Holder Seat Stem Water Bottle Holder Seat Assembly AC Adapter w/Cord End Cap, Seat Stem * Dumbbell... -
Page 8: Hardware
Hardware Hardware is pre-installed on the machine. Note: Selected pieces of the pre-installed hardware have been provided as spares in the bag. Tools Included 13 mm/14 mm 4 mm 15 mm/17 mm 6 mm Assembly 1. Attach Stabilizers to Frame Note: The hardware (*) is pre-installed. - Page 9 2. Install the Handlebar to the Handlebar Post NOTICE: Remove the AC Adapter from the Handlebar. The hardware (*) is pre-installed. After installation, make sure the hardware is fully tightened. 17mm 3. Attach the Handlebar Assembly and Seat Stem to the Frame Assembly Do not set the Seat Stem or Handlebar Post position higher than the stop mark (STOP) on the tube.
- Page 10 4. Install the Seat Assembly to the Frame Assembly NOTICE: Make sure the Seat Adjustment Handle is fully tightened to secure the Seat Assembly on the Seat Stem. When fully tightened, the Adjustment Handle must point rearward. Note: To adjust the seat after the handle is tightened, loosen the handle. Move the seat to the desired position and tighten the handle. Pull the handle out to disengage and turn so that it points rearward, then release.
- Page 11 5. Attach the Console Mast to the Frame Assembly NOTICE: Connect the Frame cable to the Console Mast cable. Remove the wire from the Console Mast cable and pull the connector out of the Console Mast tube. Gently pull the cable from the top of the Console Mast to remove all slack. Do not crimp the cables. The hardware is pre-installed (*).
- Page 12 7. Install the Console to the Frame Assembly NOTICE: Remove the Console mast cover (12a) and pre-installed hardware(*) from the back of the Console before you connect the cables. Route the Console cable through the Console Mount up to the opening at the top. Connect the Console cable and Console Mast cable. Do not crimp the cables.
- Page 13 8. Attach Pedals to Frame Assembly If the threads strip due to improper installation, then the Pedals can disengage from the bike and/or break while under usage, which can result in serious injury to the user. Note: The Left Pedal is reverse-threaded. Be sure to attach Pedals on the proper side of the Bike. Orientation is based from a seated position on the bike.
- Page 14 9. Attach the Dumbbell Holders to the Frame Assembly Note: The hardware (*) is pre-installed. (X2) 10. Attach the Water Bottle Holders to the Frame Assembly Note: The hardware (*) is pre-installed. (X2) Assembly / Owner’s Manual...
- Page 15 11. Attach the AC Adapter to the Frame Assembly 12. Set Up Your Machine a. With the machine plugged into a functioning wall outlet, the machine will start up and the red Status LED will activate. Note: The Console may go to sleep if it does not receive any input. Touch the screen of the Console to wake up the machine.
-
Page 16: Installing Shoe Clips (Cleats)
Installing the Shoe Clips (Cleats) on SPD Cycling Shoes (SPD Cycling Shoes not provided) Note: The provided shoe Cleats fit both the right and left Pedals. Tools needed (not included): pliers, 4 mm hex wrench With a pair of pliers, pull off the rubber cover to expose the cleat mounting holes on the bottom of the cycling shoe. -
Page 17: Moving And Storing The Machine
Before You Start Moving and Storing the Machine The machine may be moved by one or more persons depending on their physical abilities and capacities. Make sure that you and others are all physically fit and able to move the machine safely. Remove the power adapter. -
Page 18: Features
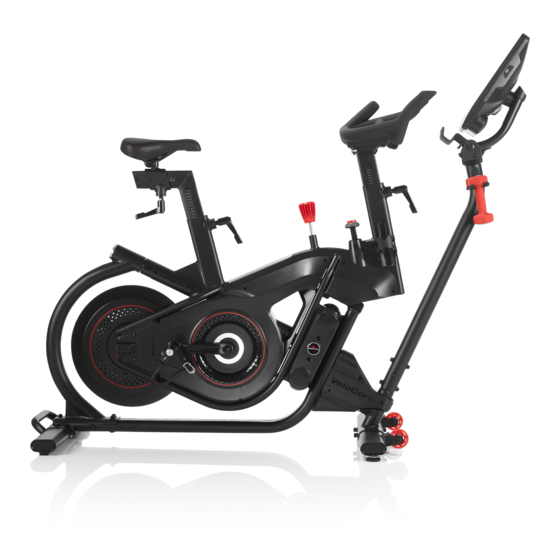
Features Adjustment Handle, Seat Slider Lean Pivot Seat Slider Power Inlet Seat Front Stabilizer Adjustment Handle, Seat Post Transport Wheel Emergency Brake/Resistance Adjustment Knob Leveler Brake Assembly Rear Stabilizer Lean Lock Knob Transport Handle Handlebar Assembly Flywheel Console (22” option shown) Pedal w/Foot Restraint and Shoe Cleat Adjustable Console Mast Shoe Clips (Cleats) -
Page 19: Emergency Stop
Emergency Stop To stop the pedals immediately, push down hard on the Emergency Brake/Resistance Adjustment Knob. This bike cannot stop the Pedals independently of the Flywheel. Reduce the pace to slow the Flywheel and Pedals to a stop. Do not dismount the bike until the Pedals have come to a complete stop. - Page 20 You can access your JRNY™ membership* through the console of this Bowflex™ machine. With a JRNY™ membership, you receive guided workouts adapted to your capabilities, conveniently displayed on your console, and friendly virtual voice coaching designed to support you on your journey to long-term fitness success.
- Page 21 JUST FOR YOU tab After logging in, the Just For You tab is the starting, or home, screen for your machine. Guided adaptive workout options* and educational videos are presented here, encouraging you on your fitness journey. Recommended Workouts Recommended workouts are based on your current fitness level, past workouts and selected time and difficulty settings. Tap on a Suggested Workout card to see an expanded description.
- Page 22 Console Display with Lean and Core Engagement Maximum Burn Rate marker Burn Rate Target range Lean and Core Engagement Interval Time Benefit Zone / Burn Rate Workout Profile Metrics Bar Time Counts in minutes and seconds the total time of your workout (e.g. 15:42 minutes). Interval During an Interval workout, the Intervals display show the currently active Interval and the total number of Intervals for the workout.
- Page 23 Resistance Resistance shows the resistance level set by the Resistance Knob. Workout Profile The Workout Profile is a visualization of the workout (showing intensity). The higher the profile line, the more intense the workout. Interval Time The Goal display shows the total workout time or the total calories for a non-interval workout. During an Interval workout, the Goal display counts down the time until the end of the workout.
-
Page 24: Remote Heart Rate Monitor
USB Charging If a USB Device is attached to the USB Port, the Port will attempt to charge the Device. The power supplied from the USB Port may not be enough to operate the Device and charge it at the same time. Bluetooth Heart Rate Enabled ®... - Page 25 Heart Rate Calculations Your maximum heart rate usually decreases from 220 Beats Per Minute (BPM) in childhood to approximately 160 BPM by age 60. This fall in heart rate is usually linear, decreasing by approximately one BPM for each year. There is no indication that training influences the decrease in maximum heart rate.
-
Page 26: Shoe Clips (Cleats)
Speakers To play audio through the speakers on your machine, open an App on the Console and allow it to stream audio. Note: Your machine is also able to receive and play audio across a Bluetooth connection from your device or stream audio from the machine to ®... -
Page 27: Operations
Operations What to Wear Wear rubber-soled athletic shoes or cycling shoes with cleats. You will need the appropriate clothes for exercise that allow you to move freely. How Often Should You Exercise Consult a physician before you start an exercise program. Stop exercising if you feel pain or tightness in your chest, become short of breath, or feel faint. - Page 28 Foot Position / Pedal Strap Adjustment Foot pedals with straps provide secure footing to the exercise bike. Put the ball of each foot in the Foot Restraint on the Pedals. Fasten the strap over the shoe. Repeat for the other foot. Be sure toes and knees point directly forward to ensure maximum Pedal efficiency.
-
Page 29: Locking For Storage
Locking the Flywheel for Storage When the machine is not in use, be sure to lock the Flywheel with the Emergency Brake/Resistance Adjustment Knob. To lock the Flywheel, turn the Emergency Brake/Resistance Adjustment Knob clockwise until it encounters an increase in resistance. Then rotate the Emergency Brake/Resistance Adjustment Knob another 1/2 turn clockwise. -
Page 30: Paused/Workout Complete Mode
Paused / Workout Complete Mode 1. To Pause a workout, stop pedaling during the workout. Note: The Console will automatically pause if there is no RPM signal for 5 seconds, or if you tap the screen and tap the Pause button. When paused, the Console will display the Play and Stop buttons. -
Page 31: Maintenance
Maintenance Read all maintenance instructions fully before you start any repair work. In some conditions, an assistant is required to do the necessary tasks. Equipment must be regularly examined for damage and repairs. The owner is responsible to make sure that regular maintenance is done. -
Page 32: Maintenance Parts
Maintenance Parts FF GG Console Crank Arm, Left Fender, Right Handlebar Pedal w/Foot Restraint, Left Crank Arm, Right Handlebar Post Pivot Shroud, Left Pedal w/Foot Restraint, Right Lean Lock Knob Fender, Left Drive Belt Brake/Resistance Knob Front Stabilizer Drive Pulley Adjustment Handle, Seat/Handlebar Transport Wheel Flywheel... -
Page 33: Troubleshooting
Troubleshooting Condition/Problem Things to Check Solution No display/partial display/unit Check electrical (wall) outlet Make sure unit is plugged into a functioning wall outlet. will not turn on Check connection at front of unit Connection should be secure and undamaged. Replace adapter or connec- tion at unit if either are damaged. - Page 34 Condition/Problem Things to Check Solution Pedals loose/unit difficult to Check pedal to crank Pedal should be tightened securely to crank arm. Be sure connection is not pedal/ Pedals seem to skip or connection cross-threaded. Do not use if pedal is not fully tightened. slip with a sudden increase in Check crank arm to axle Crank arm should be tightened securely to axle.
-
Page 35: Warranty (Us/Canada Only)
Inc. reserves the right to charge the consumer for travel outside these areas. Nautilus, Inc. is not responsible for dealer labor or maintenance charges beyond the applicable warranty period(s) stated herein. Nautilus, Inc. reserves the right to substitute material, parts or products of equal or better quality if identical materials or products are not available at the time of service under this warranty. - Page 36 ™ ™ ™ ™ ™ 8025856.050120.A...
Need help?
Do you have a question about the Bowflex VeloCore and is the answer not in the manual?
Questions and answers