
Related Manuals for Modern Flames Landscape Pro Slim Series


Summary of Contents for Modern Flames Landscape Pro Slim Series
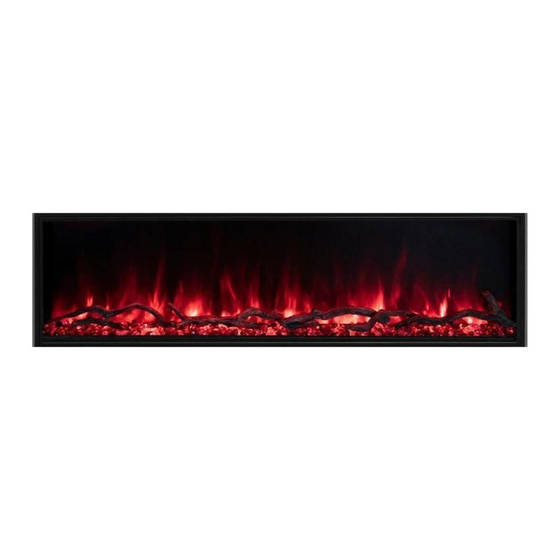
- Page 1 Landscape Pro Slim Series LPS-4414 • LPS-5614 • LPS-6814 • LPS-8014 • LPS-9614 INSTALLATION/OWNERS MANUAL FOR USE IN UNITED STATES AND CANADA SERIAL NUMBER:________________________________________...
- Page 2 USER INSTRUCTIONS LANDSCAPE PRO SERIES SLIM LPS - 4414 • LPS - 5614 • LPS - 6814 • LPS - 8014 • LPS - 9614 SAFETY INFORMATION AND OPERATIONS MANUAL Read these instructions completely before beginning installation. Failure to follow them could cause a heater malfunction resulting in serious injury and/or property damage.
-
Page 3: Table Of Contents
USER INSTRUCTIONS TABLE OF CONTENTS Important Instructions Service Parts Power Data Troubleshooting Product Guide Frequently Asked Questions Box Contents Cleaning and Maintenance Instructions Installation Wiring Diagram Operation IMPORTANT INSTRUCTIONS When using electrical heaters, basic 1. Read all instructions before installing or precautions should always be followed to using this heater. -
Page 4: Power Data
USER INSTRUCTIONS POWER DATA LPS-4414 LPS-5614 LPS-6814 LPS-8014 LPS-9614 Voltz/HZ AC 120V 60Hz AC 120V 60Hz AC 120V 60Hz AC 120V 60Hz AC 120V 60Hz Amps 14 Amps 14 Amps 14 Amps 14 Amps 14 Amps Heater AC 120V 1500W AC 120V 1500W AC 120V 1500W AC 120V 1500W AC 120V 1500W Lamps LED DC 12V LED DC 12V... -
Page 5: Box Contents
INSTALLATION BOX CONTENTS 1 Fire Unit 1 Remote 4 L-Metal Mounting 1 Glass Face Brackets 1 Trim Kit Logs 1 Owner’s Manual Acrylic Media... -
Page 6: Installation
INSTALLATION INSTALLATION WARNING: If the information in these CAUTION: Keep combustible materials, instructions is not followed exactly, a fire such as furniture, pillows, bedding, or explosion may result causing property papers, clothes and curtains at least 3 damage, personal injury or death. feet (0.9m) from the front of the heater and keep them away from the sides and rear. - Page 7 INSTALLATION Fully recessed installation Model LPS-4414 44 1/2” 24 1/8” 6” LPS-5614 56 1/2” 24 1/8” 6” LPS-6814 68 1/2” 24 1/8” 6” LPS-8014 80 1/2” 24 1/8” 6” LPS-9614 96 1/2” 24 1/8” 6” 1. This installation is optimized for a 2x6 framed wall.
- Page 8 INSTALLATION Half recessed installation 1. This installation is optimized for a 2x4 framed wall. Prepare the framed opening according to the chart on page 7. Provide a dedicated flexible 15 amp 120 volt circuit for hard wire installation. 2. Install L Metal Nailing Flanges to the fireplace.
-
Page 9: Operation
Power when it was cycled off. If the fireplace is on, this button will act as a reset and bring all colors back to the default Modern Flames' Reset signature color. This will cycle the heater between high, low and off. -
Page 10: Service Parts
MAINTENANCE SERVICE PARTS ITEM PHOTO DESCRIPTION PRINTED CIRCUIT BOARD CONTROLS LOW MF-PRO-PCB VOLTAGE AND HIGH VOLTAGE FUNCTIONS AND TRANSFORMER WIFI MF-PRO-WIFI WIFI BOARD MF-PRO-HF HEATER FAN 120 V MF-PRO-PTC PTC HEATER 120/240 V 1500/3000 WATTS MFSM120 SPINDLE MOTOR 120 V 50-60 HZ MF-PRO-RC PRO SERIES RF REMOTE CONTROL OPTIONAL... - Page 11 MAINTENANCE SERVICE PARTS ITEM PHOTO DESCRIPTION MF-PRO-PIB POWER INDICATOR BOARD MF-PRO-NTC THERMOSTAT SENSOR MF-LPS-TK-44 MF-LPS-TK-56 MF-LPS-TK-68 TRIM KIT MF-LPS-TK-80 MF-LPS-TK-96 MF-LPS-F/LED-44 MF-LPS-F/LED-56 MF-LPS-F/LED-68 RGB FLAME LED BAR MF-LPS-F/LED-80 MF-LPS-F/LED-96 MF-LPS-EB/DL-44 MF-LPS-EB/DL-56 MF-LPS-EB/DL-68 RGB EMBER BED/DOWNLIGHT LED STRIP MF-LPS-EB/DL-80 MF-LPS-EB/DL-96 MF-LPS-SR-44 MF-LPS-SR-56 MF-LPS-SR-68 SPINDLE ROD FOR FLAME OR EMBER BED...
-
Page 12: Troubleshooting
MAINTENANCE TROUBLESHOOTING Problem Possible Cause Corrective Action A. Breaker tripped or circuit has A. Reset breaker, test circuit for no power power B. Turn power off at the main B. Internal component is frozen breaker for 20 seconds. Turn and needs to be reset Nothing comes on (touch screen, power back on. -
Page 13: Frequently Asked Questions
MAINTENANCE Problem Possible Cause Corrective Action A. Disconnect unit from power A. Wiring is loose source and inspect for loose connections Flame is not visible when unit is B. LEDs defective B. Replace LEDs turned on C. Motherboard is defective C. -
Page 14: Cleaning And Maintenance Instructions
MAINTENANCE CLEANING AND MAINTENANCE INSTRUCTIONS There is very little maintenance involved with your electric fireplace. Please follow the few points below: • On a semi-annual basis unplug the machine from it’s power source, wait for the heating element to cool and dust the fire unit with a dry cloth. Be careful not to brush any wires that may be exposed as you do this. - Page 15 MAINTENANCE NOTES...
- Page 16 ©2019 www.modernflames.com Please dispose of properly.
Need help?
Do you have a question about the Landscape Pro Slim Series and is the answer not in the manual?
Questions and answers