Advertisement
Quick Links
Advertisement

Related Manuals for Converters.TV 15401


Summary of Contents for Converters.TV 15401
- Page 1 4 SDI Input to 2 HDMI Output Switcher with Multi-view PiP - # 15401 Operation Manual...
- Page 2 Introduction The 4 by 2 SDI to HDMI Seamless Quad PIP Splitter is a high performance, high speed zooming/shrinking system that can be easily configure and control for quad or picture-in-picture video processing. Allowing 4 different SDI input sources to be freely selected and arranged on to HDMI displays with total of 8 different types of settings.
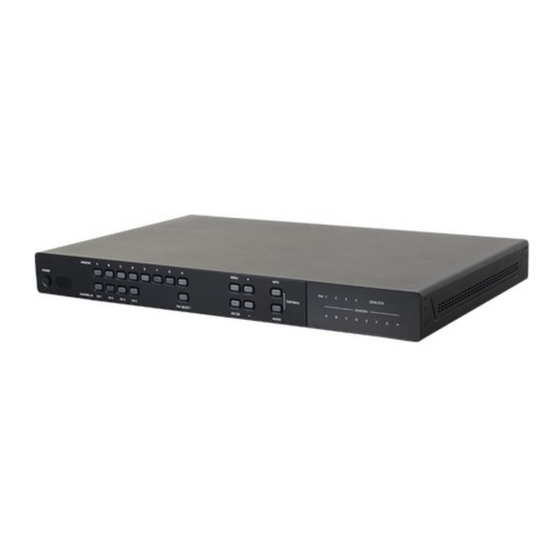
- Page 3 Operation Controls and Front Panel Functions 1. POWER Button & LED: Press this button to power on the device and the LED will illuminate in green or set it to standby mode and the LED will illuminate in Red. IR Window: Accept IR signal from the device’s remote control included in the package only.
- Page 4 Press this button to select audio channel. Note: Press the 'INFO & AUDIO' buttons together to switch output resolution to 720p@60Hz instantly Rear Panel SDI IN: Connect with source equipment such as SNG camera or SDI signal devices. HDMI OUT: Connect with HD TV/monitor for output image display.
- Page 5 Press this button to mute the audio from HDMI output port. ▲ /▼/►/◄ & OK Buttons: Press this buttons to scroll through the OSD selection and press OK to enter and confirm the setting. Menu: Press this button to enter into the OSD menu. Exit: Press this button to exit the OSD menu or the OSD settings.
- Page 6 0~100 (50) Value Reset Menu Exit Picture 0~100 (50) Reset 0~100 (50) 0~100 (50) 0~100 (50) Value Reset Menu Exit Menu Exit Window Channel 1 Size CH1 Wxxx Setup Select Hxxx Width Unit Width Ten Width Hundred Height Unit Height Ten Height Hundred Position CH1 Hxxx Vxxx...
- Page 7 Width Hundred Height Unit Height Ten Height Hundred Position CH1 Hxxx Vxxx Horizontal Unit Horizontal Ten Horizontal Hundred Vertical Unit Vertical Ten Vertical Hundred Priority Image Output On/Off Window Reset Menu Exit Channel 3 Size CH1 Wxxx Select Hxxx Width Unit Width Ten Width Hundred Height Unit...
- Page 8 Window Reset Menu Exit Channel 4 Size CH1 Wxxx Select Hxxx Width Unit Width Ten Width Hundred Height Unit Height Ten Height Hundred Position CH1 Hxxx Vxxx Horizontal Unit Horizontal Ten Horizontal Hundred Vertical Unit Vertical Ten Vertical Hundred Priority Image Output On/Off Window Reset...
- Page 9 Window Channel 1 Mirror On/Off Convert Convert On/Off Fade In-Out Rotation R90/L90/Up-Side Down180/Off Window Reset Menu Exit Channel 2 Mirror On/Off Convert Fade In-Out On/Off Rotation R90/L90/Up-Side Down180/Off Window Reset Menu Exit Channel 3 Mirror On/Off Convert On/Off Fade In-Out R90/L90/Up-Side Rotation Down180/Off...
- Page 10 Minimum For Cr 16~240 Maximum For Cr 16~240 Chromakey On/Off White Minimum For Y 234~235 Maximum For Y 234~235 Minimum For Cb 127~129 Maximum For Cb 127~129 Minimum For Cr 127~129 Maximum For Cr 127~129 Chromakey On/Off Yellow Minimum For Y 218~220 Maximum For Y 218~220 Minimum For Cb 16~18 Maximum For Cb 16~18...
- Page 11 Minimum For Cb 213~215 Maximum For Cb 213~215 Minimum For Cr 228~230 Maximum For Cr 228~230 Chromakey On/Off Minimum For Y 61~63 Maximum For Y 61~63 Minimum For Cb 101~103 Maximum For Cb 101~103 Minimum For Cr 239~240 Maximum For Cr 239~240 Chromakey On/Off Blue Minimum For Y 30~32...
- Page 12 Information Screen Resolution F/W Version Upgrade Exit Menu Exit Note: 1. When in 'NATIVE' resolution, the unit will read the EDID settings of the display connected to HDMI OUT A. 2. Naming character up to 9 characters. 3. Chromakey Setup only works when CH 1and CH 2 are selected. CH 1 is the background and CH 2 is the top layer to be overlaid.
- Page 13 RS-232 and Telnet Controls Command Description Parameter Prints all available commands to the screen Prints all available Help commands to the screen SPOW 0/1 Set the unit power 0=Off 1=On on/off RPOW Show current power state SRES 0~18 Set output resolution 0=480p@60Hz 1=576p@50Hz 2=720p@50Hz...
- Page 14 ROSDT Show OSD display current time SOSDG 0~10 Set OSD transparent 0~10 value ROSDG Show OSD transparent current value Set brightness value for X=0/1~4, 0=All channels, SBRI X Y input channel 1~4=Channel 1~4 Y=0~100 RBRI 0~4 Show brightness current 0=All channels, 1~4= value Channel 1~4 Set contrast value for...
- Page 15 RIMAGE 0~4 Show output channel 0=All channels, image current** 1~4=Channel 1~4 X=Channel 1~4 SPRI X Y Set windows Y=Priority 1~4 priority** RPRI 0~4 Show windows 0=All channels, 1~4=Channel 1~4 priority** X=Channel 1~4 SLABEL X Y Assign a preset Y=A~Z and/or 0~9 (up to 9 name** characters) RLABEL 0~4...
- Page 16 4=Cyan 5=Green 6=Magenta 7=Red 8=Blue 9=Black RCHRKS Show chromakey color current to screen* Set the YCbCr color X=0~11 SCHRC X Y range for the chromakey* 0=User 1 Y Max 1=User 1 Y Min 2=User 1 Cb Max 3=User 1 Cb Min 4=User 1 Cr Max 5=User 2 Cr Min 6=User 2 Y Max...
- Page 17 (xxx=0~255) Show static current RGAADD gateway address to screen SETHT 0~6 Set Ethernet timeout 0=Off, 1=10m, 2=20m, 3=30m, 4=40m, 5=50m, 6=60m (m=minute) RETHT Show Ethernet timeout current to screen RELINK Relink the unit in 2 seconds Set MAC address SMAC X x=0~9 and/or A~F RMAC Show current MAC...
- Page 18 Software Application Please download the software from www.cypress.com.tw with file name CDPS V2.000 and save it in a directory where you may use it later. Connect the unit with PC/Laptop through the Ethernet port of an active network system and open the CDPS V2.000 application. Click on Find Devices on Network and a list of the devices connected to the system will show up.
- Page 19 Telnet Control To access the telnet control under MS windows, click ‘Start’ menu and type “cmd” in the search field then press enter. Under Mac OS X, go to Go→Application→Utilities→Terminal. See below for reference. Once in the command line interface (CLI) type "telnet", then the IP address, and hit enter.
- Page 20 Press “Help” or “? ” then hit enter to bring up all available commands Note: Any commands will not be executed unless followed by a...
-
Page 21: Webgui Control
carriage return. Commands are case-insensitive. If the IP is changed then the IP Address required for Telnet access will also change accordingly. WebGUI Control On a PC/Laptop that is connected to an active network system, open a web browser and type device’s IP address (default setting IP:192.168.1.50 ) on the web address entry bar. - Page 22 Window Setup Click on 'Windows Setup' to select the widow display format from E~H with its size and position, simply drag and pull each channel to the desired position. Once the setting is done it can be labeled and saved. Note: This page is only selectable under Window mode E~H and under these modes Window Convert and Chromakey Setup will not be selectable.
- Page 23 OSD Settings Click on' OSD Settings' to set OSD size, timeout and transparent settings and allow info display On or Off Window Convert Click on 'Window Convert' to set each window’s appearance by mirror, fade- in-out or rotation. Note: This page is only selectable under Window mode A~D...
- Page 24 Chromakey Setup Click on 'Chromakey Setup' to set each window’s chromakey. Note: This page is only selectable under Window mode A~D. Ethernet Click on 'Ethernet' to set IP status, IP address and other IP related setting.
- Page 25 Specifications SMPTE Standards 259M-C, 292M, 424M/425M-AB SDI Transmission Rates 270Mbps, 1.485Gbps & 1.485/1.001Gpbs, 2.970Gbps & 2.970/1.001Gbps Video Bandwidth 225MHz/6.75Gbps Input Ports 4×SDI Output Ports 2×HDMI SDI Timings Support SD-SDI: SMPTE 259M-C@270Mbps HD-SDI: SMPTE292M@1.485 & 1.485/1.001Gpbs 3G-SDI: SMPTE 424M/425M-AB@2.970 & 2.971/1.001Gpbs HDMI Timings Support 480i, 576i, 720p@50/59.94/60, 1080i@50/59.94/60,...
Need help?
Do you have a question about the 15401 and is the answer not in the manual?
Questions and answers