Advertisement
Table of Contents
- 1 Usb Connector
- 2 Before You Start
- 3 Led Status Indicators
- 4 Connecting the Camera to the PC
- 5 Turn off Camera
- 6 Switching between Modes
- 7 Osd (On-Screen Display) Menu
- 8 Firmware Update
- 9 Additional Information
- 10 Loop Recording
- 11 Motion Detection
- 12 Image Stabilizer
- 13 Troubleshooting
- Download this manual
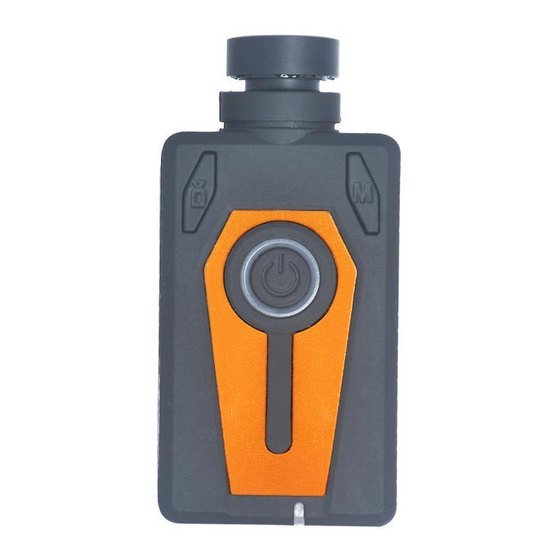
User Guide for the Mobius Maxi ActionCam
Description
The above picture shows the arrangement of the user operating features.
►This manual does not cover replacing the internal battery or lens.
►This manual assumes the camera is loaded with the latest firmware available at the
time of writing. Functionality may vary with earlier or later firmware versions.
Cards
You should always use micro SDHC or Micro SDXC cards with a class rating of 10 or
above, the faster the better. The cards may either be formatted as FAT32 or exFAT.
Cards with a capacity of up to 512GB have been tested.
Large cards formatted with FAT32 will drastically increase the camera's boot time. For
example, it may take up to 15 seconds or more for the camera to boot with a 512GB
card formatted with FAT32. There is virtually no start-up delay when using an exFAT-
formatted card.
If a specific card does not work correctly after it has been freshly formatted you should
no longer use the card with the camera. A different card, even an identical card, will
most likely work perfectly.
►Setting the Video Quality to Extreme Fine uses a bitrate which lies outside the chipset
specification. Only use extremely fast cards such as UHS U3, V30, V60 or V90 when
the Extreme Fine parameter is set, especially in combination with 4K or 2.7K Video
Resolution.
►Important: If the firmware detects that the card is too slow (class rating too low), it will
decrease the recording speed and/or resolution and the parameter value will be
overwritten.
Advertisement
Table of Contents

Related Manuals for Mobius Maxi


Summary of Contents for Mobius Maxi
- Page 1 User Guide for the Mobius Maxi ActionCam Description The above picture shows the arrangement of the user operating features. ►This manual does not cover replacing the internal battery or lens. ►This manual assumes the camera is loaded with the latest firmware available at the time of writing.
-
Page 2: Usb Connector
9. The camera will return to Standby mode when the formatting is finished. USB connector The Mobius Maxi uses a 10 pin Mini USB connector. Although 10-pin, the connector is compatible with all standard 5-pin mini USB cables for USB data transfer and charging. - Page 3 The Reset button The reset button is in the small hole located on the right side in line with the center of the Power Button (looking at the camera from the top with the lens pointing forward). It can be pressed by carefully inserting a bent paper clip or similar instrument. The Reset button should only be pressed in case the camera no longer reacts to button presses.
-
Page 4: Led Status Indicators
LED status indicators The following LED states are for a camera not connected to the PC. ○ Steady Yellow - The camera is in Video Mode 1 and is on standby. ☼ Slowly flashing Yellow (1 sec. On, 1 sec. Off) - The camera is in Video Mode 1 and is recording video. -
Page 5: Turn Off Camera
Charging • Connect one end of the supplied standard USB cable to the camera. • Connect the other end to a USB, 5V DC power source (wall charger, PC or external battery). • When the yellow LED turns on, press the Power button for about two seconds to turn the camera OFF. - Page 6 Recording Video Mode 1 or 2 (yellow or blue LED) Start video recording. • Briefly press the shutter button (top left). • ► If the recording LED has been disabled, the yellow or blue LED will slowly blink 3 times and then turn off, indicating that recording has started. •...
- Page 7 Likewise, you must disconnect your current WiFi (internet/home network) connection and then (manually) connect your phone to the Maxi as soon as the camera's WiFi mode is enabled. Please refer to your phone's manual on how to connect/disconnect to WiFi.
- Page 8 ► The app requires at least Mobius Maxi firmware V2.07 to run correctly. 3. Manual configuration using an external monitor It is also possible to manually change the configuration settings by using the On Screen Display (OSD) by connecting the camera to an external Monitor/TV.
- Page 9 4. Manual configuration using a text file With firmware version 0.80 and above the parameters can be set by using a text file. This makes it possible to set the parameters using virtually any computer system. Previous firmware versions did not support this functionality. The text file must be named "SysCfg2C.txt"...
-
Page 10: Osd (On-Screen Display) Menu
OSD (On Screen Display) Menu Connect the camera to a monitor or TV and then turn it on. ► Long Press the Shutter button (top left) to enter Setup Mode. See above (Camera Setup - Manual configuration). ► To enter Playback Mode, press the Mode button (top right) to cycle from Video Mode1 ->... - Page 11 The date and time and all parameters will be reset to their default values. Recording using an external power supply With the Mobius Maxi, it is possible to charge the battery and record at the same time using a standard external USB 5V DC power supply. The power supply may be mains driven (normal household wall plug), or run off batteries, including the car charger USB plug (optional accessory) and cable supplied with the camera.
-
Page 12: Additional Information
Additional information The following functions/parameters need additional explanation: Beeper The camera is equipped with a built-in beeper. The beeper sound can be turned on or off using one of the setup methods described above. G-Sensor The camera is equipped with a built-in Gravity-Sensor which allows the camera to record upright video or pictures automatically, even when used upside-down. -
Page 13: Motion Detection
Motion Detection Motion Detection only works in video modes. It does not function in Photo Mode. When Motion Detection is enabled, the Power-Off Standby timeout setting will be ignored. The camera will, therefore, not turn off unless there is no power left to keep the camera running, the memory card is full or the camera is manually turned off. - Page 14 TV Video-Out Full Screen The Video-Out format parameter can be set to 'Normal' 16:9 or 'Full Screen'. If set to 'Normal', the Video-Out image will be shown in its native 16:9 ratio. Most monitors will show black bars top and bottom. If set to 'Full Screen', the Video-Out image will be shown zoomed with the sides cropped from 16:9 to 4:3.
-
Page 15: Troubleshooting
Trouble shooting Q. When I press the Power button, nothing happens. A. An apparent 'dead' camera can be caused by the following: • The battery is flat or defective. Replace or charge the battery. • The Firmware may have locked up. Use a paper clip or similar object to press the Reset button. - Page 16 Q. The camera is not recognized as a removable disk. A. The operating system must be XP or greater. The camera must be connected using a standard USB cable. Confirm the cable is not defective by attaching another USB device using the same cable. Do not use a USB hub. Try using another USB port. Defective cables are the most common problems when the camera is not correctly recognized by the PC.
- Page 17 Q. The camera records video with a different frame rate and/or resolution than defined by the parameter settings. A. The card's Class rating is too low. If the firmware detects that the card is too slow (class rating too low), it will decrease the recording speed and/or resolution. Q.
Need help?
Do you have a question about the Maxi and is the answer not in the manual?
Questions and answers