Table of Contents
Advertisement
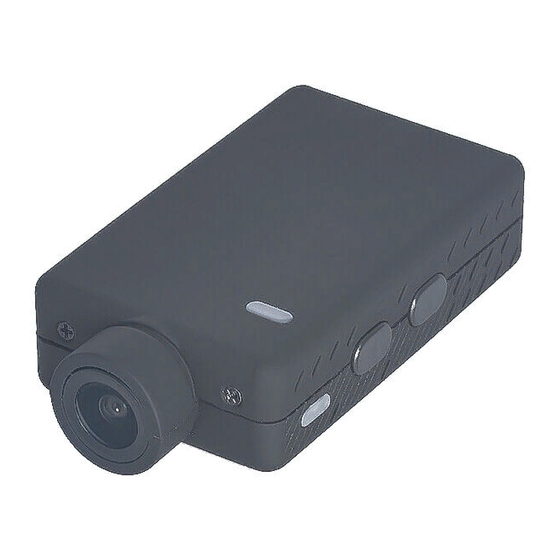
User Guide for the Mobius Mini ActionCam
Preliminary version
Description
The above picture shows the arrangement of the user operating features.
►This manual does not cover replacing the internal battery or lens.
►This manual assumes the camera is loaded with the latest firmware available at the
time of writing. Functionality may vary with earlier or later firmware versions.
Cards
You should always use micro SDHC or Micro SDXC cards with a class rating of 10 or
above. The cards may either be formatted as FAT32 or exFAT. Cards with a capacity of
200GB have been tested.
USB connector
The M2 uses a 10 pin Mini USB connector. The connector is compatible with all
standard mini USB cables for USB data transfer and charging.
Cables
The camera requires a standard (5-pin) USB cable for charging or connecting to
external battery packs for continuous recording. A standard USB cable is also used to
connect the camera to the PC in order to set the parameters or to access the camera as
an external disk.
A special 10-pin USB cable is required for A/V out (TV-Out, Video-Out)
You must under no circumstances use any other "special" cable, especially the "special"
cable supplied with the old #11 808 camera. Doing so will destroy your camera beyond
repair.
So, do not use a #11 "special" cable under any
circumstances.
►Always use HIGH QUALITY USB cables. Cheap cables may lead to all sorts of
problems. If possible, keep the cable as short as possible.
Before you start
Before using the camera for the first time, ensure the internal battery is fully charged.
See below under "Charging".
Advertisement
Table of Contents

Related Manuals for Mobius Mini ActionCam


Summary of Contents for Mobius Mini ActionCam
- Page 1 User Guide for the Mobius Mini ActionCam Preliminary version Description The above picture shows the arrangement of the user operating features. ►This manual does not cover replacing the internal battery or lens. ►This manual assumes the camera is loaded with the latest firmware available at the time of writing.
- Page 2 The Reset button The reset button is in the small hole located below and to the right of the USB Socket (looking at the camera from the rear). It can be pressed by carefully inserting a bent paper clip or similar instrument. The Reset button should only be pressed in case the camera no longer reacts to button presses.
- Page 3 Connecting the camera to the PC Make sure a card is inserted and the camera is turned OFF if you want to access the camera as an external device (disk drive, setup). Always connect the camera directly to the PC. Do not use a USB hub. ►...
-
Page 4: Webcam Mode
If the drivers were installed correctly the camera should now be in webcam mode. ►Note: Windows XP has an integrated WebCam viewer. Your Mobius should be visible in Explorer (My Computer) as a "USB Video Device". This functionality does not exist in... - Page 5 Camera Setup (Configuration) GUI (Graphical User Interface) configuration - recommended method On Windows it is recommended to always use the program mSetup.exe to modify the camera's configuration. mSetup communicates directly with the camera and makes configuring the camera a very simple task. The camera must be in Webcam mode in order to set the parameters.
-
Page 6: Osd (On-Screen Display) Menu
OSD (On Screen Display) Menu Connect the camera to a monitor or TV and then turn it on. ► Long Press the Shutter button to enter Setup Mode. See above (Camera Setup - Manual configuration). ► To enter Playback Mode, press the Mode button to cycle from Video Mode1 -> Video Mode2 ->... -
Page 7: Additional Information
The camera is now ready for use. Recording using an external power supply With the Mobius Mini, it is possible to charge the battery and record at the same time using a standard external USB 5V DC power supply. The power supply may be mains driven (normal household wall plug), or run off batteries, including the car charger USB plug (optional accessory) and cable supplied with the camera. -
Page 8: Troubleshooting
Trouble shooting Q. When I press the Power button, nothing happens. A. The battery is flat or defective. Replace or charge the battery. Use a paper clip or similar object to press the Reset button. Q. When I turn on the camera the yellow and blue LEDs blink rapidly about 16 times. The camera then turns off. - Page 9 Q. The camera is not recognized as a removable disk. A. The operating system must be XP or greater. The camera must be connected using a standard USB cable. Confirm the cable is not defective by attaching another USB device using the same cable. Do not use a USB hub. Try using another USB port. Defective cables are the most common problems when the camera is not correctly recognized by the PC.
- Page 10 Q. The camera functions normally but the video is completely black. A. Make sure the lens cap is removed. Q. There is a distinctive buzzing or clicking noise when videos are played back. A. Only use quality micro SD cards with a class rating of 10. Low quality cards can draw excessive current which may result in electrical noise in the recording.
Need help?
Do you have a question about the Mini ActionCam and is the answer not in the manual?
Questions and answers