Clearaudio Statement TT1 User Manual
Tangential tonearm
Hide thumbs
Also See for Statement TT1:
- User manual (24 pages) ,
- User manual (17 pages) ,
- User manual (18 pages)
Table of Contents
Advertisement
Quick Links
S
t
a
t
e
m
e
S
t
a
t
e
m
T
a
n
g
e
n
t
i
a
l
T
a
n
g
e
n
t
i
a
Hi-Fi Components
Spardorfer Str. 150 D-91054 Erlangen Germany Tel. +49 9131 40300 100 Fax: +49 9131 40300 119
n
t
T
T
1
e
n
t
T
T
1
t
o
n
e
a
r
m
l
t
o
n
e
a
r
m
clearaudio electronic
www.clearaudio.de
Copyright Clearaudio 2015
www.analogshop.de
info@clearaudio.de
User Manual
Made in Germany
Statement TT1 – Tonearm
GmbH
Version 4.4_22.05.2015 _E
Advertisement
Table of Contents

Related Manuals for Clearaudio Statement TT1


Summary of Contents for Clearaudio Statement TT1
- Page 1 User Manual Made in Germany Statement TT1 – Tonearm clearaudio electronic Hi-Fi Components GmbH Spardorfer Str. 150 D-91054 Erlangen Germany Tel. +49 9131 40300 100 Fax: +49 9131 40300 119 www.clearaudio.de www.analogshop.de info@clearaudio.de Copyright Clearaudio 2015...
- Page 2 Please take a moment to read this owner’s manual to ensure correct set-up, to avoid any potential damage and to discover how to care for your Statement TT1 so that it gives you many years of musical enjoyment and pleasure.
-
Page 3: Table Of Contents
7 - 8 5. Mounting the TT1 tonearm on the Statement turntable 9 - 11 6. Cartridge pre-adjustment / adjustment 12-13 7. Technical data 8. Transportation advice 9. Maintenance 10. Service information 11. Warranty Page 3 clearaudio electronic GmbH 2015... -
Page 4: Package Contents
User Manual 1. Package contents The Clearaudio Statement TT1 tangential tonearm is delivered in a specially designed packaging to ensure its safe transport. Please check that the contents are as shown below and listed at the bottom of the page:... -
Page 5: Package Overview
Statement TT 1 User Manual 2. Package overview The Statement TT1 is packed in a special foam packaging and comes almost completely assembled. Picture 1: Package view Please note: The armwand is packed separately and need to be installed. Picture 2: Armwand (shown with bearing carriage) Additional parts, accessories and tools are also packed separately. -
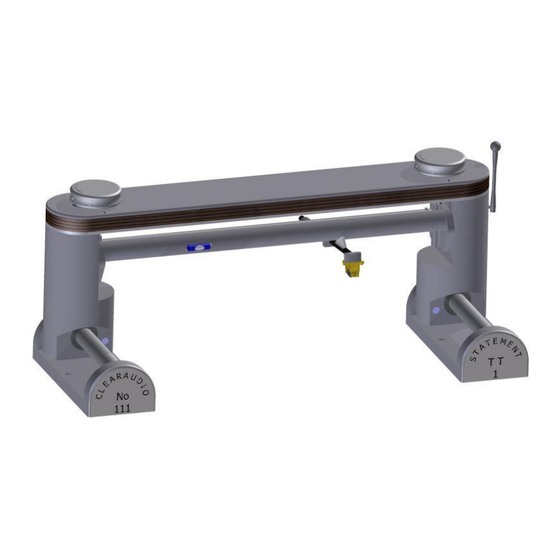
Page 6: Front And Rear View Of Assembled Tt1 Tonearm
Rear view Tonearm cable ground screw Tonearm cable holder Cueing lever Cueing lift mechanism Tonearm cable holder Tonearm mounting base Bearing carriage Base mounting and armwand bolt Picture 3: Front and rear view Page 6 clearaudio electronic GmbH 2015... -
Page 7: Assembly And Operation
Picture 4: Installing the stainless steel tonearm mounting bases on the Statement turntable Do not tighten the base mounting bolts (see page 4 package content No. 8), you should be still able to turn the bases. Page 7 clearaudio electronic GmbH 2015... - Page 8 While holding the installation gauge in place tighten the two bolts with the hex key (allen key) (page 4, package content 5) provided. Attention: Any misalignment at this stage will lead to later problems in positioning the TT1 tonearm. Picture 7: Tightening the mounting bolts Page 8 clearaudio electronic GmbH 2015...
-
Page 9: Mounting The Tt1 Tonearm On The Statement Turntable
Please note: Always hold the tonearm in place while fixing the four bolts. Picture 8: Placing the tonearm assembly in position Picture 9: Tightening the tonearm mounting bolts Page 9 clearaudio electronic GmbH 2015... - Page 10 Please note: You may need to readjust the levelling of the Statement turntable once you have fully completed set-up of the TT1 tonearm. Please take great care in undertaking the following steps. Picture 11: Pre-mounted bearing carriage and glass tube Page 10 clearaudio electronic GmbH 2015...
- Page 11 Statement TT 1 User Manual Picture 12: Mounting of the armwand Mount the armwand to the bearing carriage with the aluminium block and the two screws. Picture 13: Mounted armwand Page 11 clearaudio electronic GmbH 2015...
-
Page 12: Cartridge Pre-Adjustment / Adjustment
Please hold the armwand carefully so you don’t apply too much force to the bearings. For the best results we recommend using Clearaudio’s Weight Watcher stylus pressure gauge (available in our online shop Art. No. AC094). - Page 13 Attention: Before first use or after a long period of storage, please move the cueing lift up and down approximately 4-5 times so that the oil inside can flow allowing the cueing lift to operate smoothly. Page 13 clearaudio electronic GmbH 2015...
-
Page 14: Technical Data
To avoid possible damage, the armwand should be removed for transportation. 9. Maintenance If the Statement TT1 tonearm is not in use for a long period, please cover the tonearm to protect it from dust. The glass tube can be cleaned with pure alcohol. -
Page 15: Service Information
Statement TT 1 User Manual 10. Service information If any servicing or repair of a Clearaudio product is necessary, please first contact your dealer or distributor. Alternatively contact Clearaudio directly and we will advise you of your nearest service location. -
Page 16: Warranty
User Manual 11. Warranty To benefit from the full Clearaudio warranty, you must fill out the relevant part of the warranty registration certificate /card and send it back to Clearaudio within two weeks of purchase. A warranty of 10 years will only be provided if the product is returned to us in its original packaging.
Need help?
Do you have a question about the Statement TT1 and is the answer not in the manual?
Questions and answers