Clearaudio Statement TT1 User Manual
Tangential tonearm
Hide thumbs
Also See for Statement TT1:
- User manual (24 pages) ,
- User manual (18 pages) ,
- User manual (20 pages)
Table of Contents
Advertisement
Quick Links
Download this manual
See also:
User Manual
S
t
a
t
e
m
e
n
t
T
T
1
S
t
a
t
e
m
e
n
t
T
T
1
T
a
n
g
e
n
t
i
a
l
t
o
n
e
a
r
m
T
a
n
g
e
n
t
i
a
l
t
o
n
e
a
r
m
User Manual
Made in Germany
clearaudio electronic
Hi-Fi Components
GmbH
Spardorfer Str. 150 D-91054 Erlangen Tel. +49 9131/40300100 FAX +49 9131/51683
www.clearaudio.de
www.analogshop.de
info@clearaudio.de / copyright clearaudio 2013
Version 3_22.11.13_E
Advertisement
Table of Contents

Subscribe to Our Youtube Channel
Related Manuals for Clearaudio Statement TT1


Summary of Contents for Clearaudio Statement TT1
- Page 1 User Manual Made in Germany clearaudio electronic Hi-Fi Components GmbH Spardorfer Str. 150 D-91054 Erlangen Tel. +49 9131/40300100 FAX +49 9131/51683 www.clearaudio.de www.analogshop.de info@clearaudio.de / copyright clearaudio 2013 Version 3_22.11.13_E...
-
Page 2: User Manual
Please take a moment to read this owner’s manual to ensure correct set up, to avoid any possible damage and to learn how proper care of your clearaudio Statement TT 1 tangential tonearm, which will give you many years of musical enjoyment and pleasure. -
Page 3: Table Of Contents
7 - 8 5. Statement TT 1 tonearm mounting on Statement 9 - 12 6. Cartridge pre-adjustment / adjustment 13 - 14 7. Transportation advice 8. Service - information 9. Warranty 10. Technical data Page 3 clearaudio electronic GmbH 2013... -
Page 4: Package Contents
Hex key screws: to mount tonearm on 2x 2x big hex key bolts round bases White pair of gloves Quartz tube assembly kit Installation gauge for cartridges Cartridge/ Headshell mounting screws Instruction manual (not shown) Page 4 clearaudio electronic GmbH 2013... -
Page 5: Package Overview
Tonearm chassis, not including the armwand. The armwand and the glastube are packed seperatly and need to be installed. Picture 2: Armwand and glastube The accessories, tools etc. are packed as well separately. Page 5 clearaudio electronic GmbH 2013... -
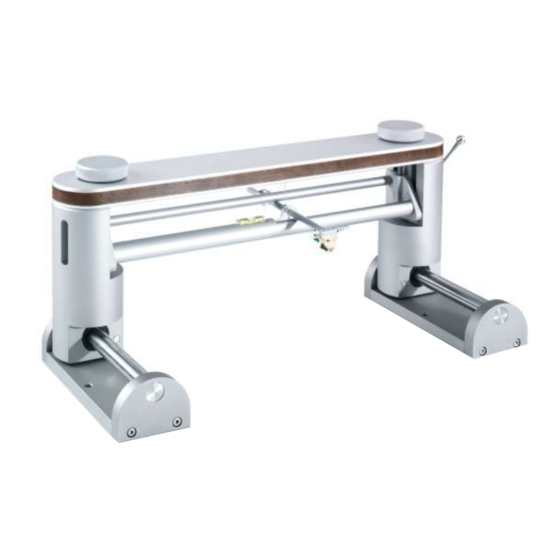
Page 6: Front And Back View Of Assembled Tt 1 Tonearm
Statement TT 1 User Manual 3. Clearaudio STATEMENT TT1/ tangential tonearm Picture 3: Front and back view Page 6 clearaudio electronic GmbH 2013... -
Page 7: Assembly And Operation
TT1 tonearm. 40 mm 40 mm Picture 4: Putting the stainless steel round base onto the Statement turntable Do not tighten the cylinders completely, you should be still able to turn them. Page 7 clearaudio electronic GmbH 2013... - Page 8 Tighten the 2 bolts, with the provided hex key, while holding ( pressing ) the gauge down. Attention: any misalignment will leat to a problem to place the TT1 tonearm later ! Picture 7: Tighten the gauge Page 8 clearaudio electronic GmbH 2013...
-
Page 9: Statement Tt1 Tonearm Mounting On Statement
Statement TT 1 User Manual 5. Statement TT1 tonearm mounting on Statement Now you can place the tonearm chassis on top of the 2 cylinders. Take it carefully with one hand at the top cover (tower bridge), so that the sliding bars are not moving. While holding it in place, over the 4 machined threads, start inserting the provided (4) hex key screws and tighten them. - Page 10 Now slide the glastube into the machined precision tube holder (at the back of the TT1 tonearm) and place it into the buffer by pushing it into the left rubber ring Attention: Put the glastube flat into the cut out, then push it leftwards! Damage can occure ! Page 10 clearaudio electronic GmbH 2013...
- Page 11 Please note: You might want to fix the tonearm cable with a tape to the tower bridge. Picture 14: Fixing the tonearm with a tape Page 11 clearaudio electronic GmbH 2013...
- Page 12 Tight the screw gently! The tonearm cable is equipped with a ground washer. Take the attached ground screw, below the tower bridge and attached the ground washer, while screwing it in the associated thread. Page 12 clearaudio electronic GmbH 2013...
-
Page 13: Cartridge Pre-Adjustment / Adjustment
The diamond tip of the cartridge must be always aligned in the blackline (groove) of the gauge. This fine adjustment can be realised by moving the armwand back or forward. Simply lock or unlock the screw on the bottom of the carriage. Picture 17: Cartridge adjustment Page 13 clearaudio electronic GmbH 2013... - Page 14 Please hold the armwand carefully in order not to put too much force to the bearings. For the best results we recommend the use of the clearaudio weight watcher stylus force gauge. e.g. 10 g for Goldfinger or 5 g for Titanium) ...
-
Page 15: Transportation Advice
Otherwise serious damage could occur! The armwand needs to be built out, to avoid any possible damage as well If the Statement TT1 tonearm is not in use for a longer period, please cover the tonearm in order to prevent it from dust. -
Page 16: Warranty
RETAIN YOUR PURCHASE RECEIPT Your purchase receipt is your permanent record of a valuable purchase. It should be kept in a safe place to be referred to as necessary for insurance purposes or when corresponding with clearaudio. IMPORTANT When seeking warranty service, it is the responsibility of the consumer to establish proof and date of purchase. Your purchase receipt or invoice is adequate for such proof. -
Page 17: Technical Data
Dimensions (H x H x D in inch): approx. 521 x 211 x 199 Dimensions (H x H x D in mm): approx. 20,51 x 8,31 x 7,83 Warranty: 10 years* (see chapter 9) Stand: November 2013 Page 17 clearaudio electronic GmbH 2013...
Need help?
Do you have a question about the Statement TT1 and is the answer not in the manual?
Questions and answers