Clearaudio Statement TT1 User Manual
Hide thumbs
Also See for Statement TT1:
- User manual (24 pages) ,
- User manual (16 pages) ,
- User manual (20 pages)
Table of Contents
Advertisement
Quick Links
Advertisement
Table of Contents

Subscribe to Our Youtube Channel
Related Manuals for Clearaudio Statement TT1


Summary of Contents for Clearaudio Statement TT1
- Page 1 Statement TT1 User manual © clearaudio electronic GmbH, 2017/03 Made in Germany...
- Page 2 Statement TT1 damage and to discover how to care for your so that it gives you many years of mu- sical enjoyment and pleasure. We wish you much pleasure with your new Clearaudio StatementTT1 tangential tonearm. Clearaudio electronic GmbH Warning Do not expose the equipment to rain or moisture.
-
Page 3: Table Of Contents
User manual Contents . List of components ..............4 2. Package overview ..............5 3. Front and rear view of assembled tonearm ....6 4. Assembly and operation ............7 - 8 5. Mounting the tonearm on the Statement turntable ..9 - 11 6. -
Page 4: List Of Components
Tonearm mounting base (x2) White gloves Tonearm mounting base installation Cartridge alignment gauge gauge Bag of hex keys (Allen keys) Cartridge mounting screws Main counterweights (5 pieces) User manual, Warranty card, Return delivery note (not shown) © clearaudio electronic GmbH, 2017/03... -
Page 5: Package Overview
User manual 2. Package overview Statement TT1 is packed in a special foam packaging and comes almost completely assembled. Pic. 2: Package overview Please note: The armwand is packed separately and need to be installed. Pic. 3: Armwand Additional parts, accessories and tools are also packed separately. -
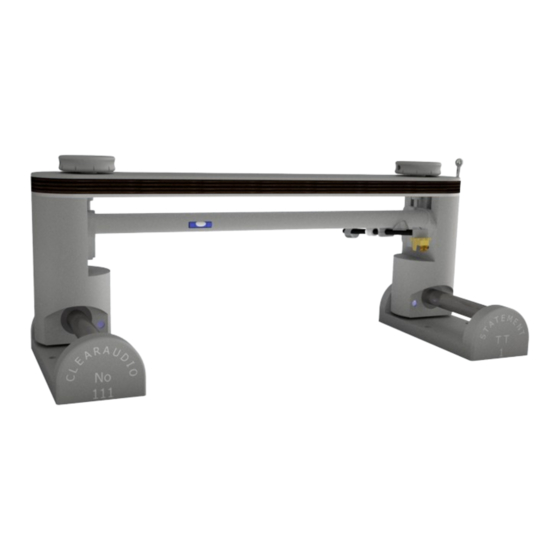
Page 6: Front And Rear View Of Assembled Tt1 Tonearm
Sliding arm base (left) Rear view Tonearm cable ground screw Tonearm cable holder Cueing lever Cueing lift mechanism Tonearm cable holder Tonearm mounting Bearing carriage and base armwand Base mounting bolt Pic. 4: Front and rear view © clearaudio electronic GmbH, 2017/03... -
Page 7: Assembly And Operation
User manual 4. Assembly and operation After checking that the package contents are as described (see page 4), place the parts on a clean and flat surface in preparation for setup. Assembly and setup of the are quite straightforward, as most parts have been factory preassembled. - Page 8 No. 4 No. 3 No. 3 Pic. 6: Placing the installation gauge No. 4 No. 3 No. 3 Pic. 7: Placing the installation gauge Pic. 8: Tightening the mounting bolts © clearaudio electronic GmbH, 2017/03...
-
Page 9: Mounting The Tt1 Tonearm On The Statement Turntable
User manual Statement 5. Mounting the tonearm on the turntable Place the tonearm chassis on top of the two mounting bases. Lift it carefully, making sure that the sliding tonearm bridge is positioned to the rear of both sliding bases as shown in picture 9. While holding it in place, insert the four socket head cap screws provided into the threaded holes in the tonearm mounting bases and tighten them. - Page 10 Remove the rubber band which is used as transportation lock. Afterwards loosen the screws from the aluminum block and remove the second transportation lock. Pic. 12: Pre-mounted bearing carriage and glass tube with transportation lock © clearaudio electronic GmbH, 2017/03...
- Page 11 User manual Pic. 13: Mounting of the armwand Mount the armwand to the bearing carriage with the aluminum block and the two screws again. Pic. 14: Mounted armwand Made in Germany...
-
Page 12: Cartridge Pre-Adjustment / Adjustment
Slide the appropriate exchangeable counterweight, dependent on the used cartridge, over the back of the armwand tube and adjust the correct tracking force. Please hold the armwand carefully so you don’t apply too much force to the bearings. For the best results we recommend using Clearaudio’s Weight Watcher stylus pressure gauge (Art. - Page 13 User manual Pic. 17: Cartridge pre-adjustments Cartridge adjustment Place a record onto the turntable platter in before starting the final adjustments. The correct tangential adjustment is essential. To ensure the correct adjustment, use the cartridge alignment gauge (see page 4, content No. 10), which must first be placed on the spindle. The diamond tip of the cartridge must be always aligned in the black line of the gauge.
-
Page 14: Technical Data
Warranty: 10 years * * Only if the warranty card is filled out correctly and sent back within 14 days to Clearaudio Clearaudio electronic is not responsible for any typographical errors in descriptions. Technical specifications are subject to change or improvement without prior notice. Product availability will be as long as stock lasts. Any copies, including extracts, of this text require written permission from Clearaudio electronic GmbH, Germany. -
Page 15: Special Notes
Otherwise serious damage could occur. 8.3 Service If any servicing or repair of a Clearaudio product is necessary, please first contact your dealer or distributor. Alternatively contact Clearaudio directly and we will advise you of your nearest service location. -
Page 16: Warranty
User manual To achieve the full Clearaudio warranty, it is necessary that you fill out and send the corresponding part of the warranty registration certificate /card back to Clearaudio, within two weeks after purchase. Only if the product is returned in it’s original packing Clearaudio can provide the warranty of 10 years for the Statment tonearm . - Page 17 ESPAÑOL GARANTIA Para obtener información acerca de la garantia póngase en contacto con su distribuidor Clearaudio. GUARDE SU RECIBO DE COMPRA Su recibo de compra es su prueba permanente de haber adquirido un aparato de valor, Este recibo deberá...
- Page 18 91054 Erlangen Germany Phone/Tel.: +49 9131 40300 100 Fax: +49 9131 40300 119 www.clearaudio.de www.analogshop.de info@clearaudio.de Handmade in Germany (Technische Änderungen vorbehalten - Technical specification are subject to change without pror notification) 2017 © clearaudio electronic GmbH, 2017/03 Made in Germany...
Need help?
Do you have a question about the Statement TT1 and is the answer not in the manual?
Questions and answers