Table of Contents
Advertisement
Quick Links
Advertisement
Table of Contents
Troubleshooting

Related Manuals for Insportline SV7092-71


Summary of Contents for Insportline SV7092-71
- Page 1 SV7092-71 Instruction Manual IN 3387 PANGAR - computer V1.01...
-
Page 2: Table Of Contents
Table of Contents Important Safety Information Computer Introduction Sketch Console Instructions Overview Buttons Functions Operation Summary Programming User Profiles Quick Start Manual PROGRAM H.R.C Watt User Recovery Workout Record Troubleshooting OSD Instructions Overview Buttons AV IN DISPLAY KEY OSD KEY Troubleshooting Console Assembly Steps... -
Page 3: Important Safety Information
Important Safety Information WARNING! To reduce the risk of electrical shock, burns, fire, or other possible injuries to the user, it is important to review this manual and the following precautions before operation. WARNING - Electric Shock 1) Only use the AC Adapter that comes with your unit. 2) Do not use the AC Adapter if it has damaged, split or broken cords or wires. -
Page 4: Console Instructions
Console Instruction Overview Buttons: Mode Key This button is used to confirm selection settings , such as time, distance, calories, pulse, and user data presetting. Reset Key Setup Mode: This button is used to set all preset values to zero. Workout Mode: When the button is held down for 2 seconds, the console will reset, taking the user back to the setup screen. -
Page 5: Operation Summary
Operation Summary 1 ) Connect power supply or press POWER KEY, the computer will power on and display Logo for 5 seconds. After enter the main menu, the computer shows UX(X=1~4) and then there will be a long beep sound. 2 ) You will be asked to set your user information. -
Page 6: Program
console will beep for 8 seconds and “0” will be blinking to let you know once it reaches 0. 7 ) After press START/STOP button, computer will ask you if you want to record this time workout data, press UP and DOWN button to select YES or NO, and press START/STOP to confirm selection Program There are 12 preset programs. -
Page 7: Watt
that you do not want to enter any preset settings, you can start your workout by pressing the START/STOP button immediately after confirming program selection. Any preset values you have entered will count down and the console will beep to let you know once it reaches 0. 9 ) After press START/STOP button, computer will ask you if you want to record this time workout data, press UP and DOWN button to select YES or NO, and press START/STOP again to start workout. -
Page 8: Recovery
START/STOP button. Any preset values you have entered will count down to 0. The console will beep when you have achieved your preset values. 10) After press START/STOP button, computer will ask you if you want to record this time workout data, press UP and DOWN button to select YES or NO, and press START/STOP again to start workout. -
Page 9: Osd Instructions
Symptom Possible Cause Troubleshooting Is the AC adapter is not plugged into the wall Plug the AC adapter into wall outlet. outlet? Is the AC adapter is not Console has no Plug the AC adapter into the unit. plugged into the unit? power Console harness is not Verify console was connected correctly during the... -
Page 10: Overview
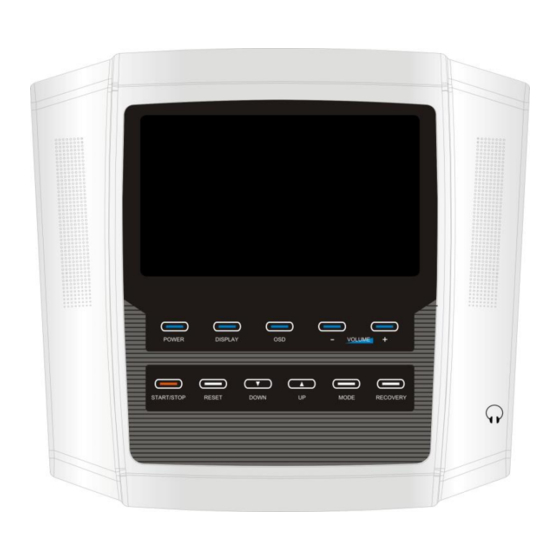
Overview OSD Button POWER KEY The screen will automatically display when power on, press POWER KEY to select power on or off. OSD Key 1. The DISPLAY button is used to toggle between the 2 different display modes. (digital TV GAME (OPTION ... -
Page 11: Osd Key
OSD+Digital TV: 2 one is Exercise mode + digital TV Instruction : 3 one is Instruction manual display Console appearance OSD KEY: Press OSD Key can get two displays, as follows:... - Page 12 Digital TV + Computer display GAME (OPTION) + Computer display Digital TV Remote Control instruction...
- Page 13 Function – Digital TV: A. Select Digital TV and press OK to enter Digital TV mode. Press Status / Information key to view operation description. There are items about channel management as follows. B. Channel Manager: Channel Organizer, Channel Sorting, Channel Grouping, Edit Channels and Delete All.
- Page 14 Digital TV (Program management) : Program Management Menu (1) Program Setting (2) Program Group (3) Edit Program...
- Page 15 (4) Delete All Program: must enter password Preset password: 0000. (6)Select all TV program, press confirm key to delete all digital TV channel. (7) Select all radio program, press confirm key to delete all radio program channel.
- Page 16 Select area searching, press confirm key to run. Manual Search: use Manual Search to search one particular frequency.
- Page 17 Auto Search: Key in beginning frequency and ending frequency and bandwidth before searching frequency range. When play searching display as above, wait % run completed, it finished searching. Function Menu Setup – OSD (System Setup):...
- Page 18 Configuration Menu – OSD Screen Setting OSD: Setup color or theme of OSD (5 options).) Time on OSD: Show live time at right up corner. OSD Timeout: Change time of OSD (6 options). OSD Trans: Setup transparent OSD or opaque OSD (7 options). OSD Language: Setup OSD language (14 languages).
- Page 19 Configuration Menu – TV Display Mode: Auto, PAL or NTSC. Aspect Ratio: 4:3LB, 4:3PS or 16:9. Setup in accordance with the screen.
- Page 20 Video Output: CVBS,RGB,P-YUV or S-Video. Brightness, Contrast, HUE and Saturation: Setup in accordance with personal preference and environments. Configuration Menu – System Setup EQ Setup: Setup audio style (5 options).
- Page 21 Surround: Setup audio surrounding (5 options). Active Antenna: Switch On to use active antenna or switch off to use passive antenna. The preset is on. JPEG Effect: ON/OFF LCN: ON/OFF Area: 13 countries to choose. After setting up area, use Installation – Area Search and it will search frequencies or signals in accordance with the area.
- Page 22 Time: Auto or Manual. Setup up time in accordance with preference and location. Manual: Setup date and time. Wakeup Timer...
- Page 23 Parents Lock Setting: Preset security code is 0000. Function Menu Setup – DTV (Software Upgrade): The item needs USD storage device and update software. Function Menu Setup – DTV (Preset): Select the item, a dialog box pops up. It asks if the user wants to return to preset, if the user answers “Yes”, all settings return to preset.
- Page 24 Use the item to identify software version. Function Menu Setup – Movie, Music and Photo: *To use these items needs USB storage device and related application program. Besides, USB device must be FAT format.。 Video format is as follows. In playing movie MPEG1 (*.dat / *.mpg) MPEG2 MP@ML (*.dat / *.mpeg / *.vob) MPEG4 ASP, Xvid, Divx 4.0 / 5.0 (*.avi)
-
Page 25: Troubleshooting
In displaying photo There is only one photo format, JPEG (*.jpg) Troubleshooting Symptom Possible Cause Troubleshooting Is the power cord is not plugged into the wall Plug the power cord into wall outlet. outlet? Is the power cord connecting to the correct Plug the power cord into the correct unit. - Page 26 display no position? working Defective Computer Call the local distributor.
Need help?
Do you have a question about the SV7092-71 and is the answer not in the manual?
Questions and answers