Advertisement
Quick Links
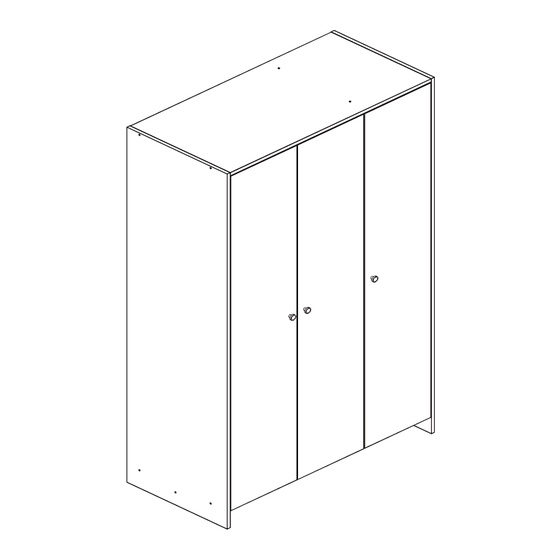
Seville - 3 Door Robe
Assembly Instructions -
Dimensions
Width - 102.5cm
Depth - 49.5cm
Height - 175.5cm
Important -
Please read these instructions fully before starting assembly
If you need help or have damaged or missing parts, call the Customer Helpline: 0870 112 1928
or email: Help@ClickSpares.co.uk (quoting your original order number)
Please keep for future reference
147/4556
171/6939
167/8338
173/6146
MADE IN
BRITAIN
Issue 3 - 21/01/15
Advertisement

Related Manuals for Argos Seville 147/4556


Summary of Contents for Argos Seville 147/4556
- Page 1 Seville - 3 Door Robe Assembly Instructions - 147/4556 Please keep for future reference 171/6939 167/8338 173/6146 Dimensions Width - 102.5cm Depth - 49.5cm MADE IN Height - 175.5cm BRITAIN Important - Please read these instructions fully before starting assembly If you need help or have damaged or missing parts, call the Customer Helpline: 0870 112 1928 or email: Help@ClickSpares.co.uk (quoting your original order number) Issue 3 - 21/01/15...
-
Page 2: Care And Maintenance
Safety and Care Advice Important - Please read these instructions fully before starting assembly • Warning: This unit weighs • Make sure you have enough • We do not approximately 59kgs. space to layout the parts before recommend the Please lift with care. starting. - Page 3 If you have damaged or missing components, call the Components - Panels Customer Helpline: 0870 112 1928 or email: Help@ClickSpares.co.uk (quoting your original order number and the reference numbers below) Please check you have all the panels listed below Left Side Right Side Upright (D2483A)
- Page 4 If you have damaged or missing components, call the Components - Fittings Customer Helpline: 0870 112 1928 or email: Help@ClickSpares.co.uk (quoting your original order number and the reference numbers below) Please check you have all the fittings listed below Note: The quantities below are the correct amount to complete the assembly. In some cases more fittings may be supplied than are required.
- Page 5 If you have damaged or missing components, call the Assembly Instructions Customer Helpline: 0870 112 1928 or email: Help@ClickSpares.co.uk (quoting your original order number and the reference numbers below) Step 1 Prepare the top and base Tap 2 wooden dowels into the top Finished front edge...
- Page 6 Assembly Instructions Step 3 Fit the top and the base to the upright Fit the top and the base onto the upright using 4 screws Finished front edge Finished p l a front edge i n c h i p a r d s u r f a c...
- Page 7 Assembly Instructions Step 5 Fit the right side Push the right side onto the top base and secure it using 4 screws Step 6 Prepare the plinth Plain chipboard Tap 2 wooden dowels into the plinth Step 7 Prepare the left side Finished Push a rail holder into...
- Page 8 Assembly Instructions Step 8 Fit the plinth Push the plinth onto the right side secure it using screw Note: Support the plinth until the left side has been fitted in the next step. Step 9 Fit the left side Push the left side onto the assembly and secure it using 5 screws Finished...
- Page 9 Assembly Instructions Step 10 The measurement from top corner X to bottom corner X must be equal to the measurement from top corner Y to bottom corner Y Fit the back Note: Do not Square up the unit by nail where the making sure that backs meet.
- Page 10 Assembly Instructions Step 12 Fit the hanging rail and the shelves Push hanging rail into the rail holders fitted to the side panels. For each of the 2 shelves , insert 4 shelf studs at the required height. Lower the 2 shelves down onto the shelf studs Make sure that the plastic...
- Page 11 Assembly Instructions Step 14 Fit doors and handles Note: The easiest way to attach each door to fit the top hinge first, then align and fit the other hinges. Push the hinge onto the front part of the hinge plate The recess at the bottom of screw B goes into the slot in the hinge plate.
- Page 12 Assembly Instructions Step 15 Adjust the doors if needed Before adjusting the doors, use a spirit level to check the base (or top) of the unit is level, front-to-back and side-to-side in the 3 positions shown. Use suitable packing pieces (not supplied) to make the unit level BEFORE making any adjustment to the hinges,...
- Page 13 If you need help or have damaged or missing parts, call the Customer Helpline: 0870 112 1928 or email: Help@ClickSpares.co.uk (quoting your original order number and the reference numbers on the component pages) Argos Ltd, 489-499 Avebury Boulevard, Central Milton Keynes, MK9 2NW...
- Page 16 ALR2909...
Need help?
Do you have a question about the Seville 147/4556 and is the answer not in the manual?
Questions and answers