Advertisement
Quick Links
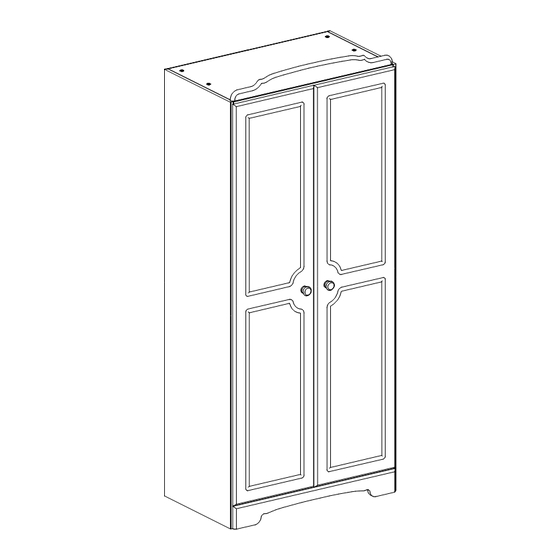
Nordic - 2 Door Wardrobe
Assembly Instructions - Please keep for future reference
Dimensions
Width : 81.1 cm
Depth : 49,0 cm
Height : 191,3 cm
Important - Please read these instructions fully before starting assembly
If you need help or have damaged or missing parts, call the Customer Helpline:
344101022
1441572
03456 400 800
02-06-2014
Advertisement

Related Manuals for Argos Nordic 1441572


Summary of Contents for Argos Nordic 1441572
- Page 1 Nordic - 2 Door Wardrobe Assembly Instructions - Please keep for future reference 1441572 Dimensions Width : 81.1 cm Depth : 49,0 cm Height : 191,3 cm Important - Please read these instructions fully before starting assembly If you need help or have damaged or missing parts, call the Customer Helpline: 03456 400 800 02-06-2014 344101022...
- Page 2 Safety and Care Advice Important - Please read these instructions fully before starting assembly • Check you have all the • Do not stand or put weight on components and tools listed on the product, this could cause pages 3 and 4. damage.
- Page 3 If you have damaged or missing components, call Components - Panels the Argos Customer Helpline: 03456 400 800 Please check you have all the panels listed below Top/Bottom x2 Side, Right Side, Left V155864 V155837 V155841 781x470x15 mm 1833x475x15 mm...
- Page 4 Components - Fittings If you have damaged or missing components, call the Argos Customer Helpline: 0845 640 30 30 Please check you have all the panels listed below Note: The quantities below are the correct amount to complete the assembly. In some cases more fittings may be supplied than are required.
- Page 5 Assembly Instructions Step 1 Knock down the Dowels A into the holes indicated on top/bottom 3 and the back plinth 4 using a small hammer . Press the magnets M into holes indicated. Step 2 Fix the support for hanger rail L to the sides 1 and 2 using screws T.
- Page 6 Assembly Instructions Step 3 Place the sides 1 and 2 onto the top 3, the back plinth 4 and the bottom Push cams into holes indicated, arrows pointing towards sides. Turn the cams C to the right to fix the top and bottom 3 and the back plinth 4.
- Page 7 Assembly Instructions Step 5 Place the backs 7 into rebates in the sides 1,2 and into the H-profile 15. Important! Make sure the angle between the top and the sides is 90° when the back is attached. Fix the backs to the sides 1,2, the top 3 and the back plinth 4, using nails i.
- Page 8 Assembly Instructions Step 8 Place the top rail 6 onto the top 3. Fix the top rail to the top using angles W and screws T Step 9 Place the hanger rail 10 into the support L. To fix the doors 8, slide the cup hinges Q onto the crossplates P.
- Page 9 Assembly Instructions Step 10 Warning! The wardrobe is heavy. Lift with care. Wallstrap and instruction Its recommended that the wardrobe is fixed to the wall. Use the fittings J. Follow the instruction included with the fittings.
- Page 10 Assembly Instructions Step 11 Adjusting the doors left/right. To adjust the door towards the left hand side - turn the adjusting screw to the right. To adjust the door towards the right hand side - turn the adjusting screw to the left. Adjusting the doors forwards/backwards.
- Page 11 a Guide to Wall Mounting & Fixings Important: When drilling into walls always check that there are no hidden wires or pipes ect. Make sure that the screws and wall plugs being used are suitable for supporting your unit. Consult a qualified tradesperson if you are unsure.
Need help?
Do you have a question about the Nordic 1441572 and is the answer not in the manual?
Questions and answers