Table of Contents
Advertisement
Advertisement
Table of Contents

Related Manuals for Bluetti AC200


Summary of Contents for Bluetti AC200
- Page 1 AC200 Portable Power Station User Manual...
-
Page 2: Table Of Contents
Contents Safety instructions……………………………………………………………….01 1. Packing list………………………………………………………………. 02 2. Function introduction………………………………………………………. . .03 3. Startup and shutdown operation…………………………………………….04 4. How to use the user-friendly touch screen display…………………04 5. The operation steps of user-friendly touch screen display……. ….04 Charging the product………………………………………………………….07 7. Discharging…………………………………………………………… ..09 8. -
Page 3: Safety Instructions
Safety instructions Please observe the following instructions to ensure safe usage: Do not alter or disassemble this product. Do not move during charging or using it, because the vibration and impact during moving will lead to poor contact of output interface. In case of fire, use dry powder fire extinguishers for this product. -
Page 4: Packing List
1. Packing list No. Product Quantity(pcs) standard option √ Power Station √ AC adapter (including AC charging cable) √ MC4 Solar charging cable (MC4 to XT90) √ Car charging cable (car to XT90) √ XT90 to aviation plug (input) √ User manual √... -
Page 5: Function Introduction
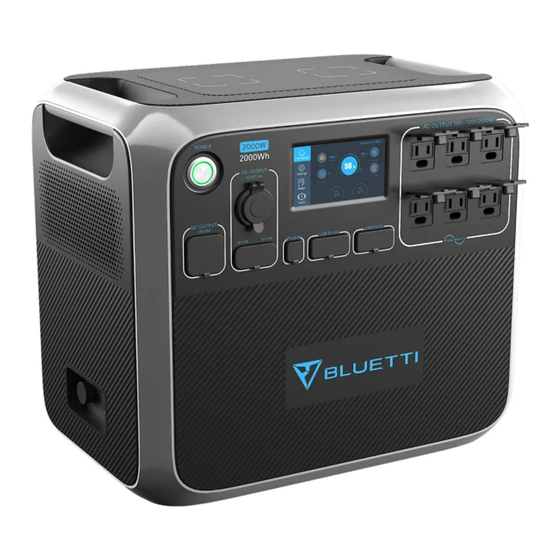
2. Function introduction Power button (EU/UK AC output x 2 pcs) 12V / 10A cigarette lighter port 12V / 25A output Type-C charging port 12V / 3A output Touchable interaction LCD display PV / car input port USB output x 4pcs 10. -
Page 6: Startup And Shutdown Operation
3. Startup and shutdown operation (1) Start up: short press the power button, the indicator light is on, and the machine is in standby mode. (2) Shutdown: press and hold the power button for more than 2 seconds, and the indicator light will be off and the machine shut off. - Page 7 (Figure 1) Homepage button Date/Time Settings button DC load information display button Data button DC ON/OFF button Faults button AC ON/OFF button PV/Car charging display button Adapter charging display button BMS information display button AC load information display button (2) Click the settings button in the main interface (Figure 2) to enter the setting interface as follows (Figure 3) : Warm tip: Please enter the setting interface to set the date and time according to the local time zone, and check the output voltage, frequency and other parameters for the first time.
- Page 8 Date and time: 2000-00-00、00:00:00 Please set the "Date and time" at least once every 2 weeks. Press to configure it. (Figure 2) (Figure3) (3) Return to the main interface (Figure 1), click the “Data” button to enter the page (Figure 4) : ●Click the “Product Info”...
-
Page 9: Charging The Product
be accessed directly from the shortcut key on the main interface; ●Click the “BMS Maintenance” button, you can view the operation information of BMS, and this part can also be accessed directly from the shortcut key in the main interface; ●Click the “Fault History”... - Page 10 Charging mode 2: From the solar panels ●Choose the solar panel with working voltage DC 35V-150V. ●Connect the solar panel to the product via solar charging cable included. ●Plug and play charging: it will start charging automatically after connecting the solar panel to the product even it is off status.
-
Page 11: Discharging
Charging mode 5: from lead acid battery ●Connect to the positive and negative poles of the battery through the provided solar charging cable(pay attention to distinguish the positive and negative poles of the battery, the red head is the positive pole, and the black head is the negative pole) . ●Enter the setting interface as shown in (Figure 2) through the display screen to set DC input source to “car mode”... -
Page 12: Examples Of Loads
9. Examples of loads (1) 12V / 25A, 12V / 3A, cigarette lighter port, USB and type C output port are suitable for most products in the market, but some products may trigger overcurrent protection if there is a large current impact at the moment of starting. (2) The power of electrical products used for AC output should be less than 2000W. -
Page 13: Specification
11. Specification Output Rated output power 2000W Low rated voltage 100-120Vac High rated voltage 220-240Vac < 5% > 88%(R load) Efficiency AC output 2000W<load<2500W, 2min; Overload capacity 2500W<load, immediately Short circuit protection Over temperature protection yes load<1500W, Max.45dB; Noise load>1500W, Max.54dB Rated voltage Rated current DC12V/25A... - Page 14 Input input voltage 100-240VAC AC charging Maximum charging voltage 58.8 VDC maximum charging power 500W input voltage 11.5V-14.4V/23V-28.8V Car input Input current 8.2A input voltage 35V-150V 12A(only 12A will be received When Solar panel Input current the current exceeds 12A) Input maximum power 700W Remarks:...
-
Page 15: Storage And Maintenance Instructions
12. Storage and maintenance instructions (1) Please fully charge the machine before storing it. (2) Turn off all power buttons. (3) To preserve the battery liftspan, please use and recharge at least once every 6 months. (4) Ensure proper ventilation while in use or store and keep away from any combustible materials or gases. -
Page 16: Faq(Frequently Asked Questions)
● Can it be charged and discharged at the same time? Yes, it supports pass through charging for both AC and DC loads. We recommend if you do this that you make sure to fully charge the AC200 at least once per month to extend battery life.
Need help?
Do you have a question about the AC200 and is the answer not in the manual?
Questions and answers