
Related Manuals for Bluetti PV420


Summary of Contents for Bluetti PV420
- Page 1 AC240P Portable Power Station User Manual V 2 . 0 Please read this manual carefully before use and keep it for future reference.
- Page 2 Warning 1. Charge the unit before first use. 2. Do not use solar panels with open circuit voltage higher than 60V. Solar input voltage range for the unit is 11V-60VDC. 3. Charge the unit immediately when the SoC drops below 5%. If the SoC drops to 0, power off the unit and charge it for at least 30 minutes before restarting.
- Page 3 Thank You! Thank you for making BLUETTI a part of your family. From the very beginning, BLUETTI has tried to stay true to a sustainable future through green energy storage solutions while delivering an exceptional eco-friendly experience for our homes and our world.
-
Page 4: Table Of Contents
Contents Safety Instructions Packing List Product Introduction Product Overview Power ON / OFF LED Screen Charging Discharging Settings AC240P + B210P Expansion Connection BLUETTI App Specifications Button Operation Instructions Troubleshooting Appx. 1 Estimating Operation Time Appx. 2 FAQ... -
Page 5: Safety Instructions
The safety instructions provided herein are for illustrative purposes that include but are not limited to those listed in this manual. Actual operation shall comply with all applicable safety standards. If you have any questions, feel free to contact BLUETTI support or your local BLUETTI dealers. - Page 6 ports of the product. • Use of an attachment not recommended or sold by the manufacturer may result in a risk of fire, electric shock, or injury to persons. • To reduce the risk of damage to the electric plug and cord, pull the plug rather than the cord when disconnecting the product.
- Page 7 • Do not stack anything on top of the product while in storage or while in use. Do not move the product while operating as vibrations and sudden impacts may lead to poor connections to the hardware inside. • CAUTION: Do not use this product in the rain •...
- Page 8 Please refer to the information on the exterior bottom enclosure for electrical and safety information before installing or operating the apparatus. SAVE THESE INSTRUCTIONS BLUETTI shall not be liable for any equipment damage caused by the violation of the above instructions. JUST POWER ON...
-
Page 9: Packing List
2. Packing List Standard Accessories Item Picture Qty. Portable Power Station AC Charging Cable Car Charging Cable Solar Charging Cable Grounding Screw AC240P Portable Power Station User Manual V 1.0 Please read this manual carefully before use and keep it for future reference. User Manual Warranty Card JUST POWER ON... -
Page 10: Optional Accessories
Optional Accessories (Available on the official BLUETTI website: https://www.bluettipower.com) Item Picture B210P Expansion Battery USB-C to USB-C Cable (output) Lead-acid Battery Charging Cable (Charge the AC240P via a lead-acid battery) RV Power Cable (For RV's 12V devices) PV Voltage Regulator... -
Page 11: Product Introduction
AC240P for uninterrupted power for days on end. Managing the AC240P is a breeze thanks to the BLUETTI App, which lets you control the unit's various functions and settings with ease. With features like ECO Mode and UPS Mode, you can optimize your power consumption and protect your device at all times. -
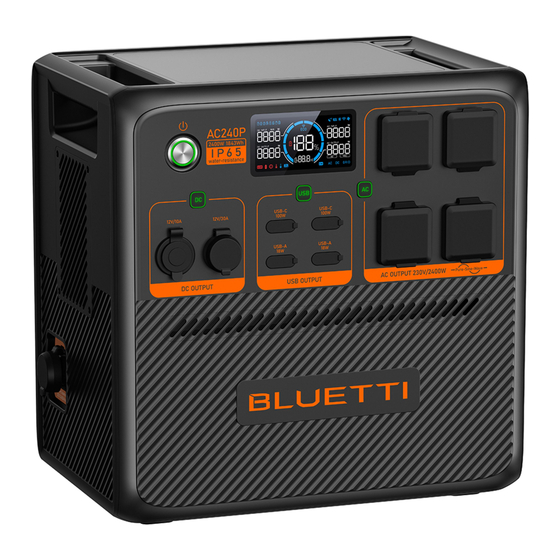
Page 12: Product Overview
4. Product Overview 4 5 6 7 EU Version UK Version Battery Expansion Port USB-C Port ① ⑨ USB-A Port Cigarette Lighter Port ② ⑩ ⑪ Power Button RV Port ③ ⑫ DC Power Button DC Input ④ ⑬ AC Input LED Screen ⑤... -
Page 13: Power On / Off
5. Power ON / OFF Attention: Please place the unit on the platform firmly and stably. • Power ON: Press the Power Button and the button lights up indicating that the AC240P is now on standby. • Power OFF: Press and hold the Power Button for 2 seconds to turn off the unit. •... -
Page 14: Led Screen
6. LED Screen The AC240P features an informative LED screen that offers easy access to all the essential information about the unit's status and performance. When you power on the unit, the LED screen lights up, and when you power off the unit, the screen turns off as well. ⑫... - Page 15 The AC240P is charging from a DC power source, such as solar panels, lead-acid batteries, etc. The AC240P connects to BLUETTI App via Bluetooth. The AC240P connects to BLUETTI App via WiFi. When it lights up, the fan is activated and working properly. If it flashes, there may be a problem with the fan.
-
Page 16: Charging
Plug the AC240P into a standard wall outlet and start charging. Once it's fully charged, the AC240P automatically stops charging to prevent overcharging. For a fast charge, you can enable Turbo Charging in the BLUETTI App, which allows for an 80% capacity in just 45 minutes at an ambient temperature of 25°C (77°F). - Page 17 Attention: For solar panels with an open circuit voltage between 60V and 145V, you can still use them to charge the AC240P. Simply connect the solar panels to the AC240P via the PV Voltage Regulator, and you can enjoy seamless and hassle-free solar charging. 7.3 Car Charging Connect AC240P to the vehicle's 12V/24V cigarette lighter port via the car charging cable.
- Page 18 7.4 Generator Charging Connect the AC240P to a generator via the AC charging cable. The AC240P also automatical- ly stops charging when it's fully charged. Note: Make sure your generator delivers the AC output with charging voltage, frequency, and Grid Self-adaption Mode voltage that meet AC240P's specifications. If the total power demand of your connected devices exceeds the generator's output capacity, please turn on the Grid Self-adaption Mode to ensure a seamless charging experience.
-
Page 19: Discharging
8. Discharging Besides the cigarette lighter port, USB-A, and USB-C, AC240P also features two types of AC outlets and an RV port, expanding your charging options. 8.1 AC Discharging Port Description AC Outlet For AC electrical devices. 8.2 DC Discharging Port Picture Specifications... -
Page 20: Settings
The AC240P offers the convenience of adjusting its settings either via the LED screen or the BLUETTI App. With the unit's LED screen, you have direct control over various settings such as Power Lifting Mode, ECO Mode, output frequency, and charging modes. - Page 21 Note: Turn off AC Power Button before setting Frequency. 9.4 WiFi & Bluetooth Connection To connect the AC240P to the BLUETTI app, turn on the WiFi or Bluetooth first. In the Setting Mode, press the DC power button to navigate through the setting items. When icon flashes on the screen, press the AC power button to turn Bluetooth on.
- Page 22 With the UPS mode enabled, the AC240P can provide uninterrupted power to your essen- tial appliances during a power outage. And there are four different modes available through the BLUETTI App, allowing you to choose the best option for your needs. •...
- Page 23 If you can not charge the AC240P using a generator or unstable grid voltage because of unstable voltage, it is recommended that you enable the Grid Self-adaption Mode through the BLUETTI App to ensure a stable, safe charging experience for both the AC240P and your devices.
-
Page 24: Ac240P + B210P Expansion Connection
10. AC240P + B210P Expansion Connection The AC240P unit supports up to 4 B210P expansion batteries, providing a total capacity of up to 10,443Wh. Follow these steps to connect the two units: 1. Make sure both the AC240P and B210P are turned off. 2. -
Page 25: Bluetti App
11. BLUETTI App Scan the QR code below or search "BLUETTI" in the App Store or Google Play to download the BLUETTI App. For more details, please refer to BLUETTI APP INSTRUCTIONS. JUST POWER ON... -
Page 26: Specifications
12. Specifications Model AC240P Battery Capacity 1,843Wh (30Ah) Cell Type Lithium Iron Phosphate (LiFePO , LFP) AC + DC Input 2,400W Max. AC+DC Output 2,500W Max. Weight 33kg / 72lbs Dimensions (L × W × H) 419.5mm × 293.5mm × 409.5mm / 16.5in × 11.6in × 16.1in Charging Temperature 0°C to 40°C Discharging Temperature... - Page 27 AC Input Voltage 230VAC Current 10.5A Frequency 50Hz / 60Hz Switching time ≤15ms Power 0-80% in 45 min 2,200W Max.(Pair with B210P for 2,400W Max.) DC Input Interface 2-pin Aviation Socket Power 1,200W Max. Current 21A Max. Voltage 11V to 60VDC Battery Expansion Port Voltage 44.8V to 57.6VDC...
-
Page 28: Button Operation Instructions
13. Button Operation Instructions Operation Function Description Press the AC Power Button Turn on / off the AC output Turn on / off the cigarette Press the DC power button lighter port and RV port output Turn on / off the USB Press the USB Power Button output In the Setting Mode, the icons for the... -
Page 29: Troubleshooting
14. Troubleshooting In the Setting Mode, press and hold the DC power button to switch the status page until icon and the error code appear simultaneously on the screen. Please refer to the table below for helpful guidance. Error Code Alarm Icon Description Troubleshooting... -
Page 30: Appx. 1 Estimating Operation Time
Check if the grid frequency is too low. Grid underfrequency Contact your local power provider if E116 necessary. Please contact BLUETTI support for Others assistance. Appx. 1 Estimating Operation Time To estimate the operation time of the AC240P, consider the load you're applying: Operation time = Battery Capacity (Wh) x DoD x η... -
Page 31: Appx. 2 Faq
Appx. 2 FAQ How do I know whether my devices will work well with this product? Please evaluate the total constant load of your devices. If it doesn't exceed the Max. output power of AC240P (2400W), you can use this power station to run your devices. Note: Some devices with built-in motors or compressors may start at 2-4 times the rated power, which can easily overload the AC240P. - Page 33 AC240P Tragbare Powerstation Benutzerhandbuch V2.0 Lesen Sie dieses Handbuch vor Gebrauch sorgfältig durch und bewahren Sie es zum späteren Nachschlagen auf.
- Page 34 Warnung 1. Laden Sie das Gerät vor dem ersten Gebrauch auf. 2. Verwenden Sie keine Solarpaneele mit einer Leerlaufspannung von mehr als 60 V. Der Eingangsspannungsbereich für Solarstrom beträgt 11–60 VDC. 3. Laden Sie das Gerät umgehend auf, wenn der Wert für den Ladezustand unter 5 % fällt. Wenn der Wert für den Ladezustand auf 0 fällt, schalten Sie das Gerät aus und laden Sie es mindestens 30 Minuten lang auf, bevor Sie es neu starten.
-
Page 35: Vielen Dank
BLUETTI engagiert sich von jeher für eine nachhaltige Zukunft – mit außergewöhnlich umweltfreundlichen Energiespeicherlösungen, von denen nicht nur Haushalte, sondern wir alle profitieren. Aus diesem Grund wird BLUETTI in mehr als 100 Ländern gerne genutzt und genießt das Vertrauen von Millionen Kunden auf der ganzen Welt. Schweden Niederlande Österreich... - Page 36 Inhalt Sicherheitshinweise Packliste Produkteinführung Produktübersicht Ein-/Ausschalten LED-Bildschirm Laden Entladen Settings Erweiterungsanschluss AC240P + B210P BLUETTI App Technische Daten Anweisungen zur Bedienung der Tasten Fehlerbehebung Anhang 1 Schätzung der Betriebszeit Anhang 2 FAQ...
-
Page 37: Sicherheitshinweise
Produkts und diesbezügliche Sicherheitshinweise zu informieren. Die darin aufgeführten Sicherheitsanforderungen dienen der Veranschaulichung, erheben jedoch keinen Anspruch auf Vollständigkeit. Der tatsächliche Betrieb muss allen geltenden Sicherheitsnormen entsprechen. Bei Fragen wenden Sie sich bitte an den BLUETTI Support oder an Ihren BLUETTI Händler. 1.1 Erklärung Zur Gewährleistung eines sicheren Betriebs müssen die folgenden Bedingungen... - Page 38 • Die Verwendung von Zubehörteilen, die nicht vom Hersteller empfohlen oder verkauft werden, kann zu Brand-, Stromschlag- oder Verletzungsgefahr führen. • Um das Risiko einer Beschädigung des Steckers und des Kabels zu verringern, ziehen Sie beim Trennen des Produkts von der Stromversorgung am Stecker und nicht am Kabel.
- Page 39 • Stapeln Sie keine Gegenstände auf dem Produkt, während es gelagert wird oder in Betrieb ist. Bewegen Sie das Produkt nicht, während es in Betrieb ist, da Vibrationen und plötzliche Stöße die Verbindungen der Gerätehardware beeinträchtigen können. • VORSICHT: Verwenden Sie dieses Produkt nicht im Regen •...
- Page 40 Beachten Sie die elektrischen Hinweise und Sicherheitsinformationen auf der Außenseite des Gehäuses, bevor Sie das Gerät installieren oder in Betrieb nehmen. BEWAHREN SIE DIESE ANLEITUNG AUF BLUETTI haftet nicht für Geräteschäden, die durch die Missachtung der vorgenannten Hinweise verursacht werden. JUST POWER ON...
-
Page 41: Packliste
2. Packliste Standardzubehör Artikel Bild Anz. Tragbare Powerstation AC-Ladekabel Autoladekabel Solarladekabel Erdungsschraube AC240P Tragbare Powerstation Benutzerhandbuch V1.0 Lesen Sie dieses Handbuch vor Gebrauch sorgfältig durch und bewahren Sie es zum späteren Nachschlagen auf. Benutzerhandbuch Garantiekarte JUST POWER ON... -
Page 42: Optionales Zubehör
Optionales Zubehör (Auf der offiziellen BLUETTI Website verfügbar: https://www.bluettipower.com) Artikel Bild Erweiterungsbatterie B210P USB-C-zu-USB-C-Kabel (Ausgang) Bleibatterie-Ladekabel (Zum Laden der AC240P mit Strom aus einer Bleibatterie) Wohnmobil-Netzkabel (Für 12V-Geräte in Wohnmobilen) PV-Spannungsregler (Wandeln Sie die hohe Spannung des Solarpaneels in ein geeignetes Niveau... -
Page 43: Produkteinführung
Und wenn Sie noch mehr Strom benötigen, können Sie einfach einen weiteren AC240P anschließen, um tagelang ununterbrochen Strom zu haben. Die Verwaltung des AC240P ist dank der BLUETTI App, mit der Sie die verschiedenen Funktionen und Einstellungen des Geräts ganz einfach steuern können, ein Kinder- spiel. -
Page 44: Produktübersicht
4. Produktübersicht 4 5 6 7 EU Version UK Version Batterieerweiterungsanschluss USB-C-Anschluss ① ⑨ USB-A-Anschluss Zigarettenanzünderbuchse ② ⑩ ⑪ Ein-/Ausschalttaste Wohnmobilanschluss ③ ⑫ DC-Taste DC-Eingang ④ ⑬ AC-Eingang LED-Bildschirm ⑤ ⑭ Taste USB Power Erdungspol ⑥ ⑮ AC-Taste Entlüftungsventil ⑦ ⑯... -
Page 45: Ein-/Ausschalten
5. Ein-/Ausschalten Zu beachten: Bitte stellen Sie das Gerät fest und stabil auf die Plattform. • Einschalten:Drücke den Power Knopf . Die Taste leuchtet auf und zeigt damit an, dass der AC240P jetzt im Standby-Modus ist. • Ausschalten: Halten Sie die Einschalttaste mindestens zwei Sekunden lang gedrückt, um das Gerät auszuschalten. -
Page 46: Led-Bildschirm
6. LED-Bildschirm Der AC240P verfügt über ein informatives LED-Display, das einen einfachen Zugang zu allen wichtigen Informationen über den Status und die Leistung des Geräts bietet. Wenn Sie das Gerät einschalten, leuchtet der LED-Bildschirm auf, und wenn Sie das Gerät ausschalten, schaltet sich auch der Bildschirm aus. ⑫... - Page 47 Der AC240P wird von einer Gleichstromquelle, z. B. einem Solarpanel, geladen, Blei-Säure-Batterien, usw. Der AC240P verbindet sich über Bluetooth mit der BLUETTI App. Der AC240P verbindet sich über WLAN mit der BLUETTI App. Wenn sie aufleuchtet, ist der Lüfter aktiviert und funktioniert ordnungsgemäß.
-
Page 48: Laden
Ladevorgang. Sobald sie vollständig aufgeladen ist, stoppt die AC240P automatisch den Ladevorgang, um eine Überladung zu vermeiden. Für eine schnelle Aufladung können Sie in der BLUETTI App das Schnellladen aktivieren, mit dem das Laden bei einer Umgebungstemperatur von 25 °C auf 80%ige Kapazität in nur 45 Minuten ermöglicht wird. - Page 49 Zu beachten: Solarpaneele mit einer Leerlaufspannung zwischen 60 V und 145 V können zum Laden der AC240P verwendet werden. Schließen Sie die Solarpaneele einfach über den PV-Spannungsregler an die AC240P an, um sie nahtlos und mühelos mit Solarstrom aufzuladen. 7.3 Laden per Auto Schließen Sie AC240P über das Autoladekabel an den 12V/24V-Zigarettenanzünder des Fahrzeugs an.
- Page 50 7.4 Laden per Generator Schließen Sie die AC240P mit dem AC-Ladekabel an einen Generator an. Die AC240P beendet den Ladevorgang automatisch, wenn sie vollständig aufgeladen ist. Hinweis: Vergewissern Sie sich, dass Ihr Generator den Wechselstromausgang mit der Ladespannung, der Frequenz und der Spannung des Netzanpassungsmodus liefert, die den Spezifikationen des AC240P entsprechen.
-
Page 51: Entladen
8. Entladen Neben dem Anschluss für den Zigarettenanzünder, USB-A und USB-C verfügt der AC240P auch über zwei Arten von Netzsteckdosen und einen Anschluss für Wohnmobile, die Ihre Lademöglichkeiten erweitern. 8.1 Wechselstrom-Entladen Anschluss Bild Beschreibung Wechselstrom- Für elektrische Wechselstromgeräte. Netzsteckdose x 4 8.2 DC-Entladung Anschluss Bild... -
Page 52: Settings
9. Settings Die AC240P ermöglicht Ihnen das Anpassen der Einstellungen entweder über den LED-Bildschirm oder über die BLUETTI App. Über das LED-Display des Geräts haben Sie direkte Kontrolle über verschiedene Einstellungen wie den Power-Lifting-Modus, den ECO-Modus, die Ausgangsfrequenz und die Lademodi. Zusätzlich können Sie mit der BLUETTI App über eine benutzerfreundliche Schnittstelle auf Ihrem Telefon den... - Page 53 Hinweis: Schalten Sie den Netzschalter aus, bevor Sie die Frequenz einstellen. 9.4 WLAN- & Bluetooth-Verbindung Um den AC240P mit der BLUETTI App zu verbinden, schalten Sie zuerst das WLAN oder Bluetooth ein. Drücken Sie im Einstellmodus die Taste DC Power, um durch die Einstel- lungsoptionen zu navigieren.
- Page 54 9.7 USV-Modus Wenn der USV-Modus aktiviert ist, kann der AC240P Ihre wichtigsten Geräte bei einem Stromausfall unterbrechungsfrei mit Strom versorgen. Über die BLUETTI App sind vier verschiedene Modi verfügbar, aus denen Sie die beste Option für Ihre Bedürfnisse auswählen können.
- Page 55 BLUETTI-App an. Zu beachten: Wenn Sie die Einstellung über den Standardwert von 10 A hinaus erhöhen möchten, wenden Sie sich bitte an den BLUETTI-Kundendienst und fordern Sie ein Passwort an, um die erforderlichen Einstellungen vorzunehmen. 9.10 Beenden des Einstellmodus Um Ihre AC240P-Einstellungen zu speichern und den Einstellungsmodus zu verlassen, halten Sie gleichzeitig die Tasten DC und AC Power gedrückt.
-
Page 56: Erweiterungsanschluss Ac240P + B210P
10. Erweiterungsanschluss AC240P + B210P Die AC240P-Einheit unterstützt bis zu 4 B210P-Erweiterungsbatterien mit einer Gesa- mtkapazität von bis zu 10.443Wh. Gehen Sie folgendermaßen vor, um die beiden Geräte zu verbinden: 1. Stellen Sie sicher, dass sowohl AC240P als auch B210P ausgeschaltet sind. 2. -
Page 57: Bluetti App
11. BLUETTI App Scannen Sie den nachstehenden QR-Code oder suchen Sie im App Store oder bei Google Play nach „BLUETTI“, um die BLUETTI App herunterzuladen. Ausführliche Angaben finden Sie in der Anleitung der BLUETTI APP. JUST POWER ON... -
Page 58: Technische Daten
12. Technische Daten Modell AC240P Batteriekapazität 1.843 Wh (30 Ah) Zellentyp Lithium-Eisenphosphat (LiFePO , LFP) AC- und DC-Eingang Max. 2.400 W AC+DC Ausgang Max. 2.500 W Gewicht 33 kg Abmessungen (L × B × H) 419,5 mm × 293,5 mm × 409,5 mm Ladetemperatur 0 °C bis 40 °C Entladetemperatur... - Page 59 AC-Eingang Spannung 230 VAC Strom 10.5 A Frequenz 50 Hz/60 Hz Umschaltzeit ≤15 ms Leistung 0-80% in 45 min 2.200W Max. (Paar mit B210P für 2.400W Max.) DC-Eingang Schnittstelle 2-polige Buchse für Einsatz im Luftverkehr Leistung Max. 1.200 W Strom Max.
-
Page 60: Anweisungen Zur Bedienung Der Tasten
14. Anweisungen zur Bedienung der Tasten Bedienung Funktion Beschreibung Wechselstromausgang Drücken Sie die Taste AC Power ein-/ausschalten Ein-/Ausschalten des Zigarettenanzünderan- Drücken Sie die Taste DC Power schlusses und des Wohnmobilausgangs USB-Ausgang ein-/auss- Drücken Sie die Taste USB Power chalten Im Einstellungsmodus leuchten die Symbole für die derzeit aktivierten Funktionen mit Ausnahme des Drücken Sie die Tasten AC und... -
Page 61: Fehlerbehebung
15. Fehlerbehebung Halten Sie im Einstellungsmodus die Gleichstromtaste gedrückt, um die Statusseite zu wechseln, bis das Symbol und der Fehlercode gleichzeitig auf dem Bildschirm erscheinen. In der nachstehenden Tabelle finden Sie nützliche Hinweise. Fehlercode Alarmsymbol Beschreibung Fehlerbehebung Prüfen Sie, ob der Stromverbrauch der Überlastung Wechselrichter angeschlossenen Geräte zu hoch ist. - Page 62 Überfrequenz im Netz örtlichen Stromversorger. Prüfen Sie, ob die Netzfrequenz zu niedrig Unterfrequenz im Netz ist. Wenden Sie sich bei Bedarf an Ihren E116 örtlichen Stromversorger. Wenden Sie sich bitte an den BLUETTI Sonstige Support, um Unterstützung zu erhalten. JUST POWER ON...
-
Page 63: Anhang 1 Schätzung Der Betriebszeit
Anhang 1 Schätzung der Betriebszeit Wenn Sie die Betriebszeit der AC240P abschätzen möchten, müssen Sie die versorgte Last berücksichtigen: Betriebszeit = Batteriekapazität (Wh) x DoD x η ÷ (Nutzleistung + Eigenverbrauch der AC240P) Hinweis: DoD (Depth of Discharge) steht für die Entladungstiefe. AC240P arbeitet mit 95% DoD für eine längere Batterielebensdauer. - Page 65 AC240P Station d’énergie portable Guide d’utilisateur V2.0 Veuillez lire attentivement ce manuel avant d’utiliser l’appareil, puis conservez-le pour vous y référer ultérieurement.
- Page 66 Avertissement 1. Chargez l’appareil avant la première utilisation. 2. N’utilisez pas de panneaux solaires avec une tension en circuit ouvert supérieure à 60 V. La plage de tension d’entrée solaire pour l’unité est de 11 V à 60 V CC. 3.
- Page 67 BLUETTI vous proposent une expérience écologique exceptionnelle, pour le respect de nos maisons et de notre monde. C’est pourquoi BLUETTI est présent dans plus de 100 pays et a obtenu la confiance de millions de clients à travers le monde.
- Page 68 Présentation du produit Présentation du produit Mise sous tension/hors tension Écran LED Charge Décharge Settings (paramètres) Connexion d'extension AC240P + B210P Fonctionnement parallèle Application BLUETTI Spécifications Instructions d'utilisation des boutons Dépannage Annexe 1 Estimation du temps de fonctionnement Annexe 2 FAQ...
-
Page 69: Consignes De Sécurité
Le fonctionnement réel doit être conforme à toutes les normes de sécurité applicables. Si vous avez des questions, n’hésitez pas à contacter l’assistance BLUETTI ou vos revendeurs BLUETTI locaux. 1.1 Déclaration Pour garantir un fonctionnement sûr, il est essentiel de respecter les conditions suivantes :... - Page 70 • Pour réduire le risque d’endommagement de la fiche et du cordon électriques, tirez sur la fiche plutôt que sur le cordon lorsque vous débranchez le produit. • N’utilisez pas de batterie ou d’appareil endommagé ou modifié, car ils pourraient présenter un comportement imprévisible entraînant un incendie, une explosion ou des blessures.
- Page 71 • ATTENTION : n’utilisez pas ce produit sous la pluie • En cas d’incendie, seul un extincteur à base de poudre sèche est adapté au produit. • AVERTISSEMENT – RISQUE DE CHOC ÉLECTRIQUE. N’utilisez jamais le produit pour alimenter des outils électriques dans le but de couper ou d’accéder à des pièces ou des câbles sous tension, ou à...
- Page 72 Veuillez vous référer aux informations sur le boîtier inférieur extérieur pour obtenir des informations électriques et de sécurité avant d’installer ou d’utiliser l’appareil. CONSERVEZ CES INSTRUCTIONS BLUETTI ne sera pas responsable de tout dommage matériel causé par la violation des instructions ci-dessus. JUST POWER ON...
-
Page 73: Liste D'emballage
2. Liste d’emballage Accessoires standard Article Image Qté. Station d’énergie portable Câble de charge CA Câble de charge pour voiture Câble de recharge solaire Vis de mise à la terre Manuel d’utilisation Carte de garantie JUST POWER ON... -
Page 74: Accessoires En Option
Accessoires en option (Disponibles sur le site officiel de BLUETTI : https://www.bluettipower.com) Article Image Batterie d’extension B210P Câble USB-C vers USB-C (sortie) Câble de charge par batterie au plomb (Charge de l’AC240P par batterie au plomb) Câble d’alimentation pour camping-car (Pour les appareils 12 V du camping-car) Régulateur de tension PV... -
Page 75: Présentation Du Produit
AC240P pour bénéficier d’une alimentation ininterrompue pendant plusieurs jours. La gestion de l’AC240P est un jeu d’enfant grâce à l’application BLUETTI, qui vous permet de contrôler facilement les différentes fonctions et paramètres de l’appareil. Avec des fonctionnalités telles que le mode ECO et le mode UPS, vous pouvez optimiser votre... -
Page 76: Présentation Du Produit
4. Présentation du produit 4 5 6 7 Version UE Version R.-U. Port pour batterie d’extension Port USB-C ① ⑨ Port USB-A Port allume-cigare ② ⑩ ⑪ Bouton d’alimentation Port pour camping-car ③ ⑫ Bouton d’alimentation CC Entrée CC ④ ⑬... -
Page 77: Mise Sous Tension/Hors Tension
5. Mise sous tension/hors tension Avertissement : Veuillez placer l’appareil sur la plate-forme de manière ferme et stable. • Mise sous tension : appuyez sur le bouton d’alimentation et le bouton s’allume, indiquant que l’AC240P est maintenant en veille. • Éteindre : Appuyez et maintenez enfoncé... -
Page 78: Écran Led
6. Écran LED L’AC240P dispose d’un écran LED informatif qui offre un accès facile à toutes les informa- tions essentielles sur l’état et les performances de l’unité. Lorsque vous allumez l’appareil, l’écran LED s’allume et lorsque vous éteignez l’appareil, l’écran s’éteint également. ⑫... - Page 79 L’AC240P se connecte à l’application BLUETTI via Bluetooth. L’AC240P se connecte à l’application BLUETTI via le wifi. Lorsque l’icône est allumée, le ventilateur est activé et fonctionne correcte- ment. Lorsque l’icône clignote, le ventilateur présente sûrement un problème.
-
Page 80: Charge
éviter une surcharge. Pour une charge rapide, vous pouvez activer Turbo Charging dans l’application BLUETTI, qui permet une capacité de 80 % en seulement 45 minutes à une température ambiante de 25°C (77°F). - Page 81 Avertissement : Pour les panneaux solaires ayant une tension en circuit ouvert comprise entre 60V et 145V, vous pouvez toujours les utiliser pour charger l’AC240P. Connectez simplement les panneaux solaires à l’AC240P via le régulateur de tension PV et vous pourrez profiter d’une charge solaire transparente et sans tracas.
- Page 82 7.4 Recharge de générateur Connectez l’AC240P à un générateur à l’aide du câble de charge CA. L’AC240P arrête également automatiquement la recharge lorsqu’il est complètement rechargé. Remarque : Assurez-vous que votre générateur fournit une sortie CA avec une tension de charge, une fréquence et une tension en mode d’auto-adaptation du réseau qui répondent aux spécifications de l’AC240P.
-
Page 83: Décharge
8. Décharge Outre les ports allume-cigare, USB-A et USB-C, l’AC240P dispose également de deux types de prises CA et d’un port RV, offrant ainsi de nombreuses options de charge. 8.1 Décharge CA Port Description 4× Prises CA Pour les appareils électriques CA. 8.2 Décharge CC Port Image... -
Page 84: Settings (Paramètres)
L’AC240P offre la commodité d’ajuster ses paramètres via l’écran LED ou l’application BLUETTI. Avec l’écran LED de l’appareil, vous avez un contrôle direct sur divers paramètres tels que le mode Augmentation de la puissance, le mode ECO, la fréquence de sortie et les modes de charge. - Page 85 éteignez le bouton d’alimentation secteur avant de régler la fréquence. Remarque : 9.4 Connexion Bluetooth et wifi Pour connecter l’AC240P à l’application BLUETTI, activez d’abord le wifi ou le Bluetooth. En mode Réglage, appuyez sur le bouton d’alimentation CC pour parcourir les éléments de réglage. Lorsque l’icône clignote à...
- Page 86 Avec le mode UPS activé, l’AC240P peut fournir une alimentation ininterrompue à vos appareils essentiels lors d’une panne de courant. Et quatre modes différents sont disponibles via l’application BLUETTI, vous permettant de choisir la meilleure option pour vos besoins. •...
- Page 87 Avertissement : Si vous avez besoin d’augmenter le réglage au-delà de la valeur par défaut de 10 A, veuillez contacter le service client de BLUETTI et demander un mot de passe pour effectuer les ajustements nécessaires. 9.10 Quitter le mode Réglage Pour enregistrer vos paramètres AC240P et quitter le mode de configuration, appuyez...
-
Page 88: Connexion D'extension Ac240P + B210P
10. Connexion d’extension AC240P + B210P L’unité AC240P prend en charge jusqu’à 4 batteries d’extension B210P, offrant une capacité totale allant jusqu’à 10 443 Wh. Suivez ces étapes pour connecter les deux unités : 1. Vérifiez que l’AC240P et le B210P sont éteints. 2. -
Page 89: Fonctionnement Parallèle
11. Application BLUETTI Scannez le code QR ci-dessous ou recherchez « BLUETTI » dans l’App Store ou Google Play pour télécharger l’application BLUETTI. Pour plus de détails, veuillez consulter les CONSIGNES RELATIVES À L’APPLICATION BLUETTI. JUST POWER ON... -
Page 90: Spécifications
12. Spécifications Modèle AC240P Capacité de la batterie 1 843 Wh (30 Ah) Type de batterie Phosphate de fer et de lithium (LiFePO , LFP) Entrée CA + CC 2 400 W max Sortie CA+CC 2 500 W max Poids 33 kg / 72 lbs Dimensions (LxlxH) 419,5 mm ×... - Page 91 Entrée CA Tension 230 V CA Intensité 10,5 A Fréquence 50 Hz/ 60 Hz Délai de commutation ≤ 15 ms Alimentation 0-80 % en 45 min 2 200 W max. (couplage avec B210P pour 2 400 W max.) Entrée CC Interface Prise aviation à...
-
Page 92: Instructions D'utilisation Des Boutons
13. Instructions d’utilisation des boutons Fonctionnement Fonction Description Appuyer sur le bouton Activer/désactiver la sortie d’alimentation CA Allumer/éteindre le port Appuyer sur le bouton allume-cigare et la sortie d’alimentation CC du port pour camping-car Appuyer sur le bouton Activer/désactiver la sortie d’alimentation USB En mode Réglage, les icônes des fonctions actuellement activées... -
Page 93: Dépannage
15. Dépannage En mode Réglage, maintenez enfoncé le bouton d'alimentation CC pour changer la page d'état jusqu'à ce que l'icône et le code d'erreur apparaissent simultanément sur l'écran. Veuillez consulter le tableau ci-dessous pour obtenir des conseils utiles. Code Icône d'alarme Description Dépannage d'erreur... -
Page 94: Annexe 1 Estimation Du Temps De Fonctionnement
Contactez votre fournisseur d'électricité local si nécessaire. Veuillez contacter l'équipe de support Others BLUETTI pour obtenir de l'aide. Annexe 1 Estimation du temps de fonctionnement Pour estimer le temps de fonctionnement de l'AC240P, tenez compte de la charge que vous appliquez : Temps de fonctionnement = Capacité... - Page 95 For more information, please visit: @ BLUETTI Support DE: @Bluetti Deutschland DE: @bluetti_de @ BLUETTI Official UK: @Bluetti United Kingdom UK: @bluetti_uk Company: POWEROAK GmbH Company: POWEROAK ENERGY UK CO.,LTD Address: Lise-Meitner-Str. 14 28816 Address: Unit 2 NorthGate, Bolsover Business Park, Stuhr Germany Woodhouse Lane Chesterfield England, S44 6BD...
- Page 96 Cer t ifi ca te Inspector: Q C : P/N: 17.0303.0706-01A1...
Need help?
Do you have a question about the PV420 and is the answer not in the manual?
Questions and answers