Table of Contents
Advertisement
INSTRUCTION
MANUAL
4MP Flexible Intensifier Technology
TVI Motorized Zoom Focus Camera
Speco Technologies is constantly developing product improvements.
We reserve the right to modify product design and specifications without notice and without incurring any obligation.
Speco(Fit).indd 1
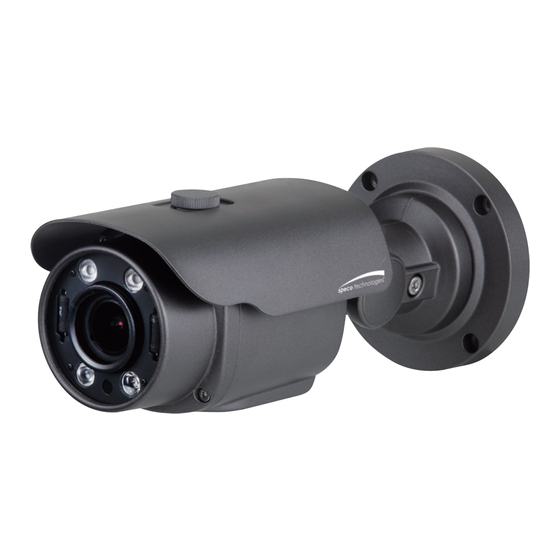
HFB4M
(Bullet Camera)
HFD4M
(Dome Camera)
Rev. 01/01/2020
2020-05-21 오전 9:52:03
Advertisement
Table of Contents

Subscribe to Our Youtube Channel
Related Manuals for Speco HFB4M


Summary of Contents for Speco HFB4M
- Page 1 TVI Motorized Zoom Focus Camera HFB4M (Bullet Camera) HFD4M (Dome Camera) Speco Technologies is constantly developing product improvements. We reserve the right to modify product design and specifications without notice and without incurring any obligation. Rev. 01/01/2020 Speco(Fit).indd 1 2020-05-21 오전 9:52:03...
-
Page 2: Table Of Contents
Package Contents ........6 ◑ Camera Installation ........7-10 ◑ Specifications ..........11,12 ◑ Camera Dimension ........13 ◑ Features ............14 ◑ OSD Menu Details ........15- 28 ◑ Trouble Shooting ......... 29 ◑ - 2 - Speco(Fit).indd 2 2020-05-21 오전 9:52:03... -
Page 3: Precautions
* If the camera is exposed to spotlight or object reflecting strong light, smear or blooming may occur. * please check that the power satisfies the normal specification before connecting the camera. - 3 - Speco(Fit).indd 3 2020-05-21 오전 9:52:07... - Page 4 CAUTION : To prevent electric shock and risk of fire hazards: Do NOT use power sources other than those specified. - 4 - Speco(Fit).indd 4 2020-05-21 오전 9:52:10...
-
Page 5: Safety Instructions
◑ Please insure that your installation area can support the weight of the camera Please handle this camera carefully : ◑ Do not use a strong or abrasive detergent when cleaning the camera ◑ Do not install near cooling or heating device - 5 - Speco(Fit).indd 5 2020-05-21 오전 9:52:10... -
Page 6: Package Contents
Package Contents Please make sure that the following items are included in the Package: 1) HFB4M Included Junction Box • 1 Power Jack • 1 Mount Base Sticker • 1 Wrench • Set Screw - 3 Tapping Screws 4x25 - 4 Hexagon Socket Screws M4x14... -
Page 7: Camera Installation
2. WHEN USING 24 VOLTS AC (40 Volt Amps) R E D (+) A C 24V L B A C K :(-) P owe r S upply 3. CONNECT VIDEO CABLE CONNECT BLACK COLOR BNC CABLE TO THE BNC JACK. - 7 - Speco(Fit).indd 7 2020-05-21 오전 9:52:11... - Page 8 Camera Installation Compatibility 1) HFB4M INTCM 2) HFD4M INTWM INTCM - 8 - Speco(Fit).indd 8 2020-05-21 오전 9:52:14...
- Page 9 Camera Installation 1. HFB4M WALL ANCHOR, WHT, 6X30, PLASTIC, 4EA JUNCTION BOX SCREW-TAP, SLV, SUS, BH_4X25, TP1, 3EA SCREW-MS, WHT, SUS, PH_M4X10, 3EA SCREW-MS, WHT, SUS, PH_M4X14, 4EA - 9 - Speco(Fit).indd 9 2020-05-21 오전 9:52:15...
- Page 10 Camera Installation 2. HFD4M - 10 - Speco(Fit).indd 10 2020-05-21 오전 9:52:15...
-
Page 11: Specifications
4MP FIT TVI Motorized Zoom Focus Camera 2.8-12mm MFZ Lens ■ HFB4M (2.8-12mm) 1/2.8” 0.01Lux SPECIFICATIONS MODEL HFB4M Sensor type 1/2.8" SONY STARVIS 5.69Mega CMOS Sensor Effective pixels 2616(H) X 1964(V), 5.14M Pixels Image sensor Total pixels 2704(H) X 2104(V), 5.69M Pixels... - Page 12 DC 12V : Max 8.5W / 0.71A, AC 24V : Max 7.9W / 0.53A Operating Temperature -10 ~ +50 Deg C. RH 95% Max. Storage Temperature -20 ~ +60 Deg C. RH 95% Max. Dimensions 4.76"(Dia)*3.85"(H) Weight 1.0 Ibs - 12 - Speco(Fit).indd 12 2020-05-21 오전 9:52:20...
-
Page 13: Camera Dimension
Camera Dimension 1) HFB4M 3.74” 9” 3.74” 9” 4.76” 4.76” 2) HFD4M 4.76” 4.76” 3.14” 3.14” - 13 - Speco(Fit).indd 13 2020-05-21 오전 9:52:21... -
Page 14: Features
TV system is switchable 'NTSC' or 'PAL' with built-in OSD. Intelligent Function ● An extraordinary technology that enables Speco Technologies TVI to become the ultimate solution by providing intelligent features based on motion detection. It also strengthens crime prevention and detection. -
Page 15: Osd Menu Details
How to Set Up the camera menu ● Setup Menu MENU SPECO PRESET MODE default INDOOR OUTDOOR LOWLIGHT HALLWAY LOBBY ELEVATOR DC LENS : INDOOR DC LENS : OUTDOOR DC LENS : INDOOR DC LENS : INDOOR DC LENS : INDOOR... - Page 16 3000K/5000K/8000K 5.WHITE BAL MANUAL R-GAIN 0~20 default : 10 B-GAIN 0~20 default : 10 RETURN (SAVE/CANCEL) 6.SPECO DNR OFF/LOW/MIDDLE/HIGH SHARPNESS 0 ~ 10 default : 10 COLOR GAIN 0 ~ 20 default : 10 GAMMA 0.45, 0.55, 0.6, 0.65 MIRROR...
- Page 17 RETURN (SAVE/CANCEL) FULL IMAGE RANGE COMP 8.SYSTEM USER OFFSET 0~32 default : 10 RETURN LANGUAGE ENG, CHN, CHN(S), JPN, KOR RIGHT UP CAM TITLE LEFT DOWN RESET ON-PUSHING RETURN (SAVE/CANCEL) 9.EXIT SAVE/CANCEL 3.EXIT - 17 - Speco(Fit).indd 17 2020-05-21 오전 9:52:22...
- Page 18 2. EXPOSURE 3. BACKLIGHT 4. DAY&NIGHT INTENSIFIER 5. WHITE BAL AUTO 6. SPECO DNR MIDDLE 7. IMAGE 8. SYSTEM 9. EXIT 3. Change menu settings using the Left or Right button. * Available values or Status are displayed by pressing the Left or Right buttons.
- Page 19 2. Select the desired lens type by pressing the Left of Right button. MENU 1. 2-MOTORIZED 2. EXPOSURE 3. BACKLIGHT 4. DAY&NIGHT INTENSIFIER 5. WHITE BAL AUTO 6. SPECO DNR MIDDLE 7. IMAGE 8. SYSTEM 9. EXIT 1. 2-MOTORIZED AF MODE ONESHOT D&N FILTER...
- Page 20 MENU 1. 2-MOTORIZED 2. EXPOSURE 3. BACKLIGHT 4. DAY&NIGHT INTENSIFIER 5. WHITE BAL AUTO 6. SPECO DNR MIDDLE 7. IMAGE 8. SYSTEM 9. EXIT 2. Select the desired shutter mode by pressing the Left or Right button. 2. EXPOSURE BRIGHTNESS...
- Page 21 2. EXPOSURE 3. BACKLIGHT 4. DAY&NIGHT INTENSIFIER 5. WHITE BAL AUTO 6. SPECO DNR MIDDLE 7. IMAGE 8. SYSTEM 9. EXIT ◆ Off : Deactivated status. ◆ HLC : This function is used to surpress or strong light source (for example, headlights of cars during nighttime) so that other subjects can be seen in more detail.
- Page 22 POS3-X : You can select the horizontal & Diagonal starting position of the monitoring area. POS3-Y : You can select the vertical & Diagonal starting position of the monitoring area. - WEIGHT [MIDDLE, HIGH, LOW] : Select the WDR level of the camera. - 22 - Speco(Fit).indd 22 2020-05-21 오전 9:52:24...
- Page 23 2. EXPOSURE 3. BACKLIGHT 4. DAY&NIGHT INTENSIFIER 5. WHITE BAL AUTO 6. SPECO DNR MIDDLE 7. IMAGE 8. SYSTEM 9. EXIT ◆ INTENSIFIER : The bright screen can be displayed by sensing the degree of the darkness automatically under the circumstance of low light condition or at night.
- Page 24 2. EXPOSURE 3. BACKLIGHT 4. DAY&NIGHT INTENSIFIER 5. WHITE BAL AUTO 6. SPECO DNR MIDDLE 7. IMAGE 8. SYSTEM 9. EXIT ◆ AUT0 : Use this mode when the color temperature is from 3,000k to 8,000k. ◆ AWB : The function to search for the color which is matched well with the ambient environment.
- Page 25 You can set different levels here. 1. Move the triangular indicator to SPECO DNR by useing the Up and Down button. 2. Select the mode to use by pressing the left or Right button and OFF/LOW/MIDDLE/HIGH level selectable.
- Page 26 15 area. The size of a designated area can be adjusted. The color of a privacy area can be selected various colors. When you select the return, the setting values in this function menu are saved, then get out of this menu. - 26 - Speco(Fit).indd 26 2020-05-21 오전 9:52:25...
- Page 27 This can be used when you want to select the additional function control. 1.When the SETUP menu is displayed, select SYSTEM using the Up and Down button. 2. Select one of the mode using the Up and Down button. - 27 - Speco(Fit).indd 27 2020-05-21 오전 9:52:26...
- Page 28 MENU 1. 2-MOTORIZED 2. EXPOSURE 3. BACKLIGHT 4. DAY&NIGHT INTENSIFIER 5. WHITE BAL AUTO 6. SPECO DNR MIDDLE 7. IMAGE 8. SYSTEM 9. EXIT 8.SYSTEM VIDEO OUTPUT IMAGE RANGE FULL LANGUAGE CAM TITLE RESET RETURN ◆ VIDEO OUTPUT - OUTPUT : TVI.
-
Page 29: Trouble Shooting
In case the focusing does not work, please do the following to correct this problem. Menu -> 1. 2MOTOR -> 3. ONEPUSHAF -> Push the “ON” button for 1 second. -> The Auto Focusing will begin upon changing to “PUSHING”. - 29 - Speco(Fit).indd 29 2020-05-21 오전 9:52:26... - Page 30 - 30 - Speco(Fit).indd 30 2020-05-21 오전 9:52:27...
- Page 31 Speco(Fit).indd 31 2020-05-21 오전 9:52:28...
- Page 32 200 New Highway Amityville, NY 11701 631-957-8700 1 800 645 5516 www.specotech.com Speco(Fit).indd 32 2020-05-21 오전 9:52:28...
Need help?
Do you have a question about the HFB4M and is the answer not in the manual?
Questions and answers