Table of Contents
Advertisement
Quick Links
Advertisement
Table of Contents

Subscribe to Our Youtube Channel
Related Manuals for logitrans Twin Stacker


Summary of Contents for logitrans Twin Stacker
- Page 1 TWIN STACKER ...
- Page 2 DK-6760 Ribe Denmark It is hereby declared that: Machine: Productgroup: Stacker with electric propulsion Type: Twin Stacker Year of manufacture/ Serial No: a) Has been manufactured in conformance with the stipulations of the: • Directive no. 2006/42/EC • Directive no. 2004/108/EC • Directive no. 2006/95/EC b) Has been manufactured in conformance with the stipulations of the standard: • EN ISO 3691-5...
-
Page 3: Table Of Contents
Contents 1.0 Before the first lift....................4 2.0 Functions and identifications ................5 3.0 How to operate the Twin Stacker ..............6 3.1 Handling of pallets ....................... 7 3.2 Handle functions ........................8 3.3 Emergency stop......................... 10 3.4 Brake function........................11 3.5 Personal safety ........................11... -
Page 4: Before The First Lift
1.0 Before the first lift... The Twin Stacker is manufactured in accordance with safety directives. Among the subjects dealt with in this Instruction Manual are: • Proper application • Physical limitations of the product • Risks with improper use Therefore please read this Instruction Manual carefully! ... -
Page 5: Functions And Identifications
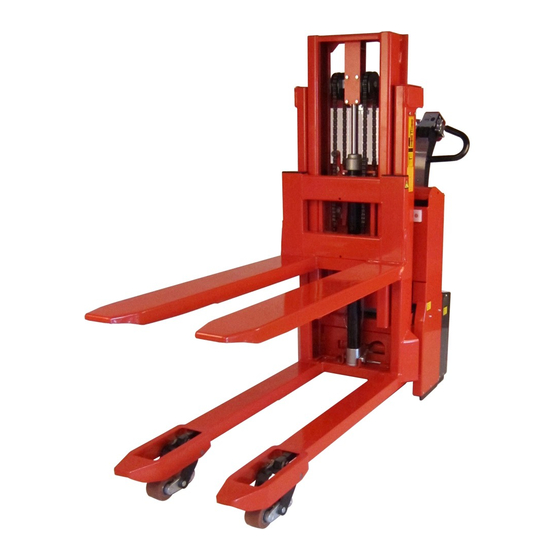
2.0 Functions and identifications 1. Safety Switch 2. Horn 3. Lift/Lower upper forks 4. Lift/Lower lowest forks 5. Forward/Reverse 6. Multiflex Function 7. Handle 8. Battery indicator / hours counter 9. Emergency Stop 10. Ignition Key 11. Charging Lamp (built-in charger) Identification Battery label, (below the battery cover) -
Page 6: How To Operate The Twin Stacker
Insert key (10) and turn clockwise to switch on control current ready for function activation. Note!!! Emergency stop (9) must not be activated. The control functions of the Twin Stacker are located in the handle (7). - The functions are dependent on the position of the handle! Position A: Drive position Drive current on Brake deactivated... -
Page 7: Handling Of Pallets
3.0 How to operate the Twin Stacker 3.1 Handling of pallets For proper operation, stand behind the handle. Raise/lower - forward/reverse The pallet can be lifted and transported - either lengthwise - or crosswise... -
Page 8: Handle Functions
3.0 How to operate the Twin Stacker 3.2 Handle functions ... - Page 9 3.0 How to operate the Twin Stacker 3.2 Handle functions ...
-
Page 10: Emergency Stop
Horn Multiflex function Multiflex function • This function makes it possible to drive the Twin Stacker, even though the handle is in its upright, braked position • The function requires two-handed operation, i.e. it must be performed deliberately • The function facilitates manoeuvring in restricted areas. -
Page 11: Brake Function
3.0 How to operate the Twin Stacker 3.4 Brake function A: Position for driving B: Position for braking See multiflex function for driving in B-position (see paragraph 3.2) 3.5 Personal safety The safety switch on the end of the handle ensures that the operator cannot be trapped when the Twin Stacker is reversed. -
Page 12: Optimum Safety
• Before lowering the forks, make certain that no foreign elements can hinder the free lowering of the forks.e • The Twin Stacker is designed for use on an even and level floor • During transport the forks shall be raised as little as possible • Transport with raised forks should be made over the shortest possible distances and at low speed • Check that the chains lift equally. -
Page 13: Avoid Overloads
4.0 Optimum safety 4.1 Avoid overloads Maximum capacity in total 1800 kg Capacity lowest forks: Up to 1800 kg Capacity upper forks: Up to 800 kg The maximum load must not be exceeded. Remember, the pallet truck is designed for evenly distributed load;... -
Page 14: There Must Be A Current Supply
5.0 There must be a current supply... 5.1 Fuses - replacement There are 5 fuses in the electrical circuit, located Sikringer behind the plate with this pictogram. Fuses Fusibles Sicherungen 80 Amp fuse for driving motor 80 Amp fuse for lifting motor lowest forks 5 Amp fuse in the control current circuit 20 Amp fuse (built-in charger) 80 Amp fuse for lifting motor upper forks... -
Page 15: Long Live Twin Stacker
6.0 Long live Twin Stacker Regular inspection and the replacement of worn or defective parts in good time will prolong the life of the Twin Stacker. “Prevention is better than repair”, therefore ensure: Correct usage Regular cleaning Periodic safety and service inspection (see the back page) Due to safety reasons, the below points have to be checked every 3 months: - Loose screws and nuts have to be tightened up. -
Page 16: Adjustment Of Side Play
6.0 Long live Twin Stacker 6.2 Adjustment of side play (In the mast rolls of the fork bracket) 1: Loosen nut (B) Screw. (A) is loosened counter-clockwise, until resistance disappears. 2: Turn the screw clockwise, until resistance appears. The following 1.5 to 2.5 turns of the screw will be a tightening of the spring (C). -
Page 17: Fork Adjustment
6.0 Long live Twin Stacker 6.3 Fork adjustment Two of the rollers on the fork bracket are mounted on eccentric pins, so that they can be adjusted. The adjustable rollers are at the top. 1. Loosen screw (pos. 91) (key width 5 mm). -
Page 18: Fault Location Key
Before asking the dealer for assistance..try the fault location key! Symptoms and observations The Twin Stacker does not drive when the handle is tilted and drive grip turned! - no click can be heard from relays when the handle is tilted - no click can be heard when the multiflex button is activated - the motor makes a humming noise... - Page 19 Cause Mending Inadequate power supply Battery discharged (error 4.2) Fault in on/off switch Fault in control current circuit Fault in main/power current circuit Too little current on battery (error 4.2) No current on brake The controller parameters are not set correctly Insufficient oil in tank.
-
Page 20: Remedy
7.0 Fault location key 7.1 Remedy 1) Check that the key (1) is turned clockwise and that emergency stop (2) is not activivated. 2) Charge battery - (see separate instruction manual for battery and charger). Access to the battery is achieved by removing the battery lid (3). 3) Check switch (4). - Page 21 7.0 Fault location key ...
-
Page 22: Good Service After Purchase
The warranty covers material and assembly defects which, subject to inspection by us or our representative, are deemed to be faults or deficiencies that prevent normal use of the parts concerned. Such affected parts shall be sent to your Logitrans dealer carriage paid within the warranty period in force at the time in question, together with a copy of the documentation for the service performed (B284 - see the back page). - Page 24 Periodic service check Service check is required once each year, or at least for every 500 hours of operation The service check is to be performed on the basis of form no. B280 and proved on form no. B284. Forms and instructions for the service check are available at your dealer.
Need help?
Do you have a question about the Twin Stacker and is the answer not in the manual?
Questions and answers