Alto-Shaam 500-1D Operator's Manual
Heated holding drawer warmers
Hide thumbs
Also See for 500-1D:
- Installation, operation and maintenance manual (33 pages) ,
- Installation operation & maintenance (33 pages) ,
- Operation and care manual (25 pages)

Related Manuals for Alto-Shaam 500-1D


Summary of Contents for Alto-Shaam 500-1D
- Page 1 Operator’s Manual Heated Holding Drawer Warmers 500-1D 500-1DN 500-2D 500-2DN 500-3D 500-3DN 500-2DI MN-46969-EN REV.01 5/20 alto-shaam.com...
-
Page 2: Manufacturer's Information
© Copyright 5/20 by Alto-Shaam, Inc. All rights reserved. This manual or any portion thereof may not be reproduced or used in any manner whatsoever without the express written permission of Alto-Shaam, Inc. Trademarks All trademarks referenced in this documentation are the property of their respective owners. -
Page 3: Foreword
– Alto-Shaam Drawer Warmers use the same soft, gentle Technology Halo Heat that made the Alto-Shaam Cook & Hold oven a kitchen staple all over the world. Product moisture is retained without adding water. With no exposed Calrod heating elements, cleaning is easy. - Page 4 OREWORD This page intentionally left blank. Dr a wer W a rm e r Op er a to r ’ s Ma n u al M N- 46 9 6 9 Rev 1 5/ 2 0 ▪ ▪ ▪ ▪...
-
Page 5: Table Of Contents
Foreword Enjoy your Alto-Shaam® Drawer Warmer! ....3 Extend Your Manufacturer’s Warranty ....3 Alto-Shaam 24/7 Emergency Repair Service . - Page 6 ABLE OF ONTENTS This page intentionally left blank. Dr a wer W a rm e r Op er a to r ’ s Ma n u al M N- 46 9 6 9 Rev 1 5/ 2 0 ▪ ▪ ▪...
-
Page 7: Safety
AFETY The Meaning of Signal Words This manual contains signal words where needed. These signal words must be obeyed to reduce the risk of death, personal injury, or equipment damage. The meaning of these signal words is explained below. DANGER Danger indicates a hazardous situation which, if not avoided, will result in serious injury or death. -
Page 8: Appliance Description And Intended Use
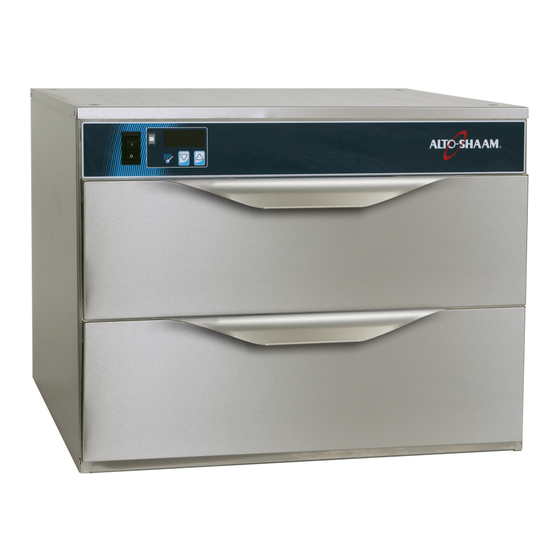
Appliance Description and Intended Use ® Halo Heat The Alto-Shaam drawer warmer is an appliance that uses Halo Heat technology Technology to keep hot foods hot. This gentle, radiant heat evenly surrounds food without the use of extremely hot elements, added humidity or fans. -
Page 9: Safety Precautions
AFETY Safety Precautions Before you begin Read and understand all instructions in this manual. Electrical precautions Obey these electrical precautions when using the appliance: ▪ Connect the appliance to a properly grounded outlet. Do not use the appliance if it is not properly grounded. Consult an electrician if there is any doubt that the outlet used is properly grounded. - Page 10 Alto-Shaam of all liability. Original manufacturer’s replacement parts may be substituted; however, these parts must be of equal quality and specifications as those provided by Alto-Shaam.
- Page 11 AFETY Continued from previous page Personal Protective Wear the following Personal Protective Equipment (PPE) while cleaning the Equipment (PPE) appliance: ▪ Protective gloves ▪ Protective clothing ▪ Eye protection ▪ Face protection Dr a we r W a rm e r Op er a to r ’...
-
Page 12: Labels
ABELS Label Locations HH-REF-009706 Dr a we r W a rm e r Op er a to r ’ s Ma n u al M N- 46 9 6 9 Rev 1 5 /2 0 ▪ ▪ ▪ ▪... - Page 13 ABELS ® Every Alto-Shaam product is precision calibrated prior to release from the factory to ensure accurate temperature control. Rating Tag LA-26348 Do not dispose of this item in general waste. (230V only) Equipotential bonding LA-36443-E Made in U.S.A. Halo Heat...
- Page 14 ABELS This page intentionally left blank. Dr a wer W a rm e r Op er a to r ’ s Ma n u al M N- 46 9 6 9 Rev 1 5/ 2 0 ▪ ▪ ▪ ▪...
-
Page 15: Dimensions
IMENSIONS Dimension Drawings 500-1D, 500-2D, 500-3D 12-5/16" (312mm) 24-5/8" (624mm) 43-3/8" (1101mm) Cord Length: 120V - 5' (1524mm) Electrical 208-240V - 8' (2438mm) Connection 230V - 8' (2438mm) 6-3/4" (171mm) FOR 4-7/8" (121mm) LEG STAND OR 5" (127mm) FOR CASTER STAND ASSEMBLY CASTER STAND ASSEMBLY WITH 3"... - Page 16 IMENSIONS Continued from previous page 500-2DI 12-5/16" 43-3/8" (1101mm) 24-5/8" (624mm) (312mm) Cord Length: Electrical 120V - 5' (1524mm) 208-240V - 8' (2438mm) Connection 230V - 8' (2438mm) 6-3/4" (171mm) FOR 4-7/8" (121mm) LEG STAND OR 5" (127mm) FOR CASTER STAND ASSEMBLY CASTER STAND ASSEMBLY WITH 3"...
-
Page 17: Installation
Alto-Shaam policy It is the policy of Alto-Shaam to assist customers in collecting claims that have been properly filed and actively pursued. Alto-Shaam cannot, however, file damage claims, assume the responsibilities for damage claims, or accept deductions in payment for damage claims. -
Page 18: How To Unpack The Appliance
Make sure you have: ▪ An appropriate lifting device and enough personnel to safely move and position the weight of the appliance. 500-1D: 80 lbs (36 kg) □ 500-2D, 500-2DI: 115 lbs (52 kg) □ 500-3D: 150 lbs (68 kg) □... -
Page 19: How To Install The Drawer Warmer
INSTALLATION How to Install the Drawer Warmer Before you begin Make sure you have: ▪ An appropriate lifting device, and enough personnel, to safely move and position the weight of the drawer warmer. ▪ Requirements The drawer warmer must be installed on a level surface. ▪... - Page 20 INSTALLATION Continued from previous page Electrical connection WARNING: Appliances without a cord provided by the factory must be equipped with a cord of sufficient length to permit the appliance to be moved for cleaning. Always use the correct AWG wire size based on the electrical requirements for the appliance.
- Page 21 INSTALLATION Continued from previous page Regarding international standard drawer warmers: If the drawer warmer is not equipped with flexible cord and plug, an all-pole country approved disconnection device which has a contact separation of at least 3mm in all poles must be incorporated in the fixed wiring for disconnection. When using a cord without a plug, the green/yellow conductor shall be connected to the terminal which is marked with the ground symbol.
- Page 22 INSTALLATION Continued from previous page Position the drawer To position the drawer warmer, do the following. warmer Step Action Make sure that: The location where the drawer warmer is being installed is rated to ▪ support the weight of the drawer warmer; The drawer warmer is within five feet of the appropriate electrical ▪...
- Page 23 INSTALLATION Continued from previous page When starting up the drawer warmer, an odor may be noticeable. If an oder is noticed, operate the drawer warmer without food for a minimum of two (2) hours at a temperature of 140°F (93°C) to remove surface oils (the total time required to remove surface oils may be longer).
- Page 24 INSTALLATION This page intentionally left blank. Dr a wer W a rm e r Op er a to r ’ s Ma n u al M N- 46 9 6 9 Rev 1 5/ 2 0 ▪ ▪ ▪ ▪...
-
Page 25: Operation
PERATION Control Identification Control Functions TH-TS-009666 Item Description Function On/Off Power Switch Press to turn on or turn off the drawer warmer Heat Indicator Light Indicates when the drawer warmer has reached the set temperature LCD Display Displays time, temperature, settings, and error codes Temperature Display Press to display the Set and Actual cavity... -
Page 26: How To Hold Hot Food
PERATION How to Hold Hot Food Before you begin Make sure: ▪ The drawer warmer is turned on. ▪ Food to be put into the drawer warmer is 140°F (60°C) to 160°F (71°C). Procedure To hold hot food, do the following. Step Action the power switch... -
Page 27: How To Display The Set Or Actual Temperature
PERATION How to Display the Set or Actual Temperature Before you begin Make sure: ▪ The drawer warmer is turned on. Procedure The factory default is set to display the Set temperature. To change the control to display the Actual temperature, do the following Step Action Press... -
Page 28: How To Change The Temperature Scale
PERATION How to Change the Temperature Scale Before you begin Make sure: ▪ The drawer warmer is turned on. Procedure ° The factory default is set to display Fahrenheit (F ). To change the control to display ° Celsius (C ), do the following. -
Page 29: How To Calibrate The Temperature Sensor
PERATION How to Calibrate the Temperature Sensor ▪ Before you begin The oven must be connected to electrical power and on. ▪ Make sure you have a multimeter with a thermocouple attachment. ▪ Make sure you have read the topic How to Display the Set and Actual Temperature. Procedure To calibrate the temperature sensor, do the following. - Page 30 PERATION Continued from previous page Allow the drawer warmer to heat for 60 minutes. Calibrate the offset number. Subtract the smaller value from the larger value. This is the offset. If the value measured by the multimeter was the larger value, the offset will positive “+”. If the value measured by the multimeter was the smaller value, the offset will be negative “–”.
- Page 31 PERATION Continued from previous page Press the Temperature Display button to save the offset and exit calibration mode. HH-TS-009694 compare Allow the drawer warmer to re-stabilize and the temperature again. Tolerance at 140 ° F (60 ° C) is +/- 8 °...
-
Page 32: How To Modify Drawer To Hold Oversized Pans
PERATION How to Modify Drawer to Hold Oversized Pans ▪ Before you begin Turn the drawer warmer off and make sure it is cool. ▪ Make sure you have a flathead screwdriver. Procedure To modify the drawer to hold oversized pans, do the following. Step Action Remove... -
Page 33: Maintenance
AINTENANCE Maintenance Schedule ▪ Requirements See topic How to Clean the Drawer Warmer. ▪ Disconnect the drawer warmer from power source and let cool. Daily For daily maintenance, do the following. ▪ Remove any spills with disposable paper wipes or a damp cloth. ▪... -
Page 34: How To Clean The Drawer Warmer
AINTENANCE How to Clean the Drawer Warmer Before you begin WARNING: Electric shock hazard. Set the power switch to the OFF position and unplug the appliance. CAUTION: Burn hazard. Allow the drawer warmer to cool before cleaning. CAUTION: Corrosive materials hazard. Wear eye protection and hand protection when cleaning. -
Page 35: Troubleshooting
ROUBLESHOOTING Error Codes Code Description Cause/Remedy E-10 Cavity probe shorted Cavity air sensor reading < 5°F (-15°C). Verify sensor integrity. E-11 Cavity probe open Cavity air sensor reading > 517°F (269°C). Verify sensor integrity. E-20 Product probe is shorted Product probe reading < 5°F (-15°C). Verify (oven will cook in time only) sensor integrity. - Page 36 ROUBLESHOOTING Code Description Cause/Remedy E-87 EEPROM Error Stored offsets corrupted Offsets reset to 0 Control may need a recalibration. Possible bad EEPROM. Contact factory if problem persists. E-88 EEPROM Error All timer setpoints are reset to 1 minute. Timers, if previously on, are now off. Possible bad EEPROM E-90 Button stuck...
-
Page 37: Warranty
ARRANTY Warranty Introduction Alto-Shaam, Inc. warrants to the original purchaser only, that any original part found to be defective in material or workmanship will be replaced with a new or rebuilt part at Alto-Shaam's option, subject to provisions hereinafter stated. - Page 38 No person except an officer of Alto-Shaam, Inc. is authorized to modify this warranty or to incur on behalf of Alto-Shaam any other obligation or liability in connection with Alto-Shaam equipment.
- Page 39 ARRANTY This page intentionally left blank. Dr a we r W a rm e r Op er a to r ’ s Ma n u al M N- 46 9 6 9 Rev 1 5 /2 0 ▪ ▪ ▪ ▪...
Need help?
Do you have a question about the 500-1D and is the answer not in the manual?
Questions and answers