Advertisement
Quick Links
Advertisement

Subscribe to Our Youtube Channel
Related Manuals for Flycam FLCM-FLN-PA


Summary of Contents for Flycam FLCM-FLN-PA
- Page 1 Flowline Camera Support With (FLCM-FLN-PA) 2-Axis Arm Instruction Manual...
- Page 2 At Flycam, our goal is to ensure 100% Customer Satisfaction in all that we do. We back our sales with a 1 year warranty from the date of purchase and work hard to resolve any problems in the unlikely event one should arise.
- Page 3 On behalf of all the people that work so hard to provide you with the most up-to-date, flexible and cost-efficient production gear, we would like to welcome you into the Flycam family. By purchasing your Flowline Steady Camera Support with Stabilizing Arm, you have just joined a host of designers, engineers, machinists, assembly, customer service and office staff that take great pride in all that they do.
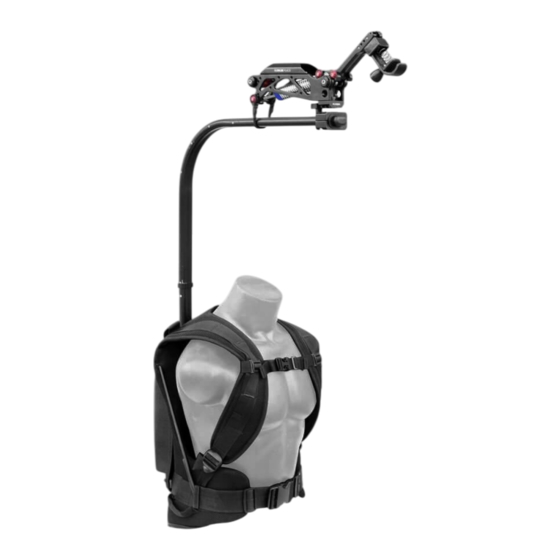
- Page 4 Flycam Placid, a two axis spring arm ensures stability and smoothness by controlling the vibrations. It works great with the gimbal rigs like Free fly Mövi or most other gimbal rigs.
- Page 5 Wear support jacket and tighten the buckles provided at the waist and at the chest and adjust as per your convenience. NOTE: The four knobs provided on the back of support jacket allows height adjustment of support bar. Use spring at back of support jacket to adjust height of rope as required.
- Page 6 Attach camera to hook and tighten with provided knob to ensure slip free connection. Loosen knob at support bar to adjust the position of camera according to eye-level, if required. Rotate the knob to release the spring tension.
- Page 7 Loosen the knob of Hook and remove the spring of Hook. For using Flowline Placid Arm with Flycam Flowline, follow these steps: Now loosen the knot of rope in order to remove the rope from hook. Remove the extension arm of Flowline. Re-attach the arm upside down and tighten the knob...
- Page 8 Loosen the Allen bolt of Placid Arm with the help of Allen Key. Now pass the rope through Placid adapter as shown in the image. Mount the Placid on Flowline arm and tighten the Allen bolt with help of Allen key. ...
- Page 9 Then insert the rope into Hook and tie the knot of Rope properly. Attach the spring to Hook and tighten the knob to secure it properly. Secure the Placid on Flowline Arm with provided tie to ensure slip free connection.
- Page 10 Now mount your camera setup on hook of Flowline and tighten the knob to secure it properly. YOUR FLOWLINE STEADY CAMERA SUPPORT WITH STABILIZING ARM ALL DRESSED UP AND READY TO GO!
- Page 11 WARRANTY We offer a one year warranty for our products from the date of purchase. We will repair or replace your product, free of charge, in the event of a defect in materials or craftsmanship obtained during normal use or handling based on the user manual. Please note that we will not cover any shipping costs for returning the product to us.
Need help?
Do you have a question about the FLCM-FLN-PA and is the answer not in the manual?
Questions and answers