Cybex Platinum SOLUTION Z-FIX Owner's Manual
Hide thumbs
Also See for SOLUTION Z-FIX:
- User manual (129 pages) ,
- User manual (104 pages) ,
- User manual (47 pages)
Table of Contents
Advertisement
Available languages
Available languages
Advertisement
Table of Contents

Related Manuals for Cybex Platinum SOLUTION Z-FIX


Summary of Contents for Cybex Platinum SOLUTION Z-FIX
- Page 1 SOLUTION Z-FIX Owner’s Manual Manual del propietario READ this Owner’s Manual carefully before first use, and keep it for future reference. LEA con cuidado este Manual del propietario antes de usar el producto por primera vez y guárdelo para uso futuro.
- Page 2 Thank you for purchasing the CYBEX Solution Z-fix High Back Booster Seat. We are proud to bring this German engineered seat to North America. We hope the Solution Z-fix will make your child’s travel both safer and more pleasant, as well as making installation and use for you as simple and easy as possible.
- Page 3 INDEX SOLUTION Z-FIX FEATURES ............................. 2 REGISTRATION AND RECALL INFORMATION ....................... 3 BOOSTER SEAT OVERVIEW ............................4 WHEN TO PLACE YOUR CHILD IN A BOOSTER SEAT ..................6 CHILD SIZE: HEIGHT, WEIGHT, AND AGE RANGES ....................7 WARNINGS AND IMPORTANT SAFETY INFORMATION ..................8 ASSEMBLY ..................................
- Page 4 SOLUTION Z-FIX FEATURES The Solution Z-fix brings all new technologies to the High Back Booster Seat category to enhance the safety of your child in the event of a side impact collision. LINEAR SIDE-IMPACT PROTECTION™ (L.S.P.) The L.S.P. system allows the forces from a side impact collision to be reduced gradually to help minimize injuries.
- Page 5 REGISTRATION AND RECALL INFORMATION Please complete the Registration Card that came with CERTIFICATION your Child Restraint and mail it immediately or register In the United States, this child restraint system conforms to online. all applicable Federal Motor Vehicle Safety Standards. Child restraints could be recalled for safety reasons.
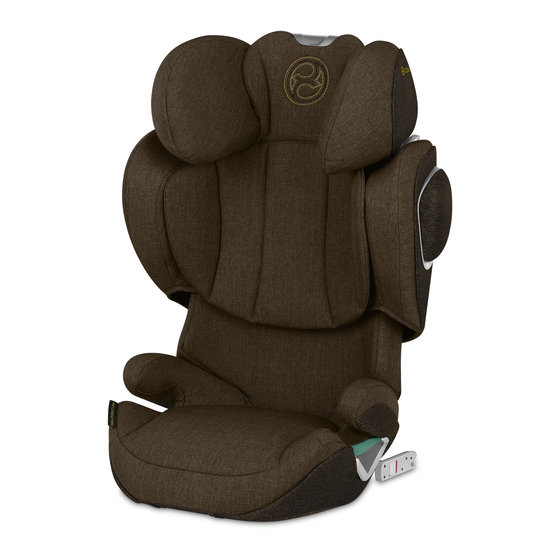
- Page 6 BOOSTER SEAT OVERVIEW FRONT VIEW Reclining Headrest Head Protection Backrest Owner’s Manual (behind Backrest pad) Shoulder Pad L.S.P. Bolster Armrest Rigid LATCH/UAS Lower Belt Guide Booster Base Owner’s Manual...
- Page 7 BOOSTER SEAT OVERVIEW REAR VIEW Headrest Height Adjustment Handle Shoulder Belt Guide Expanding Backrest BOTTOM VIEW Product Information Label LATCH/UAS Connector (stored inside base) LATCH/UAS Guides (tied to Booster Base for shipping) LATCH/UAS Adjustment Handle...
- Page 8 WHEN TO PLACE YOUR CHILD IN A BOOSTER SEAT Booster seats raise the child up and help to position the How is a booster seat used? vehicle lap and shoulder belt correctly. When the child is Using a booster seat is very similar to buckling yourself into properly restrained in a booster seat, their risk of injury in the vehicle: all types of crashes is reduced.
- Page 9 CHILD SIZE: HEIGHT, WEIGHT, AND AGE RANGES WARNING! DEATH or SERIOUS INJURY can occur • USE ONLY with children who are 3 years of age or older AND who weigh 18-50 kg (40-110 lb) AND whose height 18-50 kg (40-110 lb) is 96-152 cm (38-60 inches).
- Page 10 WARNING! DEATH or SERIOUS INJURY can occur • YOUR CHILD’S SAFETY depends • KEEP this Owner’s Manual for future on you correctly installing and using this reference by storing it in the pocket booster seat. behind the Backrest pad. • READ and FOLLOW all booster seat •...
- Page 11 WARNING! DEATH or SERIOUS INJURY can occur instruction and labeling, this booster seat child restraint/booster seat installation to will substantially improve the chances for determine allowable seating positions. survival in most crashes. • Use this booster seat FORWARD • TOO MUCH RECLINE IN THE FACING ONLY.
- Page 12 WARNING! DEATH or SERIOUS INJURY can occur • NEVER USE a locking clip when • DO NOT LEAVE loose objects (e.g. installing this booster seat. books, bags, etc.) in a vehicle. In the event of a sudden stop, loose objects will •...
- Page 13 WARNING! DEATH or SERIOUS INJURY can occur • NEVER USE this booster seat if it has • DISCONTINUE USING this booster been damaged in any way or has missing seat when it is older than eight (8) years parts. and recycle it. The date of manufacture can be found on a label affixed to the •...
- Page 14 ASSEMBLY WARNING! DEATH or SERIOUS INJURY can occur • NEVER USE the Booster Base without the Backrest attached. • NEVER use this booster seat with the Backrest past the allowable adjustment range. An audible CLICK will alert you when you have gone too far. STEP 1 Connect the Backrest to the Booster Base.
- Page 15 VEHICLE SEAT LOCATION REQUIREMENTS WARNING! DEATH or SERIOUS INJURY can occur • ONLY PLACE this booster seat FORWARD FACING in a vehicle seating location allowed by the vehicle manufacturer. Refer to your vehicle Owner’s Manual for information about vehicle seat belt systems, air bags, and child restraint/booster seat installation to determine allowable seating positions.
- Page 16 VEHICLE SEAT LOCATION REQUIREMENTS WARNING! DEATH or SERIOUS INJURY can occur • Vehicle headrest MUST NOT INTERFERE with the booster seat Backrest. See the vehicle Owner’s Manual for adjustment or possible removal of vehicle headrest. • NO PART of this booster seat should hang over the front of the vehicle seat.
- Page 17 VEHICLE SEAT BELT REQUIREMENTS WARNING! DEATH or SERIOUS INJURY can occur • USE ONLY the vehicle’s lap and shoulder belt system when restraining your child in this booster seat. • NEVER USE this booster seat with a lap belt only, or with any motorized, door mounted, or inflatable vehicle belts.
- Page 18 Lower Anchors and a Top Tether built into your when not in use. In a sharp turn, crash or vehicle. The Solution Z-fix has been designed to attach to sudden stop, an unsecured booster seat the Lower Anchors of this system.
- Page 19 INSTALLING USING LATCH/UAS The Solution Z-fix is designed to be used with the vehicle’s lower LATCH/UAS anchors, if available. This booster seat may also be used in seating positions without lower LATCH/ UAS anchors (see page 19). STEP 1 Select a seat location allowed by your vehicle manufacturer equipped with a LAP AND SHOULDER BELT system.
- Page 20 INSTALLING USING LATCH/UAS STEP 3 Place the Solution Z–fix on its side. While squeezing the orange LATCH/UAS Adjustment Handle located on the bottom of the Booster Base, pull the LATCH/UAS Connectors out until they stop. Then rotate the LATCH/UAS Connectors 180°.
- Page 21 INSTALLING WITH SEAT BELT ONLY WARNING! DEATH or SERIOUS INJURY can occur • ACCORDING TO ACCIDENT STATISTICS, children are safer when properly restrained in rear vehicle seating positions. • NEVER USE the Booster Base without the Backrest attached. • NEVER USE a locking clip when installing this booster seat. First, refer to pages 13–14 for Vehicle Seat Location Requirements.
- Page 22 ADJUSTING THE SEAT FOR YOUR CHILD HEIGHT AND WIDTH The innovative size adjustment of the Solution Z-fix automatically adjusts the width of the Shoulder Pad as the height of the Headrest is adjusted. After the Solution Z-fix is properly installed:...
- Page 23 ADJUSTING THE SEAT FOR YOUR CHILD ADJUSTING THE RECLINING HEADREST The Solution Z-fix has a Three Position Reclining Headrest to help prevent your child’s head from falling forward while asleep. After adjusting the Backrest to the correct height for your child (page 20), select the position that is most comfortable for your child.
- Page 24 SECURING YOUR CHILD IN THE BOOSTER SEAT WARNING! DEATH or SERIOUS INJURY can occur • NEVER USE WITH A LAP BELT ONLY. • NEVER ALLOW your child to place the shoulder belt behind his or her back. • NEVER ALLOW your child to place the shoulder belt under his or her armpit.
- Page 25 SECURING YOUR CHILD IN THE BOOSTER SEAT WARNING! DEATH or SERIOUS INJURY can occur • NEVER POSITION any part of the vehicle seat belt over the top of the armrests. • NEVER USE with the shoulder belt in contact with your child’s neck. •...
- Page 26 SECURING YOUR CHILD IN THE BOOSTER SEAT STEP 1 Slip the shoulder belt between the Shoulder Pad and the Headrest and route the belt inside the Belt Guide making sure it rests INSIDE the area. STEP 2 Pull the shoulder belt down across your child’s chest while guiding the lap belt underneath both armrests.
- Page 27 SECURING YOUR CHILD IN THE BOOSTER SEAT When your child sits properly in the booster seat: • The lap portion of the seat belt must be positioned and snug on your child’s thighs and NEVER on your child’s abdomen. • The shoulder belt should be threaded through the belt guide and positioned across the mid-point of your...
- Page 28 UNINSTALLING THE BOOSTER SEAT STEP 1 Unbuckle the vehicle belt. Remove the shoulder belt from the guide by pressing down on the red belt guide hook. STEP 2 While squeezing the LATCH/UAS Adjustment Handle, pull the booster seat away from the vehicle seat. STEP 3 Release both LATCH/UAS Connectors at the same time by pressing in while pulling back on the release buttons.
- Page 29 FABRIC COVERS WARNING! DEATH or SERIOUS INJURY can occur • NEVER USE this booster seat without properly installed fabric covers. • Do not damage, remove, or dispose of the foam Headrest Pads or Side Pads on this booster. REMOVING THE FABRIC COVERS The seat is covered with five separate parts - the Reclining Headrest Pad (1), Headrest Cover (2), Side Pad Cover (3), Backrest Cover (4), and Seat Pad (5).
- Page 30 FABRIC COVERS c. Untuck the Side Pad Cover from around the silver base of the L.S.P. Bolster and pull the Side Pad Cover toward the front of the seat. d. Release the two snaps on the underside of the Side Pad Cover, pull the cover off the opposite Side Pad, and finish removing the cover by pulling toward the back of the seat.
- Page 31 FABRIC COVERS 3. Side Pad Cover: a. With the Headrest in its highest position, pull the Side Pad Cover on over one Side Pad at a time, making sure to support the base of the foam pad as you do. Make sure that the red belt guide always remains visible above the seat cover.
- Page 32 CARE AND CLEANING SPOT CLEANING OWNER’S MANUAL Spot clean the fabric seat After carefully reading and covers as needed with a clean following these instructions, cloth using mild detergent and store the Owner’s Manual in water. the pocket behind the Backrest Pad.
- Page 33 SAFETY CHECKLIST Did you read and completely understand this Owner’s Manual and all labels found on this booster seat? Is the booster seat completely assembled according to these instructions, with the Backrest attached to the Booster Base? Is today’s date before the “Do Not Use After” date on your booster seat? Is your child 3 years of age or older AND does he/she weigh 18-50 kg (40-110 pounds) AND stand 96-152 cm (38-60 inches) tall? Is the booster seat forward-facing in a seating position with a lap and shoulder belt?
- Page 34 RESOURCES IF YOU NEED HELP 75% OF ALL CAR SEATS ARE INSTALLED INCORRECTLY! Please contact our Customer Care Department, where we have many Child Passenger Safety (CPS) Technicians Installing your car seat correctly in your vehicle is extremely on staff, with any questions you may have concerning important for your child’s safety.
- Page 35 WARRANTY IMPORTANT: Immediately register your Solution Z-fix so WARRANTY LIMITATIONS we can contact you in the unlikely event of a safety recall. This warranty does not cover the effects of normal wear and Register online in the United States at http://register.cybex- tear or damages resulting from negligence, modification, online.com/us/carseats or in Canada at http://register.cybex-...
- Page 36 BIENVENIDO A LA FAMILIA CYBEX. Gracias por comprar el asiento elevador con respaldo alto Solution Z-fix de CYBEX. Estamos orgullosos de aportar este producto de ingeniería alemana a Norteamérica. Esperamos que el asiento elevador Solution Z-fix haga que los viajes del niño sean más seguros y agradables, y que la instalación y el uso sean tan sencillos como sea posible para usted.
- Page 37 INDEX CARACTERÍSTICAS DEL ASIENTO ELEVADOR SOLUTION Z-FIX ..............36 REGISTRO E INFORMACIÓN SOBRE RETIRO DE PRODUCTOS DEL MERCADO ........... 37 DESCRIPCIÓN GENERAL DEL ASIENTO ELEVADOR ................... 38 CUÁNDO COLOCAR AL NIÑO EN EL ASIENTO ELEVADOR ................40 TAMAÑO DEL NIÑO: RANGOS DE ALTURA, PESO Y EDAD ................41 ADVERTENCIAS E INFORMACIÓN IMPORTANTE DE SEGURIDAD ..............
- Page 38 CARACTERÍSTICAS DEL ASIENTO ELEVADOR SOLUTION Z-FIX El asiento elevador Solution Z-fix aporta todas las nuevas tecnologías a la categoría de asientos elevadores con respaldo alto para mejorar la seguridad del niño en caso de una colisión con impacto lateral. PROTECCIÓN LINEAL CONTRA IMPACTOS LATERALES (LINEAR SIDE-IMPACT PROTECTION™, L.S.P.)
- Page 39 REGISTRO E INFORMACIÓN SOBRE RETIRO DE PRODUCTOS DEL MERCADO Complete la tarjeta de registro que se incluye con el sistema CERTIFICACIÓN de sujeción infantil y envíela por correo de inmediato o registre el producto en línea. En los Estados Unidos, este sistema de sujeción infantil cumple todas las normas federales de seguridad aplicables para Los sistemas de sujeción infantil se pueden retirar del mercado vehículos motorizados.
- Page 40 DESCRIPCIÓN GENERAL DEL ASIENTO ELEVADOR VISTA DELANTERA Cabecera reclinable Protección para la cabeza Respaldo Manual del usuario (detrás del acojinado del Acojinado para respaldo) el hombro Refuerzo L.S.P. Descansabrazos Sistema LATCH/SAU Guía del cinturón inferior Manual del propietario Base del asiento elevador...
- Page 41 DESCRIPCIÓN GENERAL DEL ASIENTO ELEVADOR VISTA TRASERA Altura de la cabecera Asa de ajuste Guía del cinturón para hombro Respaldo expansible VISTA INFERIOR Etiqueta de información del producto Conector LATCH/SAU (almacenado dentro de la base) Guías LATCH/SAU (sujetas a la base del asiento elevador para Asa de ajuste LATCH/SAU el envío)
- Page 42 CUÁNDO COLOCAR AL NIÑO EN EL ASIENTO ELEVADOR Los asientos elevadores elevan al niño y ayudan a colocar ¿Cómo se usa el asiento elevador? correctamente el cinturón para el regazo y el hombro del El asiento elevador requiere un procedimiento muy similar al uso vehículo.
- Page 43 TAMAÑO DEL NIÑO: RANGOS DE ALTURA, PESO Y EDAD ¡ADVERTENCIA! Pueden ocurrir LESIONES GRAVES o la MUERTE • USE SOLO con niños que tengan por lo menos 3 años de edad Y que pesen entre 18 y 50 kg (40 y 18 a 50 kg (40 a 110 lb) 110 lb) Y cuya altura esté...
- Page 44 ¡ ADVERTENCIA! Pueden ocurrir LESIONES GRAVES o la MUERTE • LA SEGURIDAD DEL NIÑO depende de que usted detrás del acojinado del respaldo para mantenerlo instale y use correctamente este asiento elevador. como referencia futura. • LEA y SIGA cuidadosamente todas las •...
- Page 45 ¡ ADVERTENCIA! Pueden ocurrir LESIONES GRAVES o la MUERTE • DEMASIADO RECLINADO EN EL RESPALDO • Use este asiento elevador SOLO ORIENTADO DEL ASIENTO DEL VEHÍCULO puede causar HACIA ADELANTE. una posición incorrecta del cinturón de seguridad. • SEGÚN LAS ESTADÍSTICAS DE ACCIDENTES, Un cinturón de seguridad mal colocado aumenta los niños están más seguros cuando están el riesgo de MUERTE o LESIONES GRAVES...
- Page 46 ¡ ADVERTENCIA! Pueden ocurrir LESIONES GRAVES o la MUERTE • NUNCA USE un clip de fijación al instalar este • NO USE nada para levantar este asiento elevador asiento elevador. del asiento del vehículo. • NUNCA deje suelto un asiento elevador en el •...
- Page 47 ¡ ADVERTENCIA! Pueden ocurrir LESIONES GRAVES o la MUERTE • NO INTENTE hacer reparaciones ni modificar o • DEJE DE USAR y recicle este asiento elevador si alterar de otro modo este asiento elevador. tiene más de ocho (8) años. La fecha de fabricación se encuentra en una etiqueta adherida en la parte •...
- Page 48 ENSAMBLADO ¡ ADVERTENCIA! Pueden ocurrir LESIONES GRAVES o la MUERTE • NUNCA USE la base del asiento elevador sin el respaldo acoplado. • NUNCA use este asiento elevador con el respaldo más allá del rango de ajuste permitido. Un CLIC audible lo alertará...
- Page 49 REQUISITOS DE UBICACIÓN EN EL ASIENTO DEL VEHÍCULO ¡ ADVERTENCIA! Pueden ocurrir LESIONES GRAVES o la MUERTE • COLOQUE este asiento elevador solo ORIENTADO HACIA ADELANTE en un asiento del vehículo aprobado por el fabricante del vehículo. Consulte el manual del propietario del vehículo para obtener información sobre los sistemas de cinturón de seguridad, las bolsas de aire y la instalación del sistema de sujeción...
- Page 50 REQUISITOS DE UBICACIÓN EN EL ASIENTO DEL VEHÍCULO ¡ADVERTENCIA! Pueden ocurrir LESIONES GRAVES o la MUERTE • La cabecera del asiento del vehículo NO DEBE INTERFERIR con el respaldo del asiento elevador. Consulte el manual del propietario del vehículo para ajustar o posiblemente retirar la cabecera del asiento del vehículo.
- Page 51 REQUISITOS DEL CINTURÓN DE SEGURIDAD DEL VEHÍCULO ¡ ADVERTENCIA! Pueden ocurrir LESIONES GRAVES o la MUERTE • USE SOLO el sistema de cinturón para el regazo y el hombro del vehículo al sujetar al niño en este asiento elevador. • NUNCA USE este asiento elevador solo con un cinturón para el regazo, o con cualquier cinturón motorizado, montado en la puerta o inflable del vehículo.
- Page 52 El asiento elevador Solution Z-fix se diseñó para acoplarse a los anclajes inferiores de este sistema. asiento elevador que no esté afianzado puede salir disparado y lesionar gravemente a los ocupantes del •...
- Page 53 CÓMO INSTALAR CON EL SISTEMA LATCH/SAU El asiento elevador Solution Z-fix está diseñado para usarse con los anclajes LATCH/SAU inferiores del vehículo, si están disponibles. Este asiento elevador también se puede usar en asientos sin anclajes LATCH/SAU inferiores (consulte la página 19).
- Page 54 CÓMO INSTALAR CON EL SISTEMA LATCH/SAU PASO 3 Coloque el asiento elevador Solution Z-fix de lado. Mientras presiona la manija de ajuste LATCH/SAU naranja ubicada en la parte inferior de la base del asiento elevador, jale los conectores LATCH/SAU hacia afuera hasta que se detengan. Luego gire 180°...
- Page 55 INSTALACIÓN SOLO CON EL CINTURÓN DE SEGURIDAD ¡ ADVERTENCIA! Pueden ocurrir LESIONES GRAVES o la MUERTE • SEGÚN LAS ESTADÍSTICAS DE ACCIDENTES, los niños están más seguros cuando están adecuadamente sujetos en un asiento trasero del vehículo. • NUNCA USE la base del asiento elevador sin el respaldo acoplado. •...
- Page 56 CÓMO AJUSTAR EL ASIENTO PARA EL NIÑO ALTO Y ANCHO El innovador ajuste de tamaño del asiento elevador Solution Z-fix ajusta automáticamente el ancho del acojinado para hombro cuando se ajusta la altura de la cabecera. Después de instalar correctamente el asiento elevador Solution...
- Page 57 CÓMO AJUSTAR EL ASIENTO PARA EL NIÑO CÓMO AJUSTAR LA CABECERA RECLINABLE El asiento elevador Solution Z-fix tiene una cabecera reclinable con tres posiciones para ayudar a evitar que la cabeza del niño se caiga hacia adelante mientras duerme. Después de ajustar el respaldo a la altura correcta para el niño (página 20), seleccione la posición que le resulte más cómoda...
- Page 58 CÓMO AFIANZAR AL NIÑO EN EL ASIENTO ELEVADOR ¡ ADVERTENCIA! Pueden ocurrir LESIONES GRAVES o la MUERTE • NUNCA USE SOLO EL CINTURÓN PARA EL REGAZO. • NUNCA PERMITA que el niño coloque el cinturón para el hombro detrás de su espalda. •...
- Page 59 CÓMO AFIANZAR AL NIÑO EN EL ASIENTO ELEVADOR ¡ ADVERTENCIA! Pueden ocurrir LESIONES GRAVES o la MUERTE • NUNCA COLOQUE ninguna parte del cinturón de seguridad del asiento sobre la parte superior de los descansabrazos. • NUNCA LO USE con el cinturón para el hombro en contacto con el cuello del niño.
- Page 60 CÓMO AFIANZAR AL NIÑO EN EL ASIENTO ELEVADOR PASO 1 Deslice el cinturón para el hombro entre el acojinado para los hombros y la cabecera, y pase el cinturón dentro de la guía del cinturón asegurándose de que descanse DENTRO del área ROJA.
- Page 61 CÓMO AFIANZAR AL NIÑO EN EL ASIENTO ELEVADOR Cuando el niño está sentado adecuadamente en el asiento elevador: • La parte del regazo del cinturón de seguridad se debe colocar ceñida en la parte baja de los muslos del niño NUNCA en el abdomen del niño.
- Page 62 CÓMO DESINSTALAR EL ASIENTO ELEVADOR PASO 1 Desabroche el cinturón del vehículo. Retire el cinturón para el hombro de la guía presionando hacia abajo el gancho rojo de la guía del cinturón. PASO 2 Mientras oprime el asa de ajuste LATCH/SAU, jale y retire el asiento elevador del asiento del vehículo.
- Page 63 CUBIERTAS DE TELA ¡ ADVERTENCIA! Pueden ocurrir LESIONES GRAVES o la MUERTE • NUNCA USE este asiento elevador sin las cubiertas de tela instaladas adecuadamente. • No dañe, retire ni deseche el acojinado de espuma de la cabecera o el acojinado lateral de este asiento elevador.
- Page 64 CUBIERTAS DE TELA c. Saque la cubierta del acojinado lateral alrededor de la base plateada del refuerzo L.S.P. y jale la cubierta del acojinado lateral hacia la parte delantera del asiento. d. Libere los dos broches en la parte inferior de la cubierta del acojinado lateral, retire la cubierta del acojinado lateral opuesta y termine de retirar la cubierta jalando hacia la parte trasera del asiento.
- Page 65 CUBIERTAS DE TELA 3. Cubierta del acojinado lateral: a. Con la cabecera en la posición más alta, jale la cubierta del acojinado lateral sobre un acojinado lateral a la vez, asegurándose de apoyar la base del acojinado de espuma mientras lo hace. Asegúrese de que la guía roja del cinturón permanezca visible por encima de la cubierta del asiento.
- Page 66 CUIDADO Y LIMPIEZA MANUAL DEL PROPIETARIO LIMPIAR SOLO LAS MANCHAS Después de leer el manual Limpie las manchas de las del propietario y seguir estas cubiertas del asiento, según sea instrucciones, guárdelo en el necesario, con un paño limpio bolsillo detrás del acojinado del usando detergente suave y agua.
- Page 67 LISTA DE VERIFICACIÓN DE SEGURIDAD ¿Leyó y comprendió este manual del propietario y todas las etiquetas que se encuentran en este asiento elevador? ¿El asiento elevador está ensamblado por completo de acuerdo con estas instrucciones, con el respaldo acoplado a la base del asiento elevador? ¿La fecha de hoy es anterior a la fecha de "No usar después de"...
- Page 68 RECURSOS SI NECESITA AYUDA ¡EL 75 % DE LOS AUTOASIENTOS SE INSTALAN INCORRECTAMENTE! Comuníquese con nuestro Departamento de Atención al Cliente, donde contamos con una gran cantidad de personal técnico Instalar el autoasiento correctamente en el vehículo es muy especializado en Seguridad de Pasajeros Infantiles (CPS), para importante para la seguridad del niño.
- Page 69 IMPORTANTE: Registre de inmediato su asiento elevador LIMITACIONES DE LA GARANTÍA Solution Z-fix para que nos podamos comunicar con usted en el Esta garantía no cubre los efectos del uso y desgaste normal o caso poco probable de que se retire el producto del mercado por daños resultantes de la negligencia, modificación, instalación...
- Page 71 Cybex Industrial Limited Suite 1222, 12/F | Leighton Centre | 77 Leighton Road | Causeway Bay | Hong Kong www.cybex-online.com Distribuido en los Estados Unidos por Columbus Trading Partners USA Inc. 1801 Commerce Drive | Piqua, OH 45356 | USA Tel: 1–877–242–5676 | correo electrónico: support.americas@goodbabyint.com | www.cybex-online.com Distribuido en Canadá...
Need help?
Do you have a question about the SOLUTION Z-FIX and is the answer not in the manual?
Questions and answers