Advertisement
Available languages
Available languages
Quick Links
Advertisement

Subscribe to Our Youtube Channel
Related Manuals for Maxwell Digital Multimeters 25302


Summary of Contents for Maxwell Digital Multimeters 25302
- Page 1 DIGITAL MULTIMETER DIGITÁLIS MULTIMÉTER MULTIMETRU DIGITAL DIGITÁLNY MULTIMETER Product code / Termékkód / Cod produs /Kód produkta: 25302 anUal asználati Utasítás anUal de Utilizare žívateľská prírUčka VC9804A+...
-
Page 3: General Description
DC voltage eneral description Range Accuracy Resolution 4 digit LCD display 200 mV 0,1 mV Display with 26 mm characters 1 mV +/- (0,5% + 3) automatic negative 20 V 10 mV Polarity polarity display 200 V 100 mV Nullification automatic 1000 V +/- (1,0% + 10) - Page 4 Resistance Capacity Range Accuracy Resolution Range Accuracy Resolution 200 Ω +/- (0,8% + 5) 0,1 Ω 20 nF 10 pF +/- (3.5% 2 kΩ 1 Ω 200 nF 100 pF + 20) 20 kΩ 10 Ω 2 μF 1 nF +/- (0,8% + 3) 200 kΩ...
- Page 5 Warning: Do not connect external voltage symbol appears on the screen. source to the connectors! • The signs near the connectors warn about not exceeding the inward voltage or current. This is Frequency to prevent damage to the inside circuits. • Set the function switch to the desired Range Accuracy Resolution...
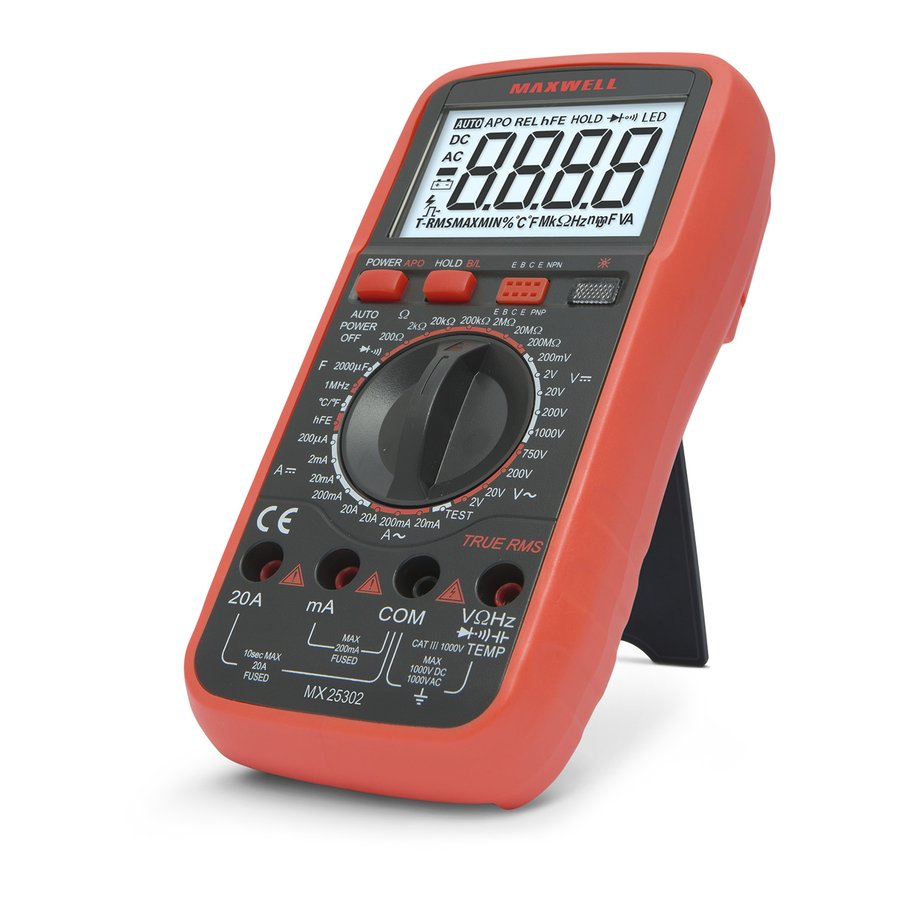
- Page 6 Model no. is a break) the display will show „1”. • If you are measuring a resistor that is part of a circuit LCD display make sure that the circuit is not under power and all Power/Auto Power off capacitors are discharged. Function switch • Do not connect inward voltage to the device as it may lead to damage to the inside circuits.
-
Page 7: Handling And Maintenance
• The amplification factor andlinG and transistor displayed screen. I = 10 μA, V = 2,8 V Maintenance Frequency measuring Handling • Connect the measuring wire or the shielded cable to • Keep the multimeter dry. If it is exposed to the „COM”... -
Page 8: Á Ltalános Leírás
á DC feszültség ltalános leírás Méréshatár Pontosság Felbontás 4 digites 200 mV 0,1 mV folyadékkristályos Kijelző kijelző, 26 mm-es 1 mV +/- (0,5% + 3) karakterekkel 20 V 10 mV automatikus negatív 200 V 100 mV Polaritás polaritás kijelzés 1000 V +/- (1,0% + 10) Nullázás automatikus... - Page 9 Ellenállás Kapacitás Méréshatár Pontosság Felbontás Méréshatár Pontosság Felbontás 200 Ω +/- (0,8% + 5) 0,1 Ω 20 nF 10 pF +/- (3.5% 2 kΩ 1 Ω 200 nF 100 pF + 20) 20 kΩ 10 Ω 2 μF 1 nF +/- (0,8% + 3) 200 kΩ...
- Page 10 Figyelmeztetés: csatlakoztasson szimbólum megjelenik a kijelzőn. kapcsokra külső feszültségforrást! • Az aljzatok melletti jelzések figyelmeztetnek, hogy a bemenő feszültség vagy áram ne haladja Frekvencia meg a jelzett értéket. Így megakadályozhatja a belső áramkörök sérülését. Range Accuracy Resolution • A funkcióválasztó kapcsolót a mérés előtt 10 Hz 0.001Hz állítsa a megfelelő...
- Page 11 Megjegyzés: • Ha a mérendő ellenállás értéke meghaladja a méréshatár maximális értékét, és a műszer túlterhelést jelez („1”), Model szám válasszon egy magasabb méréshatárt. 1MΩ fölötti LCD kijelző ellenállásoknál a műszer néhány másodperc alatt Háttérvilágítás/Auto Power Off kikapcsolás stabilizálja a kijelzett értéket. Ez teljesen normális nagy Funkció...
- Page 12 • Kerülje tárgyhoz „élő” áramkörökhöz való fekete: „-”) érintse a mérőcsúcsot a mérendő csatlakozást. Tranzisztor hFE teszt • Árammérésnél áramkört • Állítsa a funkciókapcsolót a hFE állásba feszültségmentesítse, mielőtt megszakítaná, • Határozza meg, hogy a tranzisztor NPN vagy hogy csatlakoztassa hozzá a multimétert, és ne PNP, és helyezze az alkatrészt a lábkiosztásának mérjen 20 A-nél nagyobb áramot.
- Page 13 escriere enerală Impedanţa de intrare 10MΩ Portecţie la LCD cu 4 digite, 1000 VDC Afişaj suprasarcină Caractere de 26 mm Domeniul 200 mV 250 V DC / AC RMS Afişare automată a Polaritate polarităţii negative Tensiune AC Reducere la 0 Automat Domeniu Precizia...
- Page 14 Curent DC Temperatura Domeniu Precizia Rezoluţia Domeniu Precizia Rezoluţia 200 μA 0.1 μA +/- (1.0%+5) < 400 °C -20 °C 2 mA 1 μA +/- (1,2% + 8) – 1 °C 20 mA 10 μA +1000 °C (1.5%+15) 200 mA 100 μA ≥...
- Page 15 • Notă: sensitibilitate 1 V RMS • Dacã nu cunoaşteþi valoarea de mãsurat, începeţi mãsurarea pe un Protecţie la 250 V DC / AC RMS • domeniu superior - scãzând treptat pânã la valoarea suprasarcină (max 15 secunde) corectã. • Simbolul 1 sau -1 denotã depãşirea domeniului reglat. Test tranzistori hFE În acest caz, • mutaţi selectorul pe un domeniu superior.
- Page 16 • Conectaţi cablul negru în mufa COM şi cel roşu Nr model Afişaj LCD în mufa V/Ω (notă: terminalul roşu este +) Lumina de fundal/Auto Power Off • Reglaţi selectorul de funcţii în poz.: Comutator funcţii • Atingeţi terminalele diodei. În sens direct, pe „„+”...
- Page 17 decupla automat. Schimb de baterii (I buc. de 9V) • Apăsaţi lung pe butonul Power pt. dezactivarea • Deconectaţi ciercuitele externe de aparat. funcţiei de decuplare automată. Opriţi multimetrul şi deonectaţi cablurile de Backlight măsurare din mufe. • Deşurubaţi şuruburile şi ridicaţi capacul din Press long the „B/L”...
- Page 18 DC napätie šeobecný opis Merací Presnosť Rozlíšenie 4 digitový tekutinovo rozsah krystáľový displej Displej 200 mV 0,1 mV s, 26 mm-ovými karaktermi 1 mV +/- (0,5% + 3) automatické 20 V 10 mV Polarita zobrazenie 200 V 100 mV negatívnej polarity 1000 V +/- (1,0% + 10) Vynulovanie...
- Page 19 Odpor 0,2A / 250 V poistka Merací Ochrana proti s označením „F” , Presnosť Rozlíšenie rozsah preťaženiu 20A / 250 V poistka s označením „F” 200 Ω +/- (0,8% + 5) 0,1 Ω Rozsah frekvencií: 40-200 Hz 2 kΩ 1 Ω 20 kΩ...
- Page 20 Pípovanie DÔLEŽITÉ!! signalizuje ak odpor medzi Počiatočné Dbajte na to, aby pri meraní tejto funkcie bol konektorom V/ napätie o. 3 V otočný prepínač funkcií VŹDY v pozícii TEST! Ohm a COM c je menší, ako 90 Ω Použitie Ochrana proti 250 V DC / AC RMS • Skontorolujte 9 V-ovú...
- Page 21 „20A” • Pripojte meracie šnúry paralelne pripojená do zkonektoru s označením meranému obvodu. Poznámka: Upozornenie: presvedčte sa, že meraný obvod nie je pod Ak nepoznáte veľkosť meranej veličiny, nastavte • napätím! otočný prepínač na najvyšší možný rozsah merania a Maximálne preťaženie vstupu: 250 V RMS (max. po dobu 10 ten postupne znižujte až, kým nedosiahnete želanú...
-
Page 22: Starostlivosť A Údržba
°C/°F, stlačte • Nastavte otočný prepínač funkcií do polohy pozornenie chcete merať v °F. tlačítko “HOLD/BL”, ak • Pri meraní napätie 36 V DC / 25 V AC zabezpečte, • Pripojte meraciu sondu do konektorov aby meracie káble neboli pripojené k zásuvke multimetra (dbajte na správnu polaritu, merania prúdu a otočný... - Page 23 Výmena batérie (1 ks typu 9V) Vypnite • Odpojte multimeter od meraného okruhu. multimeter a vytiahnite meracie šnúry. • Odkrúťte skrutky a odoberte spodný kryt. • Vyberte vybitú batériu a vymeňte ju za novú. Výmena poistok • Odpojte multimeter od meraného okruhu. Vypnite multimeter a vytiahnite meracie šnúry.
Need help?
Do you have a question about the 25302 and is the answer not in the manual?
Questions and answers