Advertisement
Available languages
Available languages
Quick Links
DIGITAL MULTIMETER
DIGITÁLIS MULTIMÉTER
MULTIMETRU DIGITAL
DIGITÁLNY MULTIMETER
Product code / Termékkód / Cod produs / Kód produkta:
25334
H
asználati Utasítás
M
anUal de Utilizare
U
žívateľská prírUčka
i
U
M
ser
anUal
EN
HU
RO
SK
Advertisement

Subscribe to Our Youtube Channel
Related Manuals for Maxwell Digital Multimeters 25334


Summary of Contents for Maxwell Digital Multimeters 25334
-
Page 1: Digital Multimeter
DIGITAL MULTIMETER DIGITÁLIS MULTIMÉTER MULTIMETRU DIGITAL DIGITÁLNY MULTIMETER Product code / Termékkód / Cod produs / Kód produkta: 25334 anUal asználati Utasítás anUal de Utilizare žívateľská prírUčka... - Page 2 UMMery This broad-spectrum measurement device enables you to measure DCV, ACV, DCA, ACA, resistance, diode and ideal for continuity test and cable test. Ideal for using in laboratories, factories and even at home. afety Marks This device complies to the EN61010-1 standards. Read the manual carefully before use.
- Page 3 eCHniCal data V — … Range Accuracy Resolution 200 mV ±0.8% 100 μV 1 mV 20 V ±0.5% 10 mV 200 V 100 mV 600 V ±1% Input impedance: 10 MΩ Overvoltage protection: 600 V (DC/AC RMS) Range Accuracy Resolution 1 mV 20 V 10 mV...
- Page 4 Range Accuracy Resolution 200 μA 0,1 μA 2000 μA 1 μA ±1% 20 mA 10 μA 200 mA 100 μA Max. inward current 500 mA Fuse 0,5 A/250 V Frequency range 40 Hz - 400 Hz esistanCe Range Accuracy Resolution 200Ω...
-
Page 5: Diode And Continuity Test
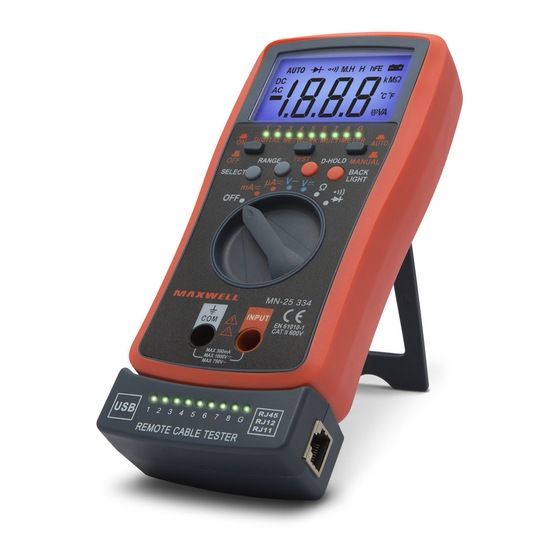
Diode and continuity test Function Description Test state The opening DC amperage Measures the opening is approx. 1mA, the closing voltage of the diode voltage is approx. 2,7 V Beeping sound if the Opened voltage is resistance is lower approx. 2,7 V than (30±20)Ω... - Page 6 peratiOn RJ45, RJ11, RJ12, USB test connector Display „Cable test” on/off button Function switching button Measuring limit switching button Function switching switch ”COM” (negative) socket USB test socket (removable) Test socket RJ45, RJ11, RJ12 (removable) Cable testing LED line (control) ”+”...
- Page 7 V — … measuring • Connect the black measurning wire to the „COM” socket and the red one to the „+” socket. • Set the function switch to the proper „V — … setting and connect the wires to the circuit. Note: •...
- Page 8 the opening voltage appears on the display. • To test the continuity, push the button “4”, the following character appears on the display: „ ”. The device beeps if the continuity of the wire is all right or the resistance is not higher than 30 Ω. Background lighting •...
- Page 9 Battery replacement (1 piece 9V battery) If the LCD display shows „ ” the battery needs to be replaced the following way: • Take the device out of the plastic holder and take off the battery holder cover. • Take out the battery and replace it to a new one. Use alkaline batteries if possible.
- Page 10 Ö sszegzés A műszer széleskörű használata lehetővé teszi DCV, ACV, DCA, ACA, ellenállás, dióda mérését, valamint folytonossági- és kábelteszt végzésére is alkalmas. Használata ideális laboratóriumokban, gyárakban és otthon is. iztOnsági Megjegyzés A mérőműszer az EN61010-1 szabványoknak megfelel. Használat előtt figyelmesen olvassa el a használati utasítást.
-
Page 11: Műszaki Adatok
űszaki adatOk V — … Méréshatár Pontosság Felbontás 200 mV ±0.8% 100 μV 1 mV 20 V ±0.5% 10 mV 200 V 100 mV 600 V ±1% Bemeneti impedancia: 10 MΩ Túlfeszültség védelem: 600 V (DC/AC RMS) Méréshatár Pontosság Felbontás 1 mV 20 V 10 mV... - Page 12 Méréshatár Pontosság Felbontás 200 μA 0,1 μA 2000 μA 1 μA ±1% 20 mA 10 μA 200 mA 100 μA Max. bemeneti áramerősség 500 mA Bizosíték 0,5A/250V Frekvencia sáv 40 Hz - 400 Hz Ellenállás Méréshatár Pontosság Felbontás 200 Ω 0.1 Ω...
- Page 13 Dióda és folytonossági teszt Funkció Leírás Teszt állapot A nyitó irányú DC A dióda nyitó áramerősség feszültségét méri kb. 1 mA, a záró irányú feszültség kb. 2,7 V Sípoló hang hal- latszik, ha az Nyitott feszültség ellenállás kevesebb, kb. 2,7 V mint (30±20)Ω...
- Page 14 űkÖdés RJ45, RJ11, RJ12, USB teszt csatlakozó Kijelző Vezetékteszt be-, kikapcsolás gomb Üzemmód váltó gomb Méréshatár váltó gomb Funkcióváltó kapcsoló ”COM” (negatív) aljzat USB teszt aljzat (levehető) Teszt aljzat RJ45, RJ11, RJ12 (levehető) Kábel tesztelő LED sor (kontrol) ”+” aljzat (V-Ω-mA-µA) ”D-Hold”...
- Page 15 V — … mérése • Helyezze be a fekete műszerzsinórt a „COM” aljzatba, a pirosat pedig a „+” aljzatba. • Állítsa be a funkciókapcsolót a „V — … fokozatba, csatlakoztassa a műszerzsinórokat az áramkörhöz. Megjegyzés: • Ha az LCD „1”-et mutat, akkor a mérendő érték túl van a méréshtáron V~ mérése •...
- Page 16 Dióda és folytonossági teszt • Helyezze a fekete műszerzsinórt a „COM” aljzatba, a pirosat pedig a „+” aljzatba. • Állítsa a funkciókapcsolót „ ” fokozatba. • Dióda mérésére a „4”-es gomb megnyomásával válthat át, a kijelzőn a „ ” karakter jelenik meg. Nyitóirányú csatlakoztatásnál működő diódánál a nyitófeszültség értéke jelenik meg a kijelzőn.
- Page 17 arBantartás • Vegye figyelembe, hogy a műszer nem víz-, por- és ütésálló. • Ne használja és ne tárolja a műszert magas hőmérsékleten, nagy páratartalmú és lobbanékony helyen vagy erős mágneses területen. • Ne használjon érdes ruhát és alkoholt a műszer tisztításához. •...
- Page 18 UMar Universalitatea Aparatului face posibilă măsurări în domeniile DCV, ACV, DCA, ACA, precum măsurarea rezistenţei, şi testarea diodelor, respectiv măsurarea continuităţii şi testarea cablajelor. Este ideal pt. utilizarea casnică dar şi în laboratoare sau în industrie. Ote de sigUranţă Aparatul este conform standardelor EN6 1010-1. Înainte de prima utilizare citiţi cu atenţie instrucţiunile de folosire.
- Page 19 eHniCe V — … Domeniu de Precizie Rezoluţie măsurare 200 mV ±0.8% 100 μV 1 mV 20 V ±0.5% 10 mV 200 V 100 mV 600 V ±1% Impedanţa de intrare: 10 MΩ Protecţie la supratensiune: 600 V (DC/AC RMS) Domeniu de Precizie Rezoluţie...
- Page 20 Domeniu de Precizie Rezoluţie măsurare 200 μA 0,1 μA 2000 μA 1 μA ±1% 20 mA 10 μA 200 mA 100 μA Curent maxim la intrare 500 mA Siguranţă 0,5A/250V Domeniu de frecvenţă 40 Hz - 400 Hz Rezistenţă Domeniu de Precizie Rezoluţie măsurare...
- Page 21 Test diodă şi continuitate Funcţia Descriere Stare test Măsoară Curentul de tensiunea de deschidere aplicat deschidere a cca. 1 mA, Tensiunea diodei inversă cca. 2,7V Sunet de aver- tizare în cazul în Tensiunea la borne care rezistenţa cca. 2,7V este mai mică de 30±20 Ω...
- Page 22 UnCţiOnare 1. Conectoare test RJ45, RJ11, RJ12, USB 2. Afişaj 3. Buton „Test” 4. Selector Mod 5. Selector domeniu de măsurare 6. Selector funcţii 7. Mufă COM (comună) 8. Mufă USB (amovibilă) 9. Mufă test RJ45, RJ11, RJ12, USB (amovibilă) 10.
- Page 23 Măsurarea tensiunii V — … • Conectaţi cablul negru în mufa „COM" şi cel roşu în mufa „+” • Mutaţi selectorul de funcţii în poziţia corespunzătoare „V — … " şi executaţi măsurarea NOTĂ: • Dacă nu cunoaşteţi valoarea de măsurat, începeţi măsurarea pe un domeniu superior - scăzând treptat până...
- Page 24 • Pt testarea diodelor, selectaţi funcţia prin butonul "4". - pe afişaj va apare simbolul " ”. • Atingeţi terminalele diodei. În sens direct, şi se va indica tensiunea de deschidere a diodei. • Pt. verificarea continuităţii selectaţi funcţia tot prin butonul "4", pe afişaj fiind indicat simbolul .
- Page 25 Î ntreţinere • Aparatul NU este protejat la praf, apă sau şocuri. • Nu folosiţi şi nu depozitaţi aparatul la temperaturi ridicate, în medii umede, în mediu inflamabil sau exploziv, respectiv în câmp magnetic puternic. • Nu folosiţi materiale abrazive sau solvenţi pt. curăţare. •...
- Page 26 Ú Tento merací prístroj umožňuje meranie nasledujúcich elektrických veličín DC V, AC V, DC A, AC A, odpor, meranie diód a tak isto prevádzať kontrolu kontinuity (pretrhnutia) a test káblov na skrat. Je vhodný pre laborátóriá, výrobné závody, montérov alebo na hobby účely. ezpečnOstné...
- Page 27 eCHniCké Údaje V — … Merací rozsah Presnosť Rozlíšenie 200 mV ±0.8% 100 μV 1 mV 20 V ±0,5% 10 mV 200 V 100 mV 600 V ±1% Vstupný odpor: 10 MΩ Ochrana proti preťaženiu: 600 V (DC/AC RMS) Merací rozsah Presnosť...
- Page 28 Merací rozsah Presnosť Rozlíšenie 200 μA 0,1 μA 2000 μA 1 μA ±1% 20 mA 10 μA 200 mA 100 μA Max. vstupný prúd 500 mA Poistka 0,5A/250V Frekvenčné pásmo 40 Hz - 400 Hz Odpor Merací rozsah Presnosť Rozlíšenie 200 Ω...
- Page 29 Test diód a kontinuity Funkcia Popis Stav merania Otvárací DC prúd je Meria otváracie približne 1mA, a zatvára- napätie diódy cie napätie približne 2,7 V Piskľavý zvuk budete počuť, ak Otváracie je odpor menší ako napätie približne 2,7 V (30±20)Ω Ochrana proti preťaženiu: 250 V (DC/AC RMS) Tabuľka funkcií...
- Page 30 revádzka RJ45, RJ11, RJ12, USB testovací konektor Displej Tlačítko pre spustenie/ukončenie testu káblov Prepínač režimov merania Prepínač meracích rozsahov Prepínač funkcií „COM” (negatívna) zásuvka USB testovací port (odoberateľný) Testovací konektor RJ45, RJ11, RJ12 (odoberateľný) Rad LED pre testovanie káblov (kontrola) ”+”...
- Page 31 V — … meranie • Umiestnite čiernu meraciu šnúru do „COM” zásuvky, červenú do „+” zásuvky. • Nastavte prepínač funkcií do zodpovedajúcej „V — … " polohy, potom pripojte meracie šnúry k meranému obvodu. Poznámka: • Ak na displeji svieti „1”, znamená to prekročenie meracieho rozsahu. V~ meranie •...
- Page 32 • Pre testovanie kontinuity stlačte tlačítko „4” do polohy, keď sa na displeji zobrazí znak „ ”. Merací prístroj bude vydávať pískľavý zvuk ak je dióda v otvorenom stave a jej odpor nie je väčší ako 30 Ω. Podsvietenie • Podržte stlačené dlhšie tlačítko “BACK LIGHT” pre zapnutie alebo vypnutie podsvietenia.
- Page 33 Výmena batérie (1 ks 9V) Ak sa na displeji zobrazí nasledujúci symbol „ ” potom vymeňte batériu: • Vyberte prístroj z plastového púzdra a odmontujte kryt batérie. • Vyberte batériu a vymeňte ju za novú. Používajte batérie s dlhou životnosťou. •...
Need help?
Do you have a question about the 25334 and is the answer not in the manual?
Questions and answers