Advertisement
Quick Links
INSTALLATION
INSTRUCTIONS
PARTS LIST
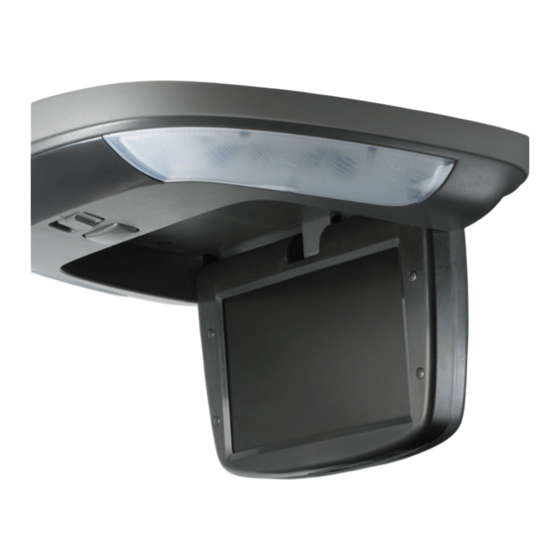
DVD Monitor Kit
P/N 08B23-S0X-100
Monitor bracket
Butterfly bracket
Template
Locknut
2 Washer-screws, 5 x 12 mm
Cushion tape
DVD Cup-to-DIN Kit
P/N 08B23-S0X-100A
Bezel
DVD player bracket
© 2003 American Honda Motor Co., Inc - All Rights Reserved.
Accessory
IN-VEHICLE
ENTERTAINMENT SYSTEM
( DVD BASED )
AII 26017 (0308)
Application
2004 ODYSSEY
Washer-screw, 5 x 12 mm
2 Flange nuts, 5 mm
i -VES DVD Base Unit Kit
P/N 08A23-9E1-010
DVD player
Monitor console
i -VES harness
FM modulator
Publications No.
AII 26017
Issue Date
AUG 2003
1 of 15
08B23-S0X-1000-91
Advertisement

Related Manuals for Honda 08B23-S0X-100


Summary of Contents for Honda 08B23-S0X-100
- Page 1 -VES harness 2 Washer-screws, 5 x 12 mm Cushion tape DVD Cup-to-DIN Kit FM modulator P/N 08B23-S0X-100A Bezel DVD player bracket 1 of 15 © 2003 American Honda Motor Co., Inc - All Rights Reserved. AII 26017 (0308) 08B23-S0X-1000-91...
-
Page 2: Tools And Supplies Required
Utility knife Masking tape Electrical tape Shop towel Scissors MODULATOR i -VES Isopropyl alcohol HARNESS Piece of wire 3 feet long Felt-tip pen 2 of 15 AII 26017 (0308) © 2003 American Honda Motor Co., Inc - All Rights Reserved. -
Page 3: Installation
Remove the template. Using a utility knife, cut out the marked areas of the headliner. Remove and discard the cut pieces of the headliner and the insulation. CONSOLE PANEL 3 of 15 © 2003 American Honda Motor Co., Inc - All Rights Reserved. AII 26017 (0308) - Page 4 10. Open the center lower pocket, and remove the six self-tapping screws. Disconnect the vehicle connector (if equipped), and remove the center lower pocket. 4 of 15 AII 26017 (0308) © 2003 American Honda Motor Co., Inc - All Rights Reserved.
- Page 5 CONSOLE SELF-TAPPING SCREW SELF- TAPPING SCREW BOLT BOLT SELF- CENTER LOWER TAPPING CONSOLE SCREW PASSENGER’S FRONT DOOR CLIPS (3) SIDE SILL TRIM 5 of 15 © 2003 American Honda Motor Co., Inc - All Rights Reserved. AII 26017 (0308)
- Page 6 LOWER ANCHOR BOLT (Note the sequence of washers. Tape the washers together to prevent them from being disrupted.) PASSENGER’S SLIDING CLIPS DOOR SILL TRIM 6 of 15 AII 26017 (0308) © 2003 American Honda Motor Co., Inc - All Rights Reserved.
- Page 7 Take care not to damage the clip or the TRIM retaining tab. CLIP FRONT DOOR OPENING TRIM CLIPS (4) CENTER PILLAR UPPER TRIM RETAINING TAB 7 of 15 © 2003 American Honda Motor Co., Inc - All Rights Reserved. AII 26017 (0308)
- Page 8 WASHER VEHICLE CONNECTOR TORX BOLT GRAB RAIL ROOF CEILING VENT SCREW SCREW (Black) SCREW (Gold) VENT KNOB (Move it to the clsoed position.) 8 of 15 AII 26017 (0308) © 2003 American Honda Motor Co., Inc - All Rights Reserved.
- Page 9 • Route the i -VES Harness 8-pin connector from the audio unit opening to the SRS unit. 9 of 15 © 2003 American Honda Motor Co., Inc - All Rights Reserved. AII 26017 (0308)
- Page 10 Secure the i -VES harness to the center pillar with the two pieces of cushion tape in the areas shown. 10 of 15 AII 26017 (0308) © 2003 American Honda Motor Co., Inc - All Rights Reserved.
- Page 11 -VES HARNESS HARNESS 39. In the glove box opening, secure the i -VES harness to the vehicle panel with two wire ties. 11 of 15 © 2003 American Honda Motor Co., Inc - All Rights Reserved. AII 26017 (0308)
- Page 12 47. Attach the DVD player bracket to the DVD player, and install the DVD player bracket with bezel to the player using the five 5 x 12 mm washer- MODULATOR screws. 12 of 15 AII 26017 (0308) © 2003 American Honda Motor Co., Inc - All Rights Reserved.
- Page 13 -VES HARNESS 20-PIN CONNECTOR VEHICLE CONNECTOR SELF-TAPPING SCREW 5 mm FLANGE SELF- SCREW SCREW TAPPING SCREW MODULATOR ANTENNA LEAD NAVIGATION UNIT BOLT 13 of 15 © 2003 American Honda Motor Co., Inc - All Rights Reserved. AII 26017 (0308)
- Page 14 -VESbase RIGHT AUDIO unit kit.) BRACKET AUDIO 5 x 12 mm WASHER- UNIT SCREW PLAYER (Included in the i -VES base unit kit.) 14 of 15 AII 26017 (0308) © 2003 American Honda Motor Co., Inc - All Rights Reserved.
- Page 15 64. Pull up on the driver’s window switch to close the window completely, then hold the switch for 2 seconds or more. 65. Test the AUTO window function. 15 of 15 © 2003 American Honda Motor Co., Inc - All Rights Reserved. AII 26017 (0308)
Need help?
Do you have a question about the 08B23-S0X-100 and is the answer not in the manual?
Questions and answers