Advertisement
Quick Links
www.collegehillshonda.com
INSTALLATION
INSTRUCTIONS
PARTS LIST
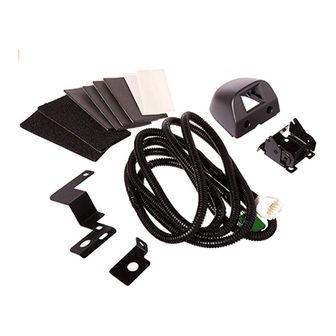
Attachment Kit
P/N: 08B21-SJC-102
Rear camera trim
Rear camera bracket
Rear camera subbracket
Harness clamp bracket A
Harness clamp bracket B
Rear camera subharness
© 2007 American Honda Motor Co., Inc. - All Rights Reserved.
Accessory
REAR CAMERA
ATTACHMENT
(EX-L WITH NAVI)
Template
19 Wire ties
10 Small wire ties
6 Wire ties with clip
6-Pin connector
Grommet
2 Clear adhesive tapes
3 Blind nuts
AII 36587 (0705)
Application
2006-2008 RIDGELINE
Publications No.
AII 36587
Issue Date
MAY 2007
1 of 17
08B21-SJC-1010-91
Advertisement

Related Manuals for Honda 08B21-SJC-102


Summary of Contents for Honda 08B21-SJC-102
-
Page 1: Installation Instructions
INSTALLATION INSTRUCTIONS PARTS LIST Attachment Kit P/N: 08B21-SJC-102 Rear camera trim Rear camera bracket Rear camera subbracket Harness clamp bracket A Harness clamp bracket B Rear camera subharness © 2007 American Honda Motor Co., Inc. - All Rights Reserved. Accessory... - Page 2 2 EPT sealers 4 Cushion tapes 2 Socket bolts, 4 x 10 mm 3 Washer screws, 4 x 12 mm 2 Washer screws, 4 x 6 mm 7 Clips Round grommet 6 Oval grommets Accessory user’s information manual Rear Camera Kit (sold separately) P/N: 08A57-SJC-100 Rear camera 2 of 17...
- Page 3 Remove the fuel fill door release handle. Remove the left front door sill trim (three clips and three retaining tabs). RETAINING TABS FUEL FILL DOOR RELEASE HANDLE 3 CLIPS FRONT Remove the left rear door sill trim (three clips and four retaining tabs).
- Page 4 Lift up the rear seats, and remove the rear seat under covers; • Remove the right rear seat under cover (four clips). • Remove the left rear seat under cover (five clips). LEFT REAR SEAT CUSHION RIGHT REAR SEAT UNDER COVER LEFT REAR SEAT UNDER...
- Page 5 11. Remove the rear trim panel cover (eight clips and two retaining tabs). 2 RETAINING TABS REAR TRIM PANEL COVER CLIPS 12. Remove the left rear seat belt upper anchor bolt cover (four retaining tabs), and remove the left rear seat belt upper anchor bolt. •...
- Page 6 17. Remove the rear bumper: • Remove the license plate (two bolts). • Remove two bolts, six self-tapping screws and six clips from the rear bumper. • Pull the rear bumper toward you. Unplug the two vehicle connectors, and remove the rear bumper.
- Page 7 19. Remove and discard the grommets from the roof panel, and install the six oval grommets and one round grommet into the roof panel. ROUND GROMMET GROMMET (Discard.) 6 GROMMETS (Discard.) 20. On the rear roof trim backside, remove and discard the clips from the rear roof trim, and install the seven clips to the rear roof trim.
- Page 8 23. Remove the front bed panel (six TORX bolts). 6 T40 TORX BOLTS 24. Remove the left bed rail trim: • Remove the screw cover (four retaining tabs). • Remove the self-tapping screw. • Pull the left bed rail trim back to release the six clips, and remove the left bed rail trim.
- Page 9 28. Remove the tailgate trim: • Remove the four screws and release the one end clip on each side. • Sharply push the tailgate to the right to release the 16 clips from the trim. • Remove the 16 clips from the tailgate and reinstall the 16 clips to the tailgate trim in the direction shown.
- Page 10 32. Drill three 8 mm holes and one 10 mm hole in the tailgate. • Wrap tape around a 3 mm drill bit, and 8 mm drill bit and a 10 mm drill bit 10 to 15 mm from the end or use a drill stop. •...
- Page 11 36. Route the rear camera harness through the 10 mm hole in the tailgate, and seat the grommet into the 10 mm hole. REAR CAMERA HARNESS GROMMET GROMMET VEHICLE PANEL 37. Install the rear camera bracket to the three blind nuts with three 4 x 12 mm washer-screws.
- Page 12 39. Install clear adhesive tapes to the tailgate: • Open the tailgate. • Get the clear adhesive tapes. Using scissors, cut 30 mm from the end of each adhesive tape. • Using isopropyl alcohol on a shop towel, clean the tailgate where the adhesive tapes will attach.
- Page 13 42. Secure the rear camera harness to the harness clamp bracket B with three small wire ties. Attach the wire tie over the tape attached to the harness. T50 TORX BOLT HARNESS (Torque to 29 to32 N·m) CLAMP BRACKET B SMALL WIRE TIE 100 mm...
- Page 14 48. Secure the rear camera harness to the tailgate with five wire ties with clip. TAILGATE TAILGATE REAR CUSHION TAPE REAR CAMERA (Cut in half.) HARNESS 49. Using isopropyl alcohol on a shop towel, clean the tailgate where the cushion tape will attach. Using scissors, cut one cushion tape in half.
- Page 15 53. Remove the vehicle grommet from the left C-pillar. LEFT C-PILLAR VEHICLE GROMMET OPENING VEHICLE GROMMET REAR CAMERA HARNESS 54. Insert the rear camera harness through the grommet, and route the rear camera harness through the vehicle grommet opening. Seat the grommet into the grommet hole.
- Page 16 60. Continue routing the rear camera subharness forward along the vehicle harness, and secure the subharness to the vehicle harness with four small wire ties. VEHICLE HARNESS REAR CAMERA SUBHARNESS FRONT SMALL WIRE TIES 61. Route the rear camera subharness along the vehicle harness and under the floor carpet, then pull the rear camera subharness out from under the floor carpet opening under the driver’s seat.
- Page 17 64. Reconnect the negative cable to the battery. Turn the key to the ON (II) position, and enter the Navi code. REAR CAMERA Adjust the angle. REAR CAMERA TRIM 4 x 10 mm SOCKET BOLTS 65. Move the shift knob to the “R” position. 66.
Need help?
Do you have a question about the 08B21-SJC-102 and is the answer not in the manual?
Questions and answers