Table of Contents
Advertisement
Quick Links
Advertisement
Table of Contents

Related Manuals for Kontron CP3923 Series


Summary of Contents for Kontron CP3923 Series
- Page 1 User Guide CP3923 Document Revision 1.2 Date: February 2016 www.kontron.com...
-
Page 2: Revision History
Disclaimer Copyright © 2016 Kontron AG. All rights reserved. All data is for information purposes only and not guaranteed for legal purposes. Infor- mation has been carefully checked and is believed to be accurate; however, no responsibility is assumed for inaccuracies. Kontron and the Kontron logo and all other trademarks or registered trademarks are the property of their respective owners and are recognized. -
Page 3: Table Of Contents
1.3.5 Humidity ....................15 1.3.6 Altitude...................... 15 1.3.7 Vibration ....................15 1.3.8 Bump......................15 1.3.9 Shock......................16 1.3.10 Safety ......................16 1.3.11 Electromagnetic Compatibility ................ 16 1.3.12 Reliability ....................16 1.3.13 RoHS ......................16 1.3.14 Lead-free....................16 Software Support ....................17 www.kontron.com... - Page 4 4.1.4 QoS ......................42 4.1.5 Multicast ....................43 Supported MIBs ....................43 4.2.1 Enterprise MIB..................... 43 4.2.2 Switching Package MIBs................. 43 4.2.3 Routing Package MIBs ................... 44 4.2.4 QoS Package MIBs ..................44 4.2.5 Multicast package MIBs ................. 44 www.kontron.com...
- Page 5 CP3923 User Guide 4.2.6 SNMP MIBs....................45 4.2.7 Kontron Private MIBs ..................45 Bootloader ...................... 47 4.3.1 Power On Self Test ..................47 4.3.2 Bootloader Shell options ................48 IPMI Firmware ....................50 4.4.1 Supported IPMI Commands................51 4.4.2 Board Sensors ..................... 60 4.4.3 Board FRU Information..................
- Page 6 POST routines and error codes ................47 Table 4-3: Bootloader Shell Options ................. 48 Table 4-4: Standard Commands ..................51 Table 4-5: Kontron OEM Commands.................. 54 Table 4-6: Sensor List....................61 Table 4-7: Temperature Sensor Thresholds [°C] ..............62 Table 4-8: Voltage/Current Sensor Thresholds..............
- Page 7 Figure 3-2: Front Panel of the CP3923-4M................34 Figure 3-3: Front Panel of the CP3923-8M................34 Figure 3-4: Front Panel of the CP3923-8C ................34 Figure 3-5: Front Panel of the CP-RIO3-923-8C ................. 37 Figure 5-1: Temperature Sensors Location ................67 www.kontron.com...
-
Page 8: Proprietary Note
This document contains information proprietary to Kontron. It may not be copied or transmitted by any means, disclosed to others, or stored in any retrieval system or media without the prior written consent of Kontron AG or one of its authorized agents. -
Page 9: Safety Instructions
It was also designed for a long fault-free life. However, the life expectancy of your product can be drastically reduced by improper treatment during unpacking and installation. Therefore, in the interest of your own safety and of the correct operation of your new Kontron product, you are requested to conform with the following guidelines. -
Page 10: General Instructions On Usage
General Instructions on Usage In order to maintain Kontron’s product warranty, this product must not be altered or modified in any way. Changes or modifications to the device, which are not explicitly approved by Kontron AG and described in this manual or received from Kontron’s Technical Support as a special handling instruction, will void your warranty. -
Page 11: Two Year Warranty
TWO YEAR LIMITED HARDWARE WARRANTY ing. However, no other warranties that may be granted or implied by anyone on behalf of Kontron are valid unless the con- sumer has the express written consent of Kontron. -
Page 12: Introduction
• 64 MBytes NOR Flash • 1 GByte NAND Flash • PCIe Management interface to BCM5622x • 10/100/1000Base-T Management Port to backplane via external Copper PHY BCM54610 • 1000Base-BX CPU-Switch Interlink via external PHY, BCM54616S • RTC Clock support www.kontron.com... -
Page 13: General Compliances
• IEC 61067-2-101 Industrial Ethernet (M4, M8 versions only) 1.1.3 Hot Swap Capability The board supports Full Hot Swap capability as required by PICMG 2.1 R2.0. It can be removed or inserted in a powered slot. Please refer to the PICMG 2.1 R2.0 specification for additional details. www.kontron.com... -
Page 14: Optional Accessories
Operation in a 64-bit CompactPCI slot or in a system master slot causes short circuit between 3.3V or 5V VIO supply rail and ground and can damage the board. 1.3.3 Power Supply voltages are: • 5.0 Volt • 3.3 Volt • 5.0 Volt IPMB_PWR www.kontron.com... -
Page 15: Temperature
1.3.8 Bump The board is designed to meet the following requirements: • Standard • DIN/IEC 60068-2-29 • VITA 47 (RC version) • Peak Acceleration: 15 g, Shock Duration: 11 ms half sine, Shock Counts: 500/direction, Recovery Time: 1 s www.kontron.com... -
Page 16: Shock
MTBF is >230,000h @ 40° C, calculations based on Bellcore/Telcordia SR-332 Issue 1. 1.3.13 RoHS Compliant to Directive 2002/95/EC: Restriction of the use of certain hazardous substances in electrical and electronic equipment. 1.3.14 Lead-free The product has to be completely lead-free concerning the production process and the components used. www.kontron.com... -
Page 17: Software Support
• IGMP snooping • CoS (Class of Service ) • DifffServ (Differentiated Services) • ACL (Access Control List) • DVMRP • PIM-DM IP Multicast • PIM-SM • IGMP (Internet Group Message Protocol) v2 and v3 • IGMP Proxy www.kontron.com... - Page 18 • For a list of supported MIBs, see chapter “Supported MIBs” on page 43 • u-boot Version 1.3.4 • POST • Multi image support Bootloader • Reliable field upgradable • H/W protected • KCS interface to PM • Serial console support Operating System • Wind River PNE 2.0 www.kontron.com...
-
Page 19: Installation
Safety Requirements The following safety precautions must be observed when installing or operating the CP3923. Kontron assumes no responsi- bility for any damage resulting from failure to comply with these requirements. WARNING Due care should be exercised when handling the board due to the fact that the heat sink can get very hot. -
Page 20: Cp3923 Initial Installation Procedures
• Fasten the front panel retaining screws. • Only non-conduction-cooled versions: Connect all external interfacing cables to the board as required. • Ensure that the board and all required interfacing cables are properly secured. 4. The CP3923 is now ready for operation. www.kontron.com... -
Page 21: Standard Removal Procedures
The CP3923 comes as a pre-installed system with all necessary OS, filesystem, drivers and applications factory-installed with default configurations. Updating the Software with new operating system or applications or new versions is provided by a dedicated update mech- anism, which is described in Chapter 4. www.kontron.com... -
Page 22: Quick Start
The procedure for assigning an IP address to the serviceport is described in the following. User input is printed in bold let- ters. 12. Connect to serial port on the front plate (using the Kontron DB9 adapter cable) or RIO module (using a RJ45 straight cable). -
Page 23: In-Band Cli Access
The procedure for assigning an IP address to the network port is described in the following. User input is printed in bold letters. 17. Connect to serial port on the front plate (using the Kontron DB9 adapter cable) or RIO module (using a RJ45 straight cable). - Page 24 To access the CLI via the Gigabit Ethernet in-band networkport, open a telnet connection to the configured IP address, port It might make sense to separate the management network from the data path by setting appropriate VLANs CP3923 CLI Reference Manual For additional information on the system configuration, refer to the www.kontron.com...
-
Page 25: Functional Description
Link NAND State FLASH LEDs 64MB 512 MB DDR2 FLASH + ECC PPC405 Ex IPMI 600 MHz IPMI 0 2136 CPLD HIROSE RS232 Hardware Monitor BLUE LED Stati LED I 2C0 Reset Power Hot Swap JTAG EEPROM Handle Switch www.kontron.com... -
Page 26: Ethernet Infrastructure
The Unit Computer controls the Ethernet infrastructure and hosts the management application. It is a PowerPC 405EX with following features: • 600MHz core frequency • PCIe management connection to Ethernet Switch • GbE connections to front management port and Ethernet Switch www.kontron.com... -
Page 27: Ipmi
Internal watchdog monitoring PM operation • The external watchdog is implemented in glue logic. The PM will be reset if its alive signal fails. The watchdog is dis- abled in case of a local update. • CompactPCI IPMB-O interface www.kontron.com... -
Page 28: Voltage And Current Sensors
(EWP). It is located on connector J2, pin A19. If left open, the signal is inactive. If pulled to GND, the signal is active. The following table shows how to configure the write protection. Default setting is 'standard'. Table 3-3: Write protection level set by EWP EWP Signal Write Protection Level inactive (3.3V or open) standard active (GND) enhanced www.kontron.com... -
Page 29: Board Interfaces
Uplink Ethernet Ports (CP3923-8M and CP3923-4M) The eight/four Ethernet Ports support 100Base-TX operation and are implemented as an Industrial M12 D-coded female connector on the front panel. This interface is connected as an uplink port to the on-board Ethernet switch. www.kontron.com... -
Page 30: Serial Port (Not On Cp3923-Rc)
An RS232 interface of the Unit Computer is the serial port which is routed to a miniature connector on the front plate. An adapter cable is available from Kontron to establish a connection with a terminal with a standard DB9 serial port. -
Page 31: Front Panel Switches (Not On Cp3923-Rc)
For accessing the GbE interfaces signals without a rear I/O module, a backplane is required which routes the Ethernet sig- nals directly to the CPU slots without the need of external cabling. Please contact Kontron if you're looking for such a solu- tion. -
Page 32: Table 3-10: Connector J1 Pinout
Row D Row E Row F V_5V_CPCI V_3V3_CPCI V_5V_CPCI V_5V_CPCI V_IO_CPCI V_3V3_CPCI V_5V_CPCI V_3V3_CPCI V_3V3_CPCI V_IO_CPCI V_3V3_CPCI V_3V3_CPCI V_3V3_CPCI IPMB0_SCL IPMB0_SDA V_IO_CPCI V_3V3_CPCI CPCI_BD_SEL# Key Area V_3V3_CPCI V_IO_CPCI V_3V3_CPCI CPCI_PCI_RST# V_5V_IPMB_PWR CPCI_HEALTHY# V_IO_CPCI V_5V_CPCI V_5V_CPCI V_5V_CPCI NC/V_-12V_CPCI NC/V_+12V_CPCI V_5V_CPCI www.kontron.com... -
Page 33: Table 3-11: Connector J2 Pinout
FL_DA1- FL_DC1+ FL_DC1- FL_DB1+ FL_DB1- FL_DD1+ FL_DD1- Note... RTM_TXD# (driven by CP3923) and RTM_RXD# (driven by RIO module) are the two- pin RS232 rear I/O interface. Note... Signal EWP only triggers the enhanced write protection feature, see chapter 3.4 www.kontron.com... -
Page 34: Front Panel Drawings
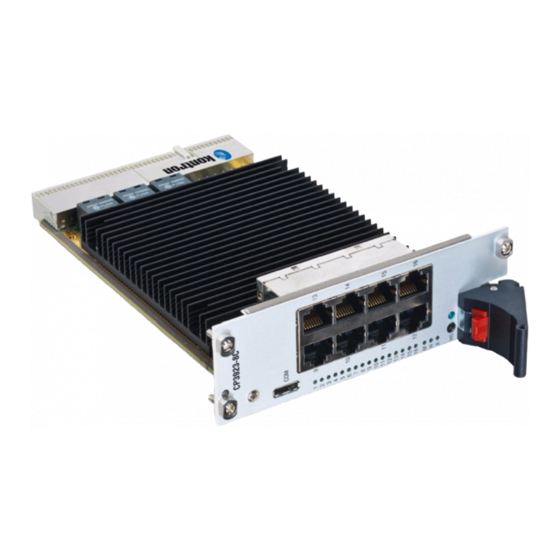
CP3923 User Guide 3.5.7 Front Panel Drawings Figure 3-2: Front Panel of the CP3923-4M Figure 3-3: Front Panel of the CP3923-8M Figure 3-4: Front Panel of the CP3923-8C www.kontron.com... -
Page 35: Rear Io Module
The Unit Computer’s Ethernet Interface is routed to the CP-RIO3-923-8C as a management access port. The standard RJ45 connector has the following pin assignment. Table 3-13: Ethernet Management RJ45 Connector Pin Assignment Signal Signal 10/100Base-T 1000Base-T BI-DA+ BI-DA- BI-DB+ BI-DC+ BI-DC- BI-DB- BI-DD+ BI-DD- www.kontron.com... -
Page 36: 10/100/1000Base-T Ports
10/100/1000 Mbps Backplane Link 8 10/100/1000 Mbps The table on the following page shows the pin assignment of one 10/100/1000BASE-T RJ45 connector. Table 3-15: MDI-X RJ45 Pin Assignment Signal Signal 10/100Base-T 1000Base-T BI_DB+ BI_DB- BI_DA+ BI_DD+ BI_DD- BI_DA- BI_DC+ BI_DC- www.kontron.com... -
Page 37: Front Panel Elements
CP3923 User Guide 3.6.4 Front Panel Elements Figure 3-5: Front Panel of the CP-RIO3-923-8C www.kontron.com... -
Page 38: Software Description
RFC 2579 - Textual Conventions for SMI v2 • RFC 2580 - Conformance statements for SMI v2 • RFC 3410 - Introduction and Applicability Statements for Internet Standard Management Framework • RFC 3411 - An Architecture for Describing SNMP Management Frameworks www.kontron.com... -
Page 39: Switching
IEEE 802.1p—Ethernet priority with user provisioning and mapping • IEEE 802.1Q—Virtual LANs w/ port-based VLANs • IEEE 802.1S—Multiple spanning tree compatibility • IEEE 802.1v—Protocol-based VLANs • IEEE 802.1W—Rapid spanning tree • IEEE 802.1X—Port-based authentication • IEEE 802.3—10BASE-T • IEEE 802.3u—100BASE-T www.kontron.com... - Page 40 Voice VLANs • Protected ports • Event and error logging facility • Runtime and configuration download capability • PING utility • RFC 768—UDP • RFC 783—TFTP • RFC 791—IP • RFC 792—ICMP • RFC 793—TCP • RFC 826 — ARP www.kontron.com...
-
Page 41: Routing
RFC 2131—DHCP relay • RFC 2328—OSPFv2 • RFC 2453—RIP v2 • RFC 3046—DHCP/BootP relay • RFC 3101—The OSPF “Not So Stubby Area” (NSSA) option • RFC 3768—Virtual Router Redundancy Protocol (VRRP) • Route redistribution across RIP and OSPF • VLAN routing www.kontron.com... -
Page 42: Qos
Interface trust mode: 802.1p, IP Precedence, IP DSCP, or untrusted • Interface traffic shaping rate • Minimum and maximum bandwidth per queue • Strict priority versus weighted (WRR/WDRR/WFQ) scheduling per queue • Tail drop versus Weighted Random Early Detection (WRED) queue depth management www.kontron.com... -
Page 43: Multicast
IEEE 802.1D-1998. • RFC 2674 - Q-BRIDGE-MIB: The VLAN Bridge MIB module for managing Virtual Bridged Local Area Networks • RFC 2737 – Entity MIB version 2 • RFC 2819 - RMON Groups 1,2,3 & 9 www.kontron.com... -
Page 44: Routing Package Mibs
RFC 2932 – IPv4 multicast routing MIB • RFC 2933 - IGMP MIB • RFC 2934 – PIM MIB for IPv4 (PIMDMv4) • Draft-ietf-pim-mib-v2-03 (PIM-SM MIB) • Draft-ietf-magma-mgmd-mib-05.txt – Multicast group membership discovery MIB • Draft-ietf-idmr-dvmrp-mib-11.txt - DVMRP MIB • IANA-RTP-PROTO_MIB www.kontron.com... -
Page 45: Snmp Mibs
• extended Ethernet features • Geographical Address • extended management features Kontron specific MIBs start with a “kex_”. Here‘s a list of MIBs provided (in this example for release GA 2.0) including its content: • kex_config • SNMP engine ID •... - Page 46 OEM software part number • OEM software configuration • kex_phy • handling of PHY interfaces (SFP/XFP) • kex_ref • basic Kontron Information • kex_version • Support FPGA version of board • Basic IPMI features supported • Support for system/slot address •...
-
Page 47: Bootloader
All POST were successful 0x01 Serial POST failed 0x02 I2C POST failed 0x04 PCIe POST failed 0x08 Ethernet POST failed 0x10 Environment POST failed 0x20 VPD POST failed 0x40 Memory data/address line POST failed 0x80 Memory device cells POST failed www.kontron.com... -
Page 48: Bootloader Shell Options
0: only data and address line test is executed 1: fast memory test with checkerboard pattern (tests 4MB of memory memtest divided on dif ferent 128kB memory chunks) 2: full memory test with checkerboard pattern If not set, the fast memory test is performed www.kontron.com... - Page 49 However, definition and execution of user-defined script variables can be done. Note... Meddling with the bootloader environment variables can affect significantly the startup sequence of the board and may cause the system to be un-bootable. www.kontron.com...
-
Page 50: Ipmi Firmware
PM from the IPMBs and resets the PM. The watchdog supervisor does not reset the payload power and the restart of the PM will not affect the payload. The external watchdog supervisor is not configurable and must not be confused with the IPMI v1.5 watchdog timer commands. www.kontron.com... -
Page 51: Supported Ipmi Commands
Get Session Info 22.20 O / No Get AuthCode 22.21 O / No Set Channel Access 22.22 O / No Get Channel Access 22.23 O / No Get Channel Info 22.24 O / No Set User Access 22.26 O / No www.kontron.com... - Page 52 Get PEF Capabilities 30.1 O / No Arm PEF Postpone Timer 30.2 O / No Sensor Device Commands M / Yes Get Device SDR Info 35.2 M / Yes Get Device SDR 35.3 M / Yes Reserve Device SDR Repository 35.4 www.kontron.com...
- Page 53 O / Yes Get SEL Entry 40.5 Storage O / Yes Add SEL Entry 40.6 Storage Partial Add SEL Entry 40.7 Storage O / No O / Yes Delete SEL Entry 40.8 Storage O / Yes Clear SEL 40.9 Storage www.kontron.com...
-
Page 54: Table 4-5: Kontron Oem Commands
Get Auxiliary Log Status 40.12 Storage O / No Set Auxiliary Log Status 40.13 Storage O / No [1] Has oem extensions 4.4.1.2 Kontron OEM Commands and Extensions Table 4-5: Kontron OEM Commands Command NetFn OemApSetNvParam OemApFormatStorage OemApRefreshExternUpdatedSensor OemApSetManufacturingDate OemApGetManufacturingDate... - Page 55 Returned as 3A98h Product ID, LS Byte first 11..12 Returned as 6A5h Auxiliary Firmware Revision Information Byte 13: Sensor Data Record Version 13..16 Byte 14: Slot ID Byte 15: Firmware Maintenance Revision Byte 16: Unused Device ID, returned as 0fh. www.kontron.com...
- Page 56 Response data Completion code OemApFormatStorage NetFn OemApFormatStorage OEM = 3Eh Byte Data Field Pass Code 0: ~’K’ (0xBA) Pass Code 1: ~’o’ (0x90) Request data 1...4 Pass Code 2: ~’n’ (0x91) Pass Code 3: ~’t’ (0x8B) Response data Completion Code www.kontron.com...
- Page 57 Data Field Token Pass Code 0: ~’K’ (0xBA) 1...4 Pass Code 1: ~’o’ (0x90) Request data Pass Code 2: ~’n’ (0x91) Pass Code 3: ~’t’ (0x8B) 5...7 Manufacturing Date Response data Completion Code OemApGetManufacturingDate NetFn OemApGetManufacturingDate OEM = 3Eh www.kontron.com...
- Page 58 Pass Code 2: ~’8’ Pass Code 3: ~’0’ Pass Code 4: ~’0’ Completion Code. 2...5 Release Code Response data 6...13 Subrelease Release Code 14...21 Date Code OemApGetFirmwareCapabilities This command retrieves the firmware capabilities vector. NetFn OemApGetFirmwareCapabilities OEM = 30h www.kontron.com...
- Page 59 Pass Code 1: ~’1’ Pass Code 2: ~’8’ Request data Pass Code 3: ~’0’ Pass Code 4: ~’0’ 6...23 Firmware capabilies vector Response data Completion Code. OemApInitMemoryErase This command initiates the memory erase process. NetFn OemApInitMemoryErase OEM = 30h www.kontron.com...
-
Page 60: Board Sensors
If the module’s Management Controller is set up as a BMC the prefix will be ‘BMC:’ independent of the slot where it resides. If the module’s Management Controller is set up as a SMC the prefix will be ‘Sxx:’ where xx is the slot number (e.g. 09). www.kontron.com... - Page 61 NA (Management Controller Locator NA / CP3923 Record) 1 / IPMI Info-1 C0h (OEM Kontron IPMI Firmware Info) Event Type: A0h (Discrete) 2 / IPMI Info-2 C0h (OEM Kontron IPMI Firmware Info) Event Type: A0h (Discrete) Event Type: 6Fh (Sensor Specif ic)
-
Page 62: Table 4-6: Sensor List
02h (Voltage) Event Type: 01h (Threshold) Event Type: 6Fh (Sensor Specif ic) 35 / POST Value C6h (Kontron OEM ) Of fset 0Eh: POST Error Event Data 2: POST code Event Type: 6Fh (Sensor Specif ic) 36 / Boot Error 1Eh (Boot Error) Refer to IPMI v1.5... -
Page 63: Board Fru Information
Supported are the following FRU data areas and data fields (shown values are examples, which may differ, depending on the used board typ): FRU Board Info Area • Manufacturing date / time • Board manufacturer: “Kontron” • Board Product Name: “ CP3923-8M” • Board Serial Number : “1234567890” •... -
Page 64: Firmware Administration
The board does support OS images up to 25.5 MB size. Note... Note that only flash partition mtd4 is using the JFFS2 file system for storage. All other flash partitions are not formatted and accessible from linux only as raw devices. www.kontron.com... -
Page 65: Updating Firmware
CP3923 CPCI Switch is done by performing the following steps: Prepare network access of the board Log in to the privileged exec mode of the CLI of the board Copy system image into the system 1 of the flash memory. (Ethernet Fabric) #copy tftp://192.168.50.154/CP3923-update-GA-2.00.pkg image1 (Ethernet Fabric) # www.kontron.com... -
Page 66: Updating Ipmi
The IPMI firmware package file is provided in HPM.1 format and is stored in the data/update directory of the release direc- tory tree. (Ethernet Fabric) #copy tftp://192.168.50.5/cp3923-ipmi-GA-2.00.pkg nvram:ipmi Flashing a new IPMI firmware will disable the IPMI Controller for some minutes. Are you sure to update the IPMI firmware? (y/n)y (Ethernet Fabric) # www.kontron.com... -
Page 67: Thermal Considerations
The complete list of sensors and their alarm thresholds can be found in chapter “Board Sensors” on page 60. As long as the temperature values stay below their upper critical threshold, all components on the CP3923 are considered to be operated within their specified temperature range. Figure 5-1: Temperature Sensors Location www.kontron.com... -
Page 68: Table 5-2: Thermal Requirements
(aberration is not qualified). WARNING As Kontron assumes no responsibility for any damage to the CP3923 or other equipment resulting from overheating any of the components, it is highly recommended that system integrators as well as end users confirm that the operational environment of the CP3923 complies with the thermal considerations set forth in this document. -
Page 69: Power Considerations
Input power connections to the backplane itself should be carefully specified to ensure a minimum of power loss and to guarantee operational stability. Long input lines, under-dimensioned cabling or bridges, high resistance connections, etc. must be avoided. It is recommended to use POSITRONIC or M-type connector backplanes and power supplies where possible. www.kontron.com... -
Page 70: Power Supply Units
The +5 VDC output level must always be equal to or higher than the +3.3 VDC output during power-up and normal operation. Both voltages must reach their minimum in-regulation level not later than 20 ms after the output power ramp start. www.kontron.com... -
Page 71: Table 6-2: Input Voltage Characteristics
RESET will not help any more. The system must be switched off for at least 3 seconds before it may be switched on again. If problems still occur, turn off the main power for 30 seconds before turning it on again. www.kontron.com... -
Page 72: Power Consumption
6.2.1 Start-up Currents The start-up currents of the CP3923 during the first 2-3 seconds after power has been applied (power-on or hot-swap inser- tion) are less than the maximum currents given in Table 6-3 for each of the variants. www.kontron.com... - Page 73 Tel.: + 49 (0) 821 / 4086 0 Tel.: + 1 888 294 4558 Tel.: + 86 10 63751188 Fax: + 49 (0) 821/ 4086 111 Fax: + 1 858 677 0898 Fax: + 86 10 83682438 info@kontron.com info@us.kontron.com info@kontron.cn www.kontron.com...
Need help?
Do you have a question about the CP3923 Series and is the answer not in the manual?
Questions and answers