Table of Contents
Advertisement
SWS 7300
INSTRUCTION MANUAL
COLOUR WEATHER STATION
WITH WIRELESS SENSOR
NÁVOD K OBSLUZE
METEOROLOGICKÁ STANICE S BAREVNÝM
DISPLEJEM A BEZDRÁTOVÝM SNÍMAČEM
NÁVOD NA OBSLUHU
METEOROLOGICKÁ STANICA S FAREBNÝM
DISPLEJOM A BEZDRÔTOVÝM SNÍMAČOM
HASZNÁLATI ÚTMUTATÓ
METEOROLÓGIAI ÁLLOMÁS SZÍNES
KEPERNYŐVEL ÉS VEZETÉK
NÉLKÜLI ÉRZÉKELŐVEL
INSTRUKCJA OBSŁUGI
STACJA POGODOWA Z KOLOROWYM
WYŚWIETLACZEM I CZUJNIKIEM
BEZPRZEWODOWYM
EN
CZ
SK
HU
PL
Advertisement
Table of Contents

Related Manuals for Sencor SWS 7300


Summary of Contents for Sencor SWS 7300
- Page 1 SWS 7300 INSTRUCTION MANUAL COLOUR WEATHER STATION WITH WIRELESS SENSOR NÁVOD K OBSLUZE METEOROLOGICKÁ STANICE S BAREVNÝM DISPLEJEM A BEZDRÁTOVÝM SNÍMAČEM NÁVOD NA OBSLUHU METEOROLOGICKÁ STANICA S FAREBNÝM DISPLEJOM A BEZDRÔTOVÝM SNÍMAČOM HASZNÁLATI ÚTMUTATÓ METEOROLÓGIAI ÁLLOMÁS SZÍNES KEPERNYŐVEL ÉS VEZETÉK NÉLKÜLI ÉRZÉKELŐVEL INSTRUKCJA OBSŁUGI STACJA POGODOWA Z KOLOROWYM WYŚWIETLACZEM I CZUJNIKIEM BEZPRZEWODOWYM...
- Page 2 Thank you for selecting this delicate colour weather station. Utmost care has gone into the design and manufacture of the product. This manual is used for DCF or MSF version. Please read the instructions carefully according to the version you purchased and keep the manual well for future reference.
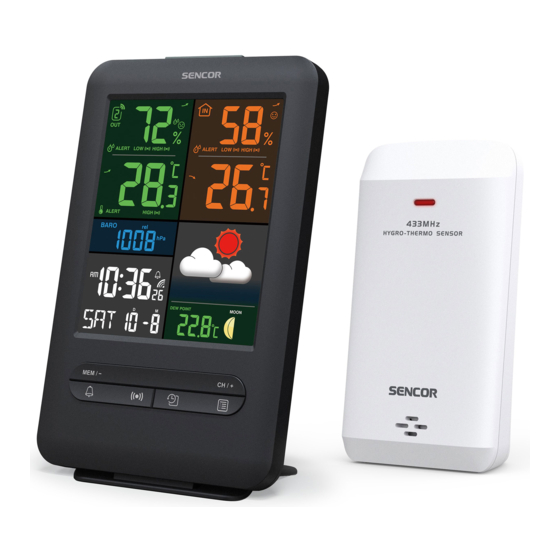
- Page 3 LCD DISPLAY 1. Outdoor humidity & temperature section 2. Baro reading section 3. Time & calendar 4. Indoor humidity & temperature section 5. Weather forecast icon 6. Weather index & moon phase section WIRELESS HYGRO-THERMO SENSOR WITH RCC RECEIVE FUNCTION 1.
-
Page 4: Important Note
IMPORTANT NOTE Read and keep these instructions. Do not subject the unit to excessive force, shock, dust, temperature or humidity. Do not cover the ventilation holes with any items such as newspapers, curtains etc. Do not immerse the unit in water. If you spill liquid over it, dry it immediately with a soft, lint-free cloth. - Page 5 NOTE: The bundled wireless sensor can receive the Radio controlled clock signal for main unit auto time setting. Just pair up the sensor with main unit to apply this function. Once the channel is assigned to a Wireless Hygro-Thermo sensor, you can only change it by removing the batteries or resetting the unit.
-
Page 6: Wireless Sensor Signal Receiving
WIRELESS SENSOR SIGNAL RECEIVING 1. In normal mode, press [SENSOR] key once to start receiving the sensor signal of current on displaying channel. The signal icon will flash. For example, when CH 2 is displayed, pressing [SENSOR] key will start receive for CH 2 only. 2. The signal icon will flash until the reception succeeded. If no signal is received within 5 minutes the icon will disappear. Receiving wireless signal after manual reset or the [SENSOR] key is pressed When waiting for signals, “--” will display in the readings field Good wireless sensor signal... -
Page 7: Reception Of Radio Controlled Signal
CH 1 CH 6 CH 1 RECEPTION OF RADIO CONTROLLED SIGNAL The time and date are radio-controlled. The current time and date are automatically synchronized with the signal that transmitted from RC station through wireless sensor. Please make sure the bundle wireless sensor is connected to the main unit. RCC SIGNAL STRENGTH INDICATOR The signal indicator shows signal receive status. -
Page 8: Time And Calendar Setting
TIME AND CALENDAR SETTING 1. In normal mode, press and hold [CLOCK SET] key for 2 seconds to enter date and time setting mode. 2. Press [CH / +] or [MEM / -] key to adjust the setting. 3. Press [CLOCK SET] key to enter the next setting 4. The setting sequence: 12/24H ➔... - Page 9 RCC setting DST (day light saving) setting ALARM TIME SETTING AND DISPLAY 1. In normal time mode, press and hold [ALARM] key for 2 seconds until the alarm hour digit flashes to enter alarm time setting mode. 2. Press [CH / +] or [MEM / -] key to change the value. Press and hold the key for quick- adjust.
-
Page 10: Temperature And Humidity Trend
EMPERATURE AND HUMIDITY FUNCTIONS 1. Press [°C / °F] key to switch between °C /°F temperature unit. 2. When the temperature is below -50°C or above 70°C, “Lo” or “Hi” will be displayed respectively. Above 70°C Below -50°C 3. Relative Humidity range is 1~99%, if out of range the reading will show “ - - “. NOTE: If temperature is displaying “Lo”... -
Page 11: Weather Forecast
THE SNOW ICON When the outdoor temperature is 3°C or below, the flashing snow icon “ ” will appear in outdoor section. WEATHER FORECAST The device contains sensitive pressure sensor built-in with sophisticated and proven software that predicts weather for the next 12 ~ 24 hours within a 30 to 50 km (19-31 miles) radius. -
Page 12: Heat Index / Dew Point
4. Press the [BARO] key once again until the RELATIVE atmospheric pressure digit flashes. 5. Press [CH / +] key or [MEM / -] key to change the value. 6. Press the [BARO] key to save and exit the setting mode. TO SELECT THE MEASUREMENT UNIT FOR THE BAROMETER Use the [BARO] key to change the unit between hPa / inHg / mmHg NOTE:... -
Page 13: History Data
HISTORY DATA (WEATHER RECORDS IN THE PAST 24 HOURS) The main unit will record past 24 hours weather data automatically that included past indoor and outdoor temperature & humidity, Baro, and Dew point / heat index records. 1. Press the [HISTORY] key to check past 1 hour history records. 2. -
Page 14: Moon Phase
High humidity alert on High temperature alert on NOTE: You cannot enter conflicting HI / LO values in the setting. For example, if the HI temperature alert value is 40°C, you cannot enter more than 39.9°C for the LO alert, and so forth. When the alert is triggered, the alarm will sound and the alarm icon on the display will flash. Press [ALARM / SNOOZE], [ALARM] or [ALERT] key to stop the alarm sound. -
Page 15: Low Battery Icon
Waxing Gibbous Full Moon Waning Gibbous Third quarter Waning Crescent LOW BATTERY ICON If the main unit or sensor is low in battery, the low battery icon “ ” will display. The icon will only appear when the corresponding channel is displayed. For example, the sensor of CH 1 is low in battery. -
Page 16: Specifications
SPECIFICATIONS Main unit Dimensions (W × H × D) 118 × 192.5 × 21mm (without attach table stand) Main power DC 5V, 1 A adaptor Backup battery CR2032 button cell Barometer range 540 to 1100hPa, 405 to 825mmHg, 15.95 to 32.49inHg Operating temperature range -5°C to 50°C ( 23°F to 122°F ) Humidity range... - Page 17 Directive 2014/53/EU. For the full version of the EU declaration of conformity, please refer to the following website: www.sencor.com Changes in the text, design and technical specifycations may change without prior notice and we reserve the right to make these changes.
- Page 18 Data on presented documents differs from data on products. Cases when the claiming product cannot be indentified according to the presented documents (e.g. the serial number or the warranty seal has been damaged). Authorized service centers Visit www.sencor. for detailed information about authorized service centers.
Need help?
Do you have a question about the SWS 7300 and is the answer not in the manual?
Questions and answers