
Related Manuals for laguna Fusion F3


Summary of Contents for laguna Fusion F3
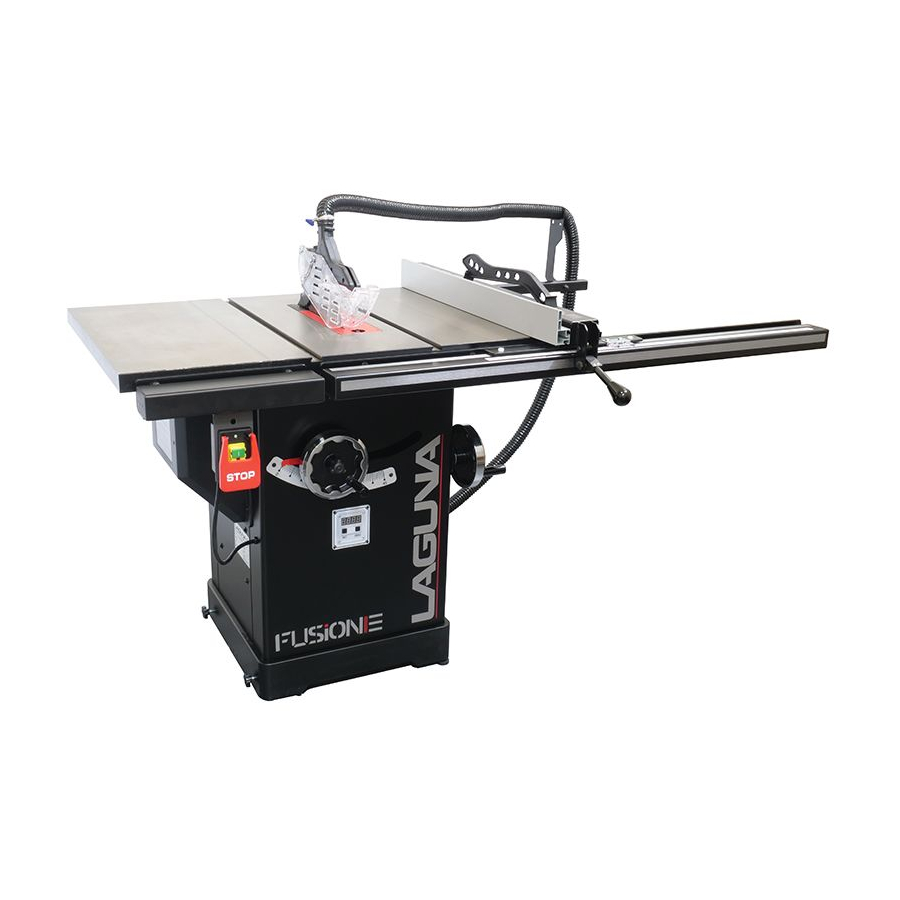
- Page 1 PRECISION WOODWORKING MANUAL Fusion F3 Table Saw MTSF3362203-0130-36 MTSF3362203-0130-52...
- Page 2 Laguna takes pride in our products and stands behind them with continuing service and support for our customers. Your Laguna machine was designed to bring a new dimension of productivity to your shop. Before using your machine for the first time, learn how to use it. This manual covers a step-by-step process of assembly and machine operation.
-
Page 3: Table Of Contents
Front Rail Pt. 2 & Control Switch .......... 39 Accessory Installation ............43 Maintenance ..................46 Troubleshooting ................47 Specifications .................. 49 Wiring Diagram ................54 Replacement Parts Diagram ............55 Replacement Parts Table ............. 60 Fusion F3 Table Saw... -
Page 4: Warranty
What Is Covered? Any part, determined by Laguna Tools®, to have a defect will be repaired or replaced (and shipped), without charge. It is required that the defective item/part be returned to Laguna Tools® with the complaint and proof of purchase in the original packaging that it was received. - Page 5 Aside from being free of defects upon receiving, consumable parts, like cutters and abrasives, are not covered by this warranty unless otherwise stated by Laguna Tools®. These parts are designed to be used at the expense of the operator and are available for replacement or inventory purchase.
-
Page 6: Safety
KEEP WORK AREA CLEAN. Cluttered areas and benches invite accidents. DON’T USE IN DANGEROUS ENVIRONMENT. Don’t use this unit in damp or wet locations or expose it to rain. Keep work area well-lighted. Fusion F3 Table Saw - Safety -... - Page 7 Feed the workpiece into the saw blade or cutter only against the direction of rotation. Feeding the workpiece in the same direction that the saw blade is rotating above the table may result in the workpiece, and your hand, being pulled into the saw blade. Fusion F3 Table Saw - Safety -...
- Page 8 Align the fence to be parallel with the saw blade. A misaligned fence will pinch the workpiece against the saw blade and create kickback. Fusion F3 Table Saw - Safety -...
- Page 9 Make sure that the saw blade is installed to rotate in the proper direction. Do not use grinding wheels, wire brushes, or abrasive wheels on a table saw. Improper saw blade installation or use of accessories not recommended may cause serious injury. Fusion F3 Table Saw - Safety -...
- Page 10 Use only 3-wire extension cords that have 3-prong grounding plugs and 3 pole receptacles that accept the tool's plug. e) Repair or replace damaged or worn cord immediately. Fusion F3 Table Saw - Safety -...
- Page 11 No adapter is available or should be used with this tool. If the tool must be reconnected for use on a different type of electric circuit, the reconnection should be made by qualified service personnel; and after reconnection, the tool should comply with all local codes and ordinances. Fusion F3 Table Saw - Safety -...
-
Page 12: Safety (French)
à l'aide du guide inclinable. Le guidage de la pièce en utilisant en même temps le guide longitudinal et le guide inclinable augmente le risque de blocage de la lame et de recul. Fusion F3 Table Saw - Safety (FRENCH) -... - Page 13 à l'aide d'un guide inclinable ou le long du guide. Une pièce torsadée, gauchie ou comportant des noeuds est instable et provoquer un mauvais alignement du trait de scie avec la lame, un blocage de la lame et un recul. Fusion F3 Table Saw - Safety (FRENCH) -...
- Page 14 Veiller à ce que la scie circulaire à table soit installée de façon à tourner dans la bonne direction. Ne pas utiliser des meules, des brosses métalliques ou des disques abrasifs sur une scie circulaire à table. Une installation incorrecte de la lame ou l'utilisation d'accessoires non recommandés peut entraîner de graves blessures. Fusion F3 Table Saw - Safety (FRENCH) -...
-
Page 15: Inventory List
IMPORTANT! All shipping damage must be noted upon delivery and signed by the owner and the delivery driver. If you find any damaged items in your package, you must contact Laguna Tools to file a complaint. In order to return damaged goods under the limited warranty to Laguna Tools, Inc., you MUST have the original packaging. - Page 16 Rear Extension Table Boxed Individually Rear Extension Table Each leg Boxed Legs individually Miter Gauge Boxed Individually Plastic Wrapped Dust Collection Hose Individually Blade Guard Assembly Boxed Individually Fence Assembly Boxed Individually Fusion F3 Table Saw - Inventory List -...
- Page 17 Listed are the items included in the package, this list does not include additional tools/hardware which may be necessary to assemble your F3 Fusion table saw. Fusion F3 Table Saw - Inventory List -...
- Page 18 Listed below are all the hardware required for assembly of the Fusion F3 table saws. The hardware below has been included in the Fusion F3’s packaging. As you inventory the other parts shipped with your machine, be sure to inventory and familiarize yourself with the hardware listed below.
- Page 19 Nylon Lock Nuts Rear Extension (16mm) Table Legs, Rear Extension table F3 Table Rubber Feet (Bottom) Hex Cap Screw Front Body to w/ Flat Washer Front Rail (left & (shorter) right side) Fusion F3 Table Saw - Inventory List -...
- Page 20 The hardware and tools listed below come individually wrapped in plastic bags. General Tools: dual-sided wrench and Allen wrenches. Band clamp with hex bolt, flat washer, and hex nut. Fence hooks and hex bolts with flat washers. Fusion F3 Table Saw - Inventory List -...
-
Page 21: Setup
© 2020 Laguna Tools Setup Fusion F3 Table Saw - Setup -... -
Page 22: Unboxing
Unboxing Your Fusion F3 table saw was carefully packaged for safe transport. The table saw should arrive attached to a wooden pallet and covered by a wooden crate housing the table saw and its accessories. When unpacking your machine, separate all enclosed materials to ensure that there are no damages to the parts you’ve received. - Page 23 3) Remove individually packaged items and inventory parts to ensure all parts have arrived undamaged. Un-crated carton Removing the table saw from the wooden pallet: The table saw will arrive secured to the wooden pallet. Fusion F3 Table Saw - Setup - Unboxing...
- Page 24 Tightening the knobs will lock the table saw’s wheels. Loosen the knobs to allow wheels to move. After the knobs have been adjusted, lift the table saw from the opposite end (like a wheel barrow). Knob Location Loosening Lock Knobs Fusion F3 Table Saw - Setup - Unboxing...
-
Page 25: Front Rail
Front Rail The Fusion F3 table saw’s front rail assembly houses the front rail and guide ruler. In conjunction with the rear rail, the front rail allows the fence to move fluidly across the table. The front rail assembly is made up of the left and right front rail brackets, the front rail, and the control switch. - Page 26 2. Thread each rubber foot through the right extension leg’s bottom threaded holes. 3. Hand tighten each foot to start. Later, the foot may need to be loosened or tightened in order to properly level the front and rear rails. Correctly installed foot: Fusion F3 Table Saw - Setup - Front Rail...
- Page 27 After completing step four, there should be two through holes in the middle of the front rail bracket which have not been used yet. These should be empty as they will be used to mount the right extension table later. Fusion F3 Table Saw - Setup - Front Rail...
- Page 28 4. Hand-tighten the bolts to secure the left front rail to the table. Then, use a level to ensure that the left front rail bracket is leveled. 5. After the left front rail bracket has been leveled, tighten the hex bolts using the wrench provided. Fusion F3 Table Saw - Setup - Front Rail...
- Page 29 © 2020 Laguna Tools Left front rail and level Flat Washer and Hex Nut (secured to the table) Fusion F3 Table Saw - Setup - Front Rail...
-
Page 30: Rear Rail
Rear Rail The Fusion F3 table saw’s rear rail assembly supports both the fence and the rear extension table attachment. In conjunction with the front rail, the rear rail allows the fence to move fluidly across the table. The rear rail assembly is made up of the left and right rear rail bracket, the dust collector hose support bracket, the rear rail bracket. - Page 31 4. Secure the dust collector hose support, right rear rail bracket, and right extension leg to the table. Thread lock washers to the head of the screws. Secure flat washers and hex nuts to the back of the screw. Fusion F3 Table Saw - Setup - Rear Rail...
- Page 32 After completing step two, there should be two through holes in the middle of the front rail bracket which have not been used yet. These should be empty as they will be used later to mount the right extension table (shown above as red circles) Fusion F3 Table Saw - Setup - Rear Rail...
- Page 33 Ensure that the through holes (not the threaded holes) on the rear rail bracket’s are used for this step. The threaded holes will be used later to attach the rear extension table to the table saw. Bolt Tightening and arrangement: Bolt, lock Leveling: washer // flat washer, nut Fusion F3 Table Saw - Setup - Rear Rail...
-
Page 34: Right Extension Table
Right Extension Table The Fusion F3 table saw’s right extension table supports both the fence and the work piece. In conjunction with the front rail, the right extension table allows the fence to move fluidly across the table to adjust to the width of the wood piece being cut. - Page 35 4. Thread flat washers and hex nuts on the backs of each of the screws. Use the wrench to tighten the bolts and secure the extension table to the front and rear rails. Pre-Installation: Underside Bracket (the picture does not show a flat washer used, please use one) Completed installation: Fusion F3 Table Saw - Setup - Right Extension Table...
-
Page 36: Rear Extension Table
Rear Extension Table The Fusion F3 table saw’s rear extension table supports both the fence and the work piece. In conjunction with the rear rail, the rear extension table provides an extra support table for the length of the wood piece being cut. - Page 37 5. Thread nylon lock nuts on to the back of the hex bolts. Tighten with a wrench or a 17 mm socket wrench (optional). Attaching legs to table: Securing Bolts Installed Legs Attaching the Rear Extension Table to the Table Saw: Fusion F3 Table Saw - Setup - Rear Extension Table...
- Page 38 3. Thread one of the three (longer) Hex Bolt with Flat Washer through each of the threaded holes. The height of the rear extension table’s legs can be adjusted as needed to level the table. Pre-installation Aligning the bracket Bolt into thread holes: Fusion F3 Table Saw - Setup - Rear Extension Table...
-
Page 39: Front Rail Pt. 2 & Control Switch
Front Rail Pt. 2 & Control Switch The Fusion F3 table saw’s front rail houses the control switch and front rail/guide ruler. The control switch allows the user to quickly turn the machine on/off before and after making cuts. The front rail assembly provides the user with a guide to measure the distance between the fence and the blade. - Page 40 Ensure that the head of the hex bolts are threaded from underneath the left front rail. The ends of each the bolts should be visible from the top of the left front rail. Pre-Installation: Control Switch Placement: Fusion F3 Table Saw - Setup - Front Rail Pt. 2 & Control Switch...
- Page 41 4. Pull the rail out as far as it will allow first. This will allow space for the fence’s nylon slider to move through comfortably. 5. Tighten each bolt using either the general wrench or a 13 mm socket wrench. Fusion F3 Table Saw - Setup - Front Rail Pt. 2 & Control Switch...
- Page 42 2. Ensure that the fence’s locking gauge is placed over the edge of the front rail. Fence fitted over the front guide rail Detailed view Front of rail showing counter sunk screws Properly Installed Fence: Fusion F3 Table Saw - Setup - Front Rail Pt. 2 & Control Switch...
-
Page 43: Accessory Installation
Accessory Installation The Fusion F3 table saw’s supports several accessories which help the machine to run smoothly and function properly. The accessories which come with your table saw are: a dust collector hose, a set of fence hooks, and a tool caddy (located underneath the table). - Page 44 The table saw’s tool caddy is located under the the right extension table. The tool caddy provides a space to store the miter gauge, the writing knife, and the blade wrench, and the general wrench when not in use. See the picture shown below to see proper placement of these tools. Fusion F3 Table Saw - Setup - Accessory Installation...
- Page 45 © 2020 Laguna Tools From Top Down: A. Arbor Wrench, B. Miter Guage, C. Riving Knife, D. Blade Guard Hook, E. Dust Hose Wrapping Hook. Your F3 Table Saw is now properly assembled. Fusion F3 Table Saw - Setup - Accessory Installation...
-
Page 46: Maintenance
Clean/vacuum dust buildup from inside cabinet Lubricate trunnion slides. · · and off motors. Lubricate worm gear. · Check/replace belt for proper tension, damage or Lubricate leadscrew. · · wear Lubricate gearing and gearboxes. · Fusion F3 Table Saw - Maintenance -... -
Page 47: Troubleshooting
11. Motor wired incorrectly. 9. Use correct blade; reduce feed rate or depth 12. Plug/receptacle at fault. of cut. 13. Motor at fault. 10. Test/repair/replace. 11. Adjust tension of/replace belt. 12. Wire motor correctly. Fusion F3 Table Saw - Troubleshooting -... - Page 48 1. Check Dust Collection Unit and hose 2. No suction fittings. 2. move motor cover and verify that the internal hose is fixed to the blade shroud port and the external 4" port. Fusion F3 Table Saw - Troubleshooting -...
-
Page 49: Specifications
Cast Iron Fusion Trunnions Blade Changing Tool Quick-Release Blade Guard Cast Iron Table & Wings Cabinet Mounted Arbor Included and Spreader Integrated Tool Storage Riving Knife Included European Hi-Lo Fence Cast Iron Table & Wings Fusion F3 Table Saw - Specifications -... - Page 50 10" x 60T Riving Knife/Spreader 3/32" (2.28 mm) 3/32" (2.28 mm) 3/32" (2.28 mm) 3/32" (2.28 mm) Thickness Required Blade Body >3.0mm >3.0mm >3.0mm >3.0mm Thickness Required Blade Kerf <2.0mm <2.0mm <2.0mm <2.0mm Thickness Fusion F3 Table Saw - Specifications -...
- Page 51 Steel and Clear Plastic Body/Cabinet Paint Powder Coated Powder Coated Powder Coated Powder Coated Type/Finish Arbor Bearings Sealed & Permanently Sealed & Permanently Sealed & Permanently Sealed & Permanently Lubricated Lubricated Lubricated Lubricated Fusion F3 Table Saw - Specifications -...
- Page 52 Must Ship Upright Carton Number 2.00 Carton Type Wood Crate Content 52" Fence Rails Weight, Gross 51.58 Lbs (23.4 Kg) Length 69-3/4" (1775 mm) Width 4-1/8" (105 mm) Height 3-7/8" (100 mm) Must Ship Upright Fusion F3 Table Saw - Specifications -...
- Page 53 ID label on cabinet ID label on cabinet ID label on cabinet Sound Rating 60-78 DBa 60-78 DBa 60-78 DBa 60-78 DBa ISO 9001 Factory Certified by a Nationally Recognized Testing Laboratory (NRTL) Fusion F3 Table Saw - Specifications -...
-
Page 54: Wiring Diagram
© 2020 Laguna Tools Wiring Diagram Fusion F3 Table Saw - Wiring Diagram -... -
Page 55: Replacement Parts Diagram
© 2020 Laguna Tools Replacement Parts Diagram Cabinet Fusion F3 Table Saw - Replacement Parts Diagram -... - Page 56 © 2020 Laguna Tools Internal Fusion F3 Table Saw - Replacement Parts Diagram -...
- Page 57 © 2020 Laguna Tools Blade Guard & Mitre Gauge Fusion F3 Table Saw - Replacement Parts Diagram -...
- Page 58 © 2020 Laguna Tools 36" Rails & Fence Fusion F3 Table Saw - Replacement Parts Diagram -...
- Page 59 © 2020 Laguna Tools 52" Rails & Fence Fusion F3 Table Saw - Replacement Parts Diagram -...
-
Page 60: Replacement Parts Table
P006 PTSF3362203-0130-2.4 043317-000 Blade Guard support PTSF3362203-0130-2.5 924884-001 Assembly 2.5.1 Support (L) PTSF3362203-0130-2.5.1 924885-001 2.5.2 Support (R) PTSF3362203-0130-2.5.2 924886-001 2.5.3 Tapping Screw M4*1.41P*20 PTSF3362203-0130-2.5.3 001201-002 2.5.4 Hex. Nut M6*1.0P(10B*5H) PTSF3362203-0130-2.5.4 008005-200 Fusion F3 Table Saw - Replacement Parts Diagram -... - Page 61 3.21 Scale PTSF3362203-0130-3.21 574852-000 3.22 Rivet PTSF3362203-0130-3.22 002301-201 Extension Table PTSF3362203-0130-4 051386-000 Table Insert Assembly PTSF3362203-0130-6 924397-001 Table Insert PTSF3362203-0130-6.1 251262-663 Flat Washer 5.3*16*1.0t PTSF3362203-0130-6.2 006011-187 Wear Plate -Right PTSF3362203-0130-6.3 270077-902 Fusion F3 Table Saw - Replacement Parts Table -...
- Page 62 PTSF3362203-0130-33 390017-000 Sawblade clamp PTSF3362203-0130-34 174399-901 TW5/8"-12 PTSF3362203-0130-35 380205-901 Round Head Socket Lock M5*0.8P*12 PTSF3362203-0130-37 002503-101 Screw Upper Trunnion PTSF3362203-0130-38 051369-000 Locking CAP screw M8*1.25P*25 PTSF3362203-0130-40 002601-107 Fixing Plate PTSF3362203-0130-41 174773-000 Fusion F3 Table Saw - Replacement Parts Table -...
- Page 63 002402-101 w/Washer Shaft PTSF3362203-0130-82 361261-901 Bushing PTSF3362203-0130-83 251276-615 Handwheel Assembly PTSF3362203-0130-84 924505-000 Fixing Knob PTSF3362203-0130-85 920703-000 Worm Gear Box PTSF3362203-0130-86 090326-000 Worm Gear Shaft PTSF3362203-0130-87 320395-901 Ball Bearing 6201 PTSF3362203-0130-88 030106-001 Fusion F3 Table Saw - Replacement Parts Table -...
- Page 64 127-A1.3 Front Rail Bracket 36" PTSF3362203-0130-127-A1.3 924917-001 127-A2 Rear Rail (L) PTSF3362203-0130-127-A2 924783-001 127-A3 Front Rail (L) PTSF3362203-0130-127-A3 924768-001 127-A4 Front Rail Bracket (L) PTSF3362203-0130-127-A4 924772-001 127-A6 Right Table Assembly PTSF3362203-0130-127-A6 924773-000 Fusion F3 Table Saw - Replacement Parts Table -...
- Page 65 Right Table PTSF3362203-0130-127-B6 924809-001 127-B6.1 CAP Scewe w/Spring M8*1.25P*20/8.2*15.4 PTSF3362203-0130-127-B6.1 001803-102 Washer 127-B6.2 Flat Washer 8.5*16*2.0t PTSF3362203-0130-127-B6.2 006001-049 127-B6.3 Hex. Nut M8*1.25P(13B*6.5H) PTSF3362203-0130-127-B6.3 008006-100 127-B6.4 Flat Head Hex. Screw M8*1.25P*25 PTSF3362203-0130-127-B6.4 000704-102 Fusion F3 Table Saw - Replacement Parts Table -...
- Page 66 251362-615 Hex. Wrench 2.5mm PTSF3362203-0130-133 040002-000 Hex. Wrench PTSF3362203-0130-188 040013-000 Hex. Wrench PTSF3362203-0130-134 040006-000 Open Wrench 10*13 PTSF3362203-0130-135 174569-904 Arbor Wrench PTSF3362203-0130-137 174315-904 Plastic Paper 1220*790*0.04t PTSF3362203-0130-140 041501-004 Stand PTSF3362203-0130-145 174469-000 Fusion F3 Table Saw - Replacement Parts Table -...
- Page 67 36" PTSF3362203-0130-190.3 850913-001 Head Guard 190.3.1 CAP Screw w/ Spring M8*1.25P*25/8.2*13.7 PTSF3362203-0130-190.3.1 001803-103 Washer 190.3.2 Flat Washer 8.5*16*2.0t PTSF3362203-0130-190.3.2 006001-049 190.3.3 Hex Nut M8*1.25P(13B*6.5H) PTSF3362203-0130-190.3.3 008006-100 190.3.4 Clamp 1.5" PTSF3362203-0130-190.3.4 042622-001 Fusion F3 Table Saw - Replacement Parts Table -...
- Page 68 LAGUNA AMERICAN HEADQUARTERS Texas: 744 Refuge Way Suite 200, Grand Prairie, Texas 75050, U.S.A. Phone: +1-800-332-4094 Huntington Beach: 7291 Heil Ave Huntington Beach, CA 92647, U.S.A. Phone: +1-949-474-1200 South Carolina: 825 Bistline Dr. Ste 101, West Columbia, SC 29172, U.S.A. Phone: +1-800-234-1976 Minnesota: 5250 West 74th St, Edina, MN 55439, U.S.A Phone: +1-949-474-1200...
Need help?
Do you have a question about the Fusion F3 and is the answer not in the manual?
Questions and answers