
Related Manuals for laguna DXIII Driftmaster Fence


Summary of Contents for laguna DXIII Driftmaster Fence
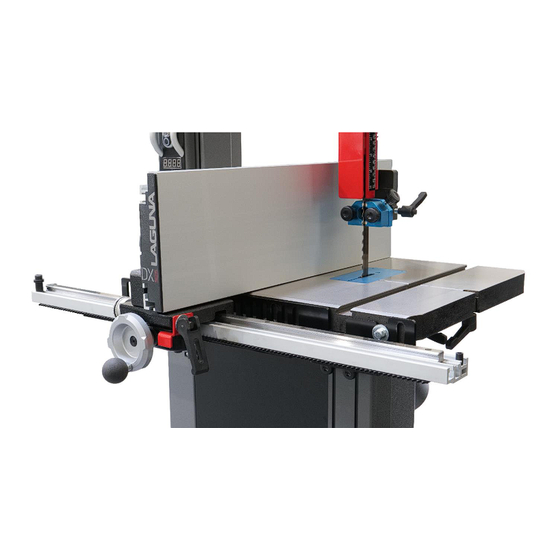
- Page 1 OWNERS’S MANUAL DXIII DRIFTMASTER FENCE Bandsaw not included with DXIII Driftmaster Fence System SKU: 110363 www.lagunatools.com...
- Page 2 Thank you for investing in a DXIII Driftmaster Fence by Laguna Tools. This fence is one of a family of unique accessories proudly offered by Laguna Tools. Every Laguna product is engineered for years of dependable service. Please feel free to contact Laguna Tools if you have a question or suggestion.
-
Page 3: Table Of Contents
Table of Contents Table of Contents .................................. 3 Warranty & Support ................................4 Safety ...................................... 5 Specifications ..................................7 Features ....................................6 Set Up ..................................... 8 Inventory ....................................8 Controls & Functions ................................9 Assembly ................................... 10 Adjustments ..................................13 Drift Adjustment ................................. -
Page 4: Warranty & Support
Warranty & Support... -
Page 5: Safety
Safety Read and understand all warnings and operation instructions before using any tool or equipment. Always follow basic safety precautions to reduce the risk of personal injury. Improper operation, maintenance or modification of tools or equipment could result in serious injury and property damage. There are certain applications for which tools and equipment are designed. - Page 6 Proposition 65 Warning...
-
Page 7: Specifications
• Carbide-tipped Resaw King blade recommended for flawless resaw cuts • Installs directly on most bandsaws (some saws may require drilling front edge of table) • See our other accessories that fit Laguna and other bandsaws Bandsaw Blades Work Lights... -
Page 8: Set Up
Set Up Receiving If this accessory was delivered by a third party, before unboxing, be sure to inspect the packaging and shipping documents supplied by the driver. Ensure that there is no visible damage to the shipment. If any damage has occurred because of shipment, note the damage on the bill of lading or refuse the shipment. -
Page 9: Controls & Functions
INVENTORY cont. Bracket Mounting Hardware 7. Laguna bandsaws, 5/16” hardware 8. JET, Powermatic, Rikon, M8 hardware 9. Powermatic, M6 hardware 10. JET, Rikon, M10 hardware Controls / Functions Fence Controls (left side) Fence Controls (right side) Left Side 1. Drift Lock 2. - Page 10 Fence Assembly Fence Assembly: 1. Insert the ruler, with the desired measuring system (in. or mm) facing “up”, into the front channel of the Rail. Ruler 2. Screw in the black Stop Stud into the threaded hole of the front channel on the right side. Tighten with an Allen wrench.
- Page 11 Bracket Assembly Mounting Options: There are several possible mounting positions for the brackets and fence, depending on the model of saw and desired fence location. Below are two of the most common examples of possible mounting scenarios. Mounting locations other than those shown below are possible, depending on your specific circumstances. NOTE: Do not place fence mounting bracket over blade changing slot in table.
-
Page 12: Assembly
Assembly: The two mounting brackets can be attached as shown in either of the two previous pictures or in other configurations that best facilitate your specific saw and conditions. NOTE: If the longer bracket fully spans the table of your saw, it can be attached without use of the shorter bracket. -
Page 13: Adjustments
Adjustments Fence Adjustments: The fence can be adjusted front-to-back by loosening the two Fence-Lock knobs on the left side of the fence and sliding the fence to the desired position. Fence installed Fence-Lock High position Knobs Adjustments The fence can be repositioned to the “lower” height by loosening the two Fence-Lock knobs, sliding the fence off and re-installing the fence at 90 degrees. -
Page 14: Drift Adjustment
The fence can also be moved quickly from right-to-left, by disengaging the rack-and-pinion engagement, (by lifting the Lock Lever (straight-out), pulling out the Red Plate and sliding the fence). IMPORTANT! Always engage the Lever Lock, with Red Plate seated, when using the fence. To re-engage the Micro-Adjustment, make sure the integrated spring has pulled the Red Plate into... -
Page 15: Operation
Ruler Adjustment: After the desired bandsaw blade has been installed and properly tensioned and the fence has been adjusted for blade drift, move the fence close to the blade. Using a ruler, measure the distance between the blade and the fence. Slide the Ruler to the same measurement as taken from the blade to fence. -
Page 16: Part References
Exploded View... -
Page 17: Parts List
Parts List Index Part Number Description Specification PBAND18BX2203-3-1 Aluminum Fence PBAND1412-175-3-2 Plastic Adjusting Screw 110363-3 Fence Body 110363-4 Lock Knob 110363-5 Flat Washer 5/16" PBAND1412-175-2-13 Lock Washer 5/16" 110363-7 Fence Head 110363-8 Phillips Flat Head Screw M4x12 PBAND1412-175-3-9 Lock Bar PBAND1412-175-12 Flat Washer 3/8"... -
Page 18: Ordering Parts
Flat Washer (not shown) 3/8" 110363-70 Hex Nut (not shown) 110363-71 Hex Nut (not shown) Parts Never perform and setup, maintenance or adjustments with the machine connected to the power source! Only use authentic Laguna Tools parts for replacements. Customer Support: (800)-332-4049 customerservice@lagunatools.com... - Page 19 Notes...
- Page 20 Laguna Tools 744 Refuge Way, Suite 200 Grand Prairie TX 75050 800-234-1976 www.lagunatools.com Service: +1 (800) 332-4049 or email customerservice@lagunatools.com 091923...
Need help?
Do you have a question about the DXIII Driftmaster Fence and is the answer not in the manual?
Questions and answers