Advertisement
Quick Links
CHANGEGIVER
POCKET GUIDE
ROUTINE MAINTENANCE,
SAFETY, INSTALLATION &
TROUBLESHOOTING
CashFlow
®
ashFlow
®
shFlow
CashFlow
®
hFlow
CashFlow
®
Flow
CashFlow
®
low
CashFlow
®
w
CashFlow
®
CashFlow
CashFlow
®
ashFlow
®
shFlow
CashFlow
®
hFlow
CashFlow
®
Flow
CashFlow
®
low
CashFlow
®
w
CashFlow
®
CashFlow
CashFlow
®
ashFlow
®
shFlow
CashFlow
®
hFlow
CashFlow
23174 G3
The
REFERENCE SERIES
®
CashFlow
CashFlow
®
®
CashFlow
®
CashFlow
®
CashFlow
®
CashFlow
®
CashFlow
CashFlow
®
®
CashFlow
®
CashFlow
®
CashFlow
®
CashFlow
®
CashFlow
CashFlow
®
520
®
®
CashFlow
®
CashFlow
®
CashFlow
CashFlow
®
®
CashFlo
®
CashFlow
®
CashFlow
®
CashFlow
®
CashFlow
®
CashFlow
CashFlow
®
®
CashFlo
®
CashFlow
®
CashFlow
®
CashFlow
®
CashFlow
®
CashFlow
CashFlow
143818044
®
C
®
Ca
®
Cas
®
Cash
CashF
®
®
C
®
Ca
®
Cas
®
Cash
CashF
®
®
C
®
Ca
®
Cas
®
Cash
Advertisement

Related Manuals for MEI CashFlow REFERENCE Series


Summary of Contents for MEI CashFlow REFERENCE Series
- Page 1 ® REFERENCE SERIES CHANGEGIVER POCKET GUIDE ROUTINE MAINTENANCE, SAFETY, INSTALLATION & TROUBLESHOOTING ® ® ® CashFlow CashFlow CashFlow ® ® ® ashFlow CashFlow CashFlow ® ® ® shFlow CashFlow CashFlow ® ® ® hFlow CashFlow CashFlow Cash ® ® ® Flow CashFlow CashFlow...
- Page 2 ® ©, MEI . , 1996. MEI reserves the right to change the product or the product specifications at any time. While every effort has been made to ensure that the information in this publication is accurate, MEI disclaims any liability for any direct or indirect losses (howsoever caused) arising out of use or reliance on this information.
- Page 3 520 changegiver Pocket Guide CONTENTS Routine Maintenance Replacing a Fuse Using the Keypad Troubleshooting Using the MEI Route Alpha 250 Terminal Address Settings for the Route Alpha 250 Terminal Installing, Starting and Testing a Unit Product Manuals and Product Technical Training Addresses of Regional Offices...
- Page 4 CashFlow ® 520 changegiver Pocket Guide , MEI., 1996...
-
Page 5: Conformance To International Standards
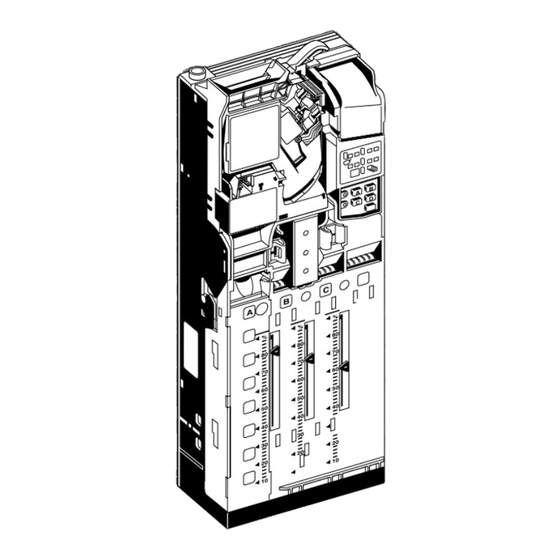
Conformance to International Standards When installed and operated according to the instructions provided for the particular unit, ® CashFlow products meet applicable international and national safety standards for any country in which they are used. , MEI., 1996... - Page 6 Acceptor module Keypad and LEDs Lid tab of acceptor Coin storage cassette Connection port for MEI release catches Route Alpha 250 terminal Coin slots for manual filling Hinge pin of acceptor Labels showing the Coin flap for manual filling...
-
Page 7: Routine Maintenance
If this happens, switch off the power to the machine for at least 15 seconds then close the lid again. Make sure the lid snaps shut. Switch the power on. Check coins are accepted. , MEI., 1996... - Page 8 You should only remove the dispenser and the dispenser arms for cleaning if there is a heavy build up of dirt or other matter in the dispenser. Always refer Product Maintenance Handbook before removing these parts. , MEI., 1996...
- Page 9 Unplug the exposed ribbon cable and lift out the acceptor Fuse box cover The fuses are under a cover in the left hand side of the unit. Always replace a blown fuse with one of the same rating. , MEI., 1996...
- Page 10 Park the dispenser arms and replace the coin cassette. Make sure that the release catches of the acceptor and the cassette snap shut firmly. Switch on power to the machine and check that the red LED comes on. , MEI., 1996...
-
Page 11: Using The Keypad
Tube C Mode button dispense (YELLOW) Function Buttons Dispense coins from tubes Park the dispenser arms Float up tubes automatically Float down tube automatically Reset tubes to pre-set levels Set the vend prices Cancel the accumulated credit , MEI., 1996... - Page 12 More selections at the same price can be made without inserting extra coins. Add coins for the next highest price, and make a selection. Continue until all prices are set. Press C to cancel credit and to exit price teach. , MEI., 1996...
-
Page 13: Troubleshooting
Check for blocker from machine through to unit. Check all looms. • Coins accepted and red LED lit? • Refer to the • Make a trial vend troubleshooting to check the unit table in this Guide , MEI., 1996... - Page 14 Troubleshooting Problem Causes Actions Red LED is on, except Normal operation No action when a vend is made Red LED is on but coins Coin jam in the changer mechanism Check for jams in the acceptor and in the tubes. Park the dispenser arms before you replace the coin cassette.
- Page 15 Product Maintenance Handbook. Blocker signal from the machine LED or keypad fault Check the keypad module. If faulty, refer to your MEI distributor. Faulty transformer Check the transformer. If faulty, refer to your MEI distributor. Red LED is flashing Fault with the changegiver unit Press A, B and C to check if coins are being dispensed.
- Page 16 Press Mode + A + B, and insert change coins through the tubes acceptor until tubes reach their pre-set levels Red LED is off Faulty LED or keypad module Check and replace the keypad module if it is faulty. Refer to your authorised MEI distributor. permanently, with no other problems present...
- Page 17 Mode button has been (Press Mode or wait for 45 seconds to exit from shifted mode). pressed Yellow LED is off Faulty LED or keypad module Check the keypad module. If faulty, refer to your MEI distributor. permanently. No other problems present...
- Page 18 Problem Causes Actions Poor coin acceptance Changegiver unit is not level Check and re-level the unit if necessary. Modules are not mounted and Check the coin entry and exit chutes of the machine are aligned aligned correctly with the coin entry cup on the unit, and with the cash box on the machine.
- Page 19 Problem Causes Actions High value coins are Too few coins in the change tubes, Re-float the coin tubes through the acceptor so that the low- leaving the low-level sensors level sensors are covered. rejected and the exact uncovered change light is on Unit is in No overpay mode Check Route Alpha address 242.
- Page 20 Check that coins are being routed to the tubes correctly. Problems in handling Faulty unit, or faulty modules Contact your MEI distributor. To help diagnosis, note the symptoms, and the model and serial number of the unit for coins persist after all reference.
- Page 21 Press ENTER again to return to the address display. Press RESET to store the new value. NOTE: If an error occurs, four half-size zeros appear. Press RESET to clear this display and to return to the current address. , MEI., 1996...
- Page 22 CashFlow ® 520 changegiver Pocket Guide Troubleshooting the MEI Route Alpha 250 Terminal Symptom Cause Solution Terminal Communications Press RESET displays an error error message at power-up Terminal Communications Repeat the last displays an error between operation. error message...
- Page 23 Address Settings for Use with the MEI Route Alpha 250 Terminal Address Parameter Range Meaning Notes Maximum credit 0-65,535 Maximum credit allowed 201 - 204 Prices 1, 2, 3 & 4 0-65,535 Values of prices 1, 2, 3 & 4...
- Page 24 Address Parameter Range Meaning Notes Inhibit coin: coins 1 to 4 0 - 15 Address value = the sum of the codes where: Code 0 = no coins inhibited Code 1 = inhibit coin 1 Code 4 = inhibit coin 3 Code 2 = inhibit coin 2 Code 8 = inhibit coin 4 To inhibit more than one coin at the same time, add...
- Page 25 Address Parameter Range Meaning Notes Inhibit coins 5 - 8 0 - 15 Code 1 / 2 / 3 / 4 = inhibit change coin 5 / 6 / 7 / 8 Not MDB Inhibit coins 9 - 12 0 - 15 Code 1 / 2 / 4 / 8 = inhibit change coin 9 / 10 / 11 /12 Not MDB Change delay...
- Page 26 Address Parameter Range Meaning Notes Clear overpayment inhibit 0 - 1 0 = cleardown allowed 1 = cleardown inhibited Not MDB Keypad inhibit 0 - 1 0 = keypad enabled 1 = keypad disabled Not MDB Price teach inhibit 0 - 1 0 = price teach allowed 1 = price teach inhibited Not MDB...
- Page 27 Address Parameter Range Meaning Notes 301 - 304 2nd coin type in tube A, B or 0 -12 0 = no coin, 1 = coin 1, 2 = coin 2, 3 = coin 3... Value of coins in tubes 0 - 65,535 Value of coins in ALL tubes READ ONLY 311 - 314...
- Page 28 Address Parameter Range Meaning Notes EEPROM errors - 0 - 15 Range value = sum of the codes, where: READ ONLY 1 = incorrect configuration version 2 = audit FEM not initialised 4 = undefined 8 = internal EEPROM write error Operational errors - 0 - 15 Range value = sum of the codes, where:...
- Page 29 Address Parameter Range Meaning Notes BDV errors - 0 - 15 Range value = sum of the codes where: 1 = audit incompatible 2 = VMC incompatible 4 = CPC incompatible Reset error flags 0 - 1 0 = do not reset error flags 1 = reset error flags Audit module - VMC I/D 0 - 65,535...
- Page 30 Address Parameter Range Meaning Notes Audit - installation day 1 - 31 Day date of installation into machine BDV/MDB Audit - installation month 1 - 12 Month of installation into machine BDV/MDB Audit - installation year 0 - 99 Year of installation into machine BDV/MDB Discount award 0 - 9999...
- Page 31 Address Parameter Range Meaning Notes Maximum coin credit 0 - 65,535 Maximum coin credit that can be accepted by the BDV only changegiver Audit unit is BDV 0 - 1 0 = audit unit not BDV type 1 = audit unit is BDV type BDV only VMC unit is BDV 0 - 1...
-
Page 32: Before Installation
Mounting points Note the model number and serial number before you contact your MEI distributor Fit the changegiver onto the locating screws in the machine 1. Ensure that the unit is level on its three keyhole mounting slots. - Page 33 2. Use the keypad or the Route Alpha terminal to set the vend prices. NOTE: Use the keypad if the installation is an electromechanical interface. If it is an electronic serial interface, prices are normally held in the vending machine. , MEI., 1996...
- Page 34 5. Press Mode + A and refloat the tubes through the acceptor. When the pre-set level is reached, further coins are routed to the cashbox. 6. Press A to return the unit to normal operation. The unit is now ready for use , MEI., 1996...
- Page 35 CashFlow and other MEI products. The courses cover the technical features and the maintenance of the product, and give hands-on experience servicing CashFlow products quickly and efficiently. Contact your regional MEI sales office more information. , MEI., 1996...
-
Page 36: Regional Offices
REGIONAL OFFICES WWW.MEIGROUP.COM... - Page 37 YOUR MEI REPRESENTATIVE...
Need help?
Do you have a question about the CashFlow REFERENCE Series and is the answer not in the manual?
Questions and answers