Advertisement
Quick Links
ICWUSA.com, Inc.
MAXIMUM LOAD CAPACITY:
28 Lbs (12.7 kg)
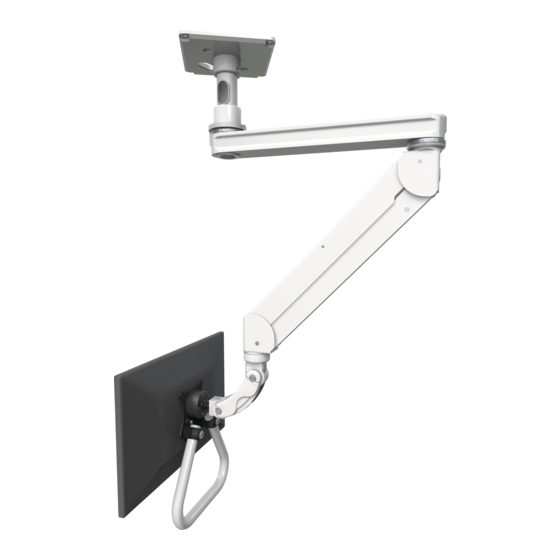
T2EQ-C8X5
MOUNT sQUARE CEILING PLATE
Using four 1/4 x 2" lag bolts
provided in hardware bag,
secure ceiling plate to a solid
wood surface or ceiling joist.
Use square pattern or inline
pattern. Be sure to use all four
bolts.
Run wires through center hole
or wire management port.
Loosen set screw BEFORE
attaching pipe. Screw
extension pipe into ceiling
plate, then tighten set screw.
Page 1 of 3
TITAN ELITE CEILING MOUNT INsTALLATION
Improved cable management.
Wires run through the joints
and are more enclosed.
Wire management holes
Loosen the set screw
in ceiling plate before
attaching extension pipe.
TITAN ELITE EASY-TO-WIRE CEILING MOUNT INSTALLATION - rev 09/01/16 pjm
If you have any questions please call Toll Free 1-800-558-4435
IMPORTANT
Do not use power tools to assemble or
adjust the arm. Use hand tools onLY.
DANGER!
the elite arm contains high pressure gas
springs. the following cautions MUSt be
observed to avoid serious injury.
• Do not attempt to adjust the arm until all components
are mounted (monitor, keyboard, etc.)
• Arm must be completely horizontal (extended)
before adjusting the arm's tension. Failure to do so will
damage the arm and void the warranty.
• never loosen or remove any of the shoulder
bolts. Doing so will cause the arm to immediately
come apart with tremendous force, and could cause
serious injury.
• If equipment requiring AC power is mounted to this unit,
have a certified electrician inspect the installation.
• Failure to install this unit according to these instructions
will void all ICW warranties. If installed incorrectly, ICW
is not liable for any damage or injury caused by the unit.
MOUNT INLINE CEILING PLATE
Firmly secure ceiling mount
to solid ceiling joist using
four #14 wood screws found
in hardware bag. Be sure
mount is level.
Loosen set screw BEFORE
attaching pipe. Screw
extension pipe into ceiling
plate, then tighten set screw.
ATTACH ARM TO EXTENsION PIPE
Thread arm onto extension pipe
and tighten. AFTER arm is firmly
attached, tighten set screw with
5/32 hex key.
DO NOT loosen lower, smaller screw
without instructions from ICW.
Loosen the set screw
in ceiling plate before
attaching extension pipe.
Set
screw
Advertisement

Subscribe to Our Youtube Channel
Related Manuals for ICW TITAN ELITE T2EQ-C8X5


Summary of Contents for ICW TITAN ELITE T2EQ-C8X5
- Page 1 • If equipment requiring AC power is mounted to this unit, have a certified electrician inspect the installation. • Failure to install this unit according to these instructions will void all ICW warranties. If installed incorrectly, ICW is not liable for any damage or injury caused by the unit. MOUNT sQUARE CEILING PLATE MOUNT INLINE CEILING PLATE Using four 1/4 x 2”...
- Page 2 TITAN ELITE CEILING MOUNT INsTALLATION Cord Management ATTACH QUICKLINK TO ARM REMOVE TITAN ARM CAPs Remove nut from bolt 9/16 wrench on QuickLink. Attach QuickLink to arm. Thread Remove plastic caps nut onto bolt through front that cover the wire ports of arm assembly.
- Page 3 TITAN ELITE CEILING MOUNT INsTALLATION FEED WIRE THROUGH TITAN ARM REPLACE ARM COVERs Before reattaching arm Reattach black plastic covers, slip wires through bushing around exiting end cover port. wires. Replace covers on the Elite section of the arm. DO NOT use a power tool to replace screws. Pull wires one at a time through the arm.
Need help?
Do you have a question about the TITAN ELITE T2EQ-C8X5 and is the answer not in the manual?
Questions and answers