
Related Manuals for TYROLIT Hydrostress HRE410


Summary of Contents for TYROLIT Hydrostress HRE410
- Page 1 OPERATING INSTRUCTIONS Ring saw HRE410 Index 000 Translation of the original operating instructions 11000556 en / 27/03/2019...
- Page 2 All repairs must be carried out by trained personnel only. Our after-sales service is available to help make sure your TYROLIT Hydrostress units remain in perfect working order.
-
Page 3: Table Of Contents
Table of conTenTs Table of contents 1. Concerning these instructions 1.1. Danger symbols in these instructions 2. Safety 2.1. General safety information 2.2. Pay attention to the safety instructions 2.3. Intended use 2.4. Target groups and responsibility 2.5. Organisational measures 2.6. - Page 4 Table of conTenTs 6.4. Replacing the clamping rollers 6.5. Lubricating the clamping rollers 6.6. Replacing the drive wheel 6.7. Blowing out water 7. Faults 7.1. Recycling waste 8. Technical data 8.1. Dimensions 8.2. Ring saw 9. EC Declaration of Conformity...
-
Page 5: Concerning These Instructions
concerning These insTrucTions Concerning these instructions These instructions are a part of the electrical tool. They describe how to use the equip- ment safely and properly in all phases of operation. ▶ Read the instructions carefully before use, particularly the safety instructions. ▶... -
Page 6: Safety
safeTy Safety Electrical tools must be operated by authorised personnel only. Information regarding authorised personnel is available in “Chapter 2.4”. General safety information WARNING Read all safety information and instructions. Any failure to observe the safety information and instructions can result in electric shock, fire and/or serious injuries. Retain all safety information and instructions for future reference. - Page 7 safeTy 2.1.3 Safety of persons • Remain alert, be aware of what you are doing and use common sense when working with the electrical tool. Do not use the electrical tool when you are tired or under the influence of drugs, alcohol or medication. A fleeting moment of carelessness when using the electrical tool can lead to serious injuries.
-
Page 8: Pay Attention To The Safety Instructions
• The electrical tool has been inspected before being shipped and is delivered in per- fect condition. TYROLIT Hydrostress does not accept liability for damage caused by failing to follow these instructions. This applies in particular to the following damage: •... -
Page 9: Target Groups And Responsibility
2.4.1 Authorised personnel Work on or with machines or systems from TYROLIT Hydrostress must be carried out by authorised personnel only. Personnel are considered to be authorised if they meet the necessary training and know-how requirements and have been assigned a precisely defined task. -
Page 10: Organisational Measures
2.4.5 Service engineer A service engineer is the term applied by TYROLIT Hydrostress to a person who per- forms the following work without direct supervision: • Installs TYROLIT Hydrostress machines and systems • Makes adjustments to machines and systems for which certain access rights are re- quired •... -
Page 11: Protective Devices And Signs On The Electrical Tool
Only original spare parts from TYROLIT Hydrostress must be used. Otherwise damage may be caused to the electrical tool or to other property and personal injuries may occur. Do not install any attachments or make any modifications to the electrical tool without prior written permission from TYROLIT Hydrostress. -
Page 12: Personal Protective Clothing
safeTy Personal protective clothing It is mandatory for anyone working with and on the electrical tool to wear personal protective equipment. 1 Helmet with hearing protection Tight-fitting, robust and 2 Visor or safety goggles comfortable clothing 3 Respiratory mask Work shoes with steel toecaps 4 Safety gloves and anti-slip soles Residual risks... - Page 13 safeTy 2.9.3 Kick-back Incorrectly positioning the disk grinding ring or cutting the wrong materials can cause the electrical tool to kick back and seriously injure the operator. • Cut only approved materials for which the tool was designed and intended. •...
- Page 14 safeTy 2.9.10 Falling parts Falling parts can cause serious head and foot injuries. • Wear a helmet and safety shoes with steel toecaps. • Secure lumps of concrete that have been cut loose to prevent them falling. • Safeguard front, underneath and rear of sawing area from falling parts and sawing sludge: It is imperative to ensure people cannot be injured or equipment damaged.
-
Page 15: Protection Against Electric Shock
safeTy 2.10 Protection against electric shock 2.10.1 Power supply INFORMATION The power supply must correspond with the information on the type plate. • Protect the connecting cables from heat, oil and sharp edges. • Do not use connecting cables for purposes for which they are not intended. •... -
Page 16: Product Description
ProducT descriPTion Product description System overview 3.1.1 Ring saw system components INFORMATION The HRE410 ring saw is combined with the WSE1621 control unit, for example, to form the sawing system. Ring saw HRE410 Power supply line Water line Control unit... -
Page 17: Ring Saw
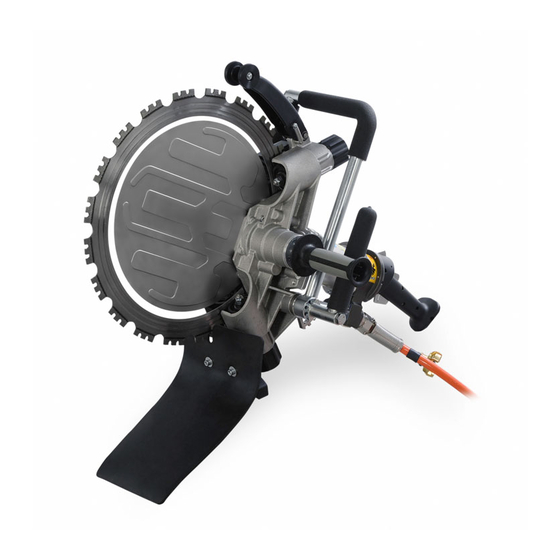
safeTy Ring saw 1 Disk grinding ring Rotary lock, 90° rotating handle 15 Foot 2 Guide plate Unlocking button 16 Spray guard 3 Spray guard, complete 10 Rear handle 17 Removable handle 4 Cover, complete 11 Start button 18 Clamping rollers 5 Front handle 12 Electric cable 19 Guide rollers... -
Page 18: Hour Counter
Hour counter INFORMATION The HRE410 ring saw is equipped with an hour counter. Scope of supply 1x ring saw HRE410 1x face-pin wrench 35 / Ø5 mm TYROLIT no. 11001604 1x 17 mm combination spanner TYROLIT No. 980338 1x operating Instructions... -
Page 19: Assembly/Disassembly
assembly/disassembly Assembly/disassembly DANGER Serious injury can be caused when the ring saw suddenly starts up ▶ Before starting assembly and disassembly work, switch off the ring saw and disconnect it from the mains power supply. Installing the guide plate INFORMATION The guide plate stabilizes the saw blade during the sawing process and distributes the water. -
Page 20: Mounting The Disk Grinding Ring
safeTy Mounting the disk grinding ring... - Page 21 safeTy Proceed as follows: ▶ Undo screw the cover mounting screws (A). ▶ Remove the cover (B). ▶ Insert the disk grinding ring so the notch and grooves match (C). ▶ Swing the eccentric shaft using the rotating handle (D) until the clamping rollers are con- tacting.
-
Page 22: Water Connection
safeTy Water connection ▶ Ensure the coupling, ring saw and supply line are clean. ▶ Check hose and coupling for damage. 4.4.1 Connecting the water hose WARNING Risk of damage to the saw blade, the motor or the drive wheel due to lack of water cooling. -
Page 23: Power Supply Connection
safeTy Power supply connection ▶ Ensure the coupling, ring saw and supply line are clean. ▶ Check the plug connection for damage. INFORMATION Check whether the connector on the control unit has eight pins. If the connector does not have eight pins, the control unit must be retrofitted with a conversion kit. -
Page 24: Operation
oPeraTion Operation Preparatory operations The work is prepared as follows: 1. Determine conditions: – Location of supply lines in walls, floors and ceilings – Cooling water drainage (risk of electric shock and water damage) 2. Secure the site. 3. Secure cut-outs in walls, ceilings and floors (e.g. crane or supports). Take weight of concrete into consideration (1m corresponds to 2400 to 2700 kg). -
Page 25: Working
oPeraTion Working Danger It is obligatory to wear protective clothing with hearing protection when using the saw. If this instruction is not followed, irreparable hearing damage may result. 5.3.1 Start the electrical tool 9 The disk grinding ring has been checked and is correctly fitted. 9 The water supply is secured. - Page 26 oPeraTion 5.3.3 Cutting area INFORMATION Position disk grinding ring below the centre. Always start cutting with the disk grinding ring rotating. Danger Risk of injury from the electrical tool suddenly kicking back. • Do not apply disk grinding ring above the centre to a corner of a workpiece. •...
- Page 27 Gripping and holding options INFORMATION When using the ring saw, always hold it firmly using both hands. The grips must be kept clean. The HRE410 ring saw offers many adjustable (X) holding options including a rotat- ing handle to guarantee optimum handling. INFORMATION To adjust the front handle, the indexing plunger under the motor must be released.
- Page 28 oPeraTion 5.3.6 Temperature and contact pressure display INFORMATION Never work with excessive contact pressure. If the contact pressure is too high, the cutting tool can heat up. Pay attention to the display element next to the handle. Contact pressure: The ring saw is equipped with an overload protection device. When working with a high contact pressure, the machine reacts in the following sequence: •...
- Page 29 oPeraTion 5.3.7 Cutting depth INFORMATION It is more economical to divide the entire cutting depth into several cuts. • For optimum guidance, first make a 50 mm to 70 mm deep cut. • Divide the entire cut depth into several cuts. 5.3.8 Jamming of the cutting tool Kick-back...
-
Page 30: Finishing Work
oPeraTion Finishing work Proceed as follows: ▶ With the motor still running, withdraw the disk grinding ring from the cut. ▶ Shut down the electrical tool. WARNING The disk grinding ring continues to rotate for a short period of time. Disconnect the electrical tool from the power supply. -
Page 31: Maintenance
mainTenance Maintenance INFORMATION Before performing cleaning, maintenance or assembly work, the saw must be discon- nected from the control unit. Maintenance and servicing table • • • • Motor • Check motor (damage, cleanliness). Water supply • Check water line (damage, leaks, •... -
Page 32: Cleaning The Drive Wheel And Rollers
mainTenance Cleaning the drive wheel and rollers INFORMATION To clean the ring saw’s rollers and drive wheel after completing the work, the diamond ring saw must be operated for at least 10 to 20 seconds at idle speed with the maximum water flow rate. -
Page 33: Lubricating The Guide Sleeve
mainTenance Lubricating the guide sleeve INFORMATION The guide sleeves on which the guide rollers are mounted must be regularly lubricated in order to allow them to move inwards and outwards freely. If the guide sleeves are stiff, the saw blade may not be pressed against the drive wheel with sufficient force. Proceed as follows: ▶... -
Page 34: Replacing The Clamping Rollers
mainTenance Replacing the clamping rollers INFORMATION The clamping rollers must be replaced when the roller surface is flat, i.e. when the grooves in the roller surface are no longer present. Proceed as follows: ▶ Unscrew the self-locking nut (A) with a 13 mm open-ended spanner while holding the hexagonal nut (B) with a 19 mm ring spanner. -
Page 35: Lubricating The Clamping Rollers
mainTenance oPeraTion Lubricating the clamping rollers INFORMATION Note that the eccentric sleeve can only be placed against the saw blade in the clockwise direction (when looking at the support roller from the front). Proceed as follows: ▶ Remove the saw blade and the guide plate. ▶... -
Page 36: Replacing The Drive Wheel
mainTenance Replacing the drive wheel INFORMATION Due to the design of the drive, the drive wheel is subject to wear. The V-shaped edge of the internal diameter of the saw blade is pressed into the V-shaped groove of the drive wheel by the guide rollers. -
Page 37: Blowing Out Water
mainTenance Blowing out water 9 The main switch is set to OFF ▶ Disconnect the mains plug. ▶ Disconnect all water lines. ▶ Connect the purge pump to the water nipple. ▶ Blow out water until all of the cooling water has been removed. ▶... -
Page 38: Faults
Faults Faults Fault Possible cause Solution The electrical tool cannot be Faulty mains cable ▶ Contact TYROLIT Hydrostress AG af- started ter-sales service Faulty power supply ▶ Check power supply Electric motor or electronics ▶ Contact TYROLIT Hydrostress AG af-... -
Page 39: Recycling Waste
Recycling waste TYROLIT Hydrostress power tools are manufactured using a high proportion of recyclable materials. A prerequisite for recycling is proper material separation. In many countries, TYROLIT is already prepared for taking back your used equipment for... -
Page 40: Technical Data
Technical daTa Technical data Dimensions Measurements in mm... -
Page 41: Ring Saw
Technical daTa Ring saw Basic data Parameter Value Transport weight 16.7 kg (with disk grinding ring) Work weight 14.5 kg Width 320 mm Height 520 mm Length (without disk grinding ring) 750 mm Protection class IP 65 Disk ring speed Max. 1938 rpm Peripheral speed Max. - Page 42 Technical daTa 8.2.4 Noise Sound emission (EN ISO 3744) Parameter Value Sound pressure level L 102 dB (A)* Maximum sound pressure level L 127 dB pCpeak Sound power level L 113 dB (A)* Uncertainty of measurement 3 dB * Conditions for the measurement: Disk grinding ring Ø...
-
Page 43: Ec Declaration Of Conformity
EC Declaration of Conformity Description Ring saw, electric Type designation Ring saw HRE410 We declare under our sole responsibility that this product complies with the following directives and standards: Directive applied 2006/42/EC from 17 May 2006... - Page 44 TYROLIT CONSTRUCTION PRODUCTS GMBH Swarovskistraße 33 | 6130 Schwaz | Austria Tel +43 5242 606-0 | Fax +43 5242 63398 Our worldwide subsidiary companies can be found on our website at www.tyrolit.com...
Need help?
Do you have a question about the HRE410 and is the answer not in the manual?
Questions and answers