
Related Manuals for XYZ Printing da Vinci 2.0 Duo


Summary of Contents for XYZ Printing da Vinci 2.0 Duo
- Page 1 User Manual da Vinci 2.0 Duo da Vinci 2.0 Duo User Manual Katrangi Electronics Trading w w w . e k t . c o m...
- Page 2 This manual provides detail instructions for the safety use of da Vinci 2.0 Duo 3D Printer. From the instruction, it will show you how to use and maintain da Vinci 2.0 Duo 3D Printer properly. If you would like to get the latest information about da Vinci 2.0 Duo 3D Printer, please refer to XYZprinting online: http://www.xyzprinting.com...
-
Page 3: Table Of Contents
User Manual da Vinci 2.0 Duo Content Chapter 1 Important Safety Instruction ................4 Chapter 2 Overview ......................6 Chapter 3 Install and Set Up ....................8 Chapter 4 Connect the Cable ....................9 Chapter 5 Printer Functions ....................10 5-1 UTILITIES ........................11 5-1.1 CHANGE CART.....................12 5-1.1.1 INSTALL CARTRIDGE............12... -
Page 4: Chapter 1 Important Safety Instruction
User Manual da Vinci 2.0 Duo Chapter 1. Important Safety Instruction Please read this manual carefully before operating the printer. The following warnings and attention notices are a best effort attempt to cover all scenarios; unfortunately it is not possible to do so. In the case of performing maintenance procedures that are not described in this manual the burden of safety falls to the customer side. -
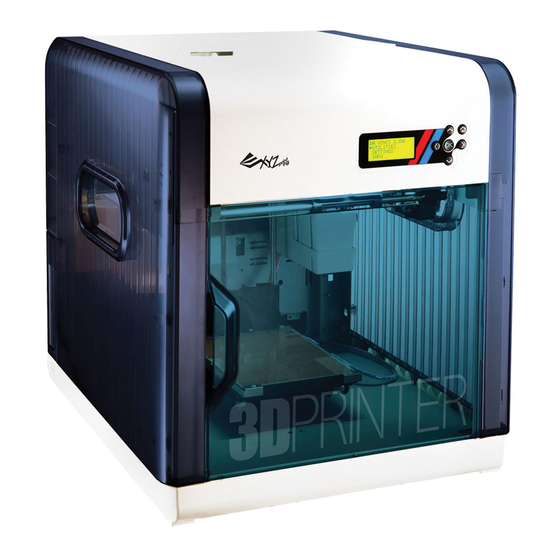
Page 5: Chapter 2 Overview
User Manual da Vinci 2.0 Duo Chapter 2 Overview This chapter describes the unpacking and set up of the printer. Before proceeding to this chapter, please make sure read the Chapter 1. Important Safety Instruction is acknowledged carefully. Attention ● Retain the box and packing material. If the need arises It will be used to transport the unit. - Page 6 User Manual da Vinci 2.0 Duo Cartridge Slot Control Panel Remove the Display Panel packaging supports Extruder Module Z-Axis USB Port Front Door Print Bed Power Switc h Power Remove the Connector print bed fixing screws and printing module fixers Display Panel: Information on printer status.
-
Page 7: Chapter 3 Install And Set Up
User Manual da Vinci 2.0 Duo Chapter 3 Install and Set Up Parts name and Functions Katrangi Electronics Trading w w w . e k t . c o m... -
Page 8: Chapter 4 Connect The Cable
User Manual da Vinci 2.0 Duo Chapter 4 Connect the cable <A. USB Port / B. Power Connector> Warning ● Make sure to set the power switch to the “off ” position before inserting the power cord. ● Make sure the power cord is properly connected. Incorrect use may cause damage to the printer. -
Page 9: Chapter 5 Printer Functions
User Manual da Vinci 2.0 Duo Chapter 5 Printer Functions Functions of Control Panel Key on the printer: Function Description Printer adjustment / Change cartridge / Sample printing UTILITIES Function settings SETTINGS INFO The fi rmware and printer statistical information... -
Page 10: Utilities
User Manual da Vinci 2.0 Duo 5-1 UTILITIES Function Description Loads/unloads fi lament CHANGE CART Moves the extruders and print bed to default "home" location HOME AXES JOG MODE Manually adjusts the movement of X/Y/Z Axis for printer maintenance BUILD SAMPLE... -
Page 11: 5-1.1 Change Cart
User Manual da Vinci 2.0 Duo 5-1.1 CHANGE CART 5-1.1.1 INSTALL CARTRIDGE 5-1.1.2 LOAD FILAMENT 1. Select the cartridge to be loaded. For loading cartridge 1, please select "CARTRIDGE1". 2. Select "LOAD FILAMENT". 3. Extruder should be heated to working temperature. - Page 12 User Manual da Vinci 2.0 Duo 3. Insert filament to the extruder via guide tube when instructed. 4. Push the filament through the filament guide tube to the hole of the extruder. 5. Please follow instructions on the panel and press “OK”...
-
Page 13: 5-1.1.3 Unload Filament
User Manual da Vinci 2.0 Duo 5-1.1.3 UNLOAD FILAMENT 1.Select the cartridge to be unloaded. For loading cartridge 1, please select "CARTRIDGE1". 2.Select "UNLOAD FILAMENT" and "OK". 3.Extruder should be heated to working temperature. Please wait until further instructed. 4.Pull the filament out from the extruder as instructed and press "OK". -
Page 14: 5-1.2 Home Axes
User Manual da Vinci 2.0 Duo 5-1.2 HOME AXES 1.Choose the HOME AXES function and select "Yes", extruders and print bed will be moved to default "home" positions. 2.Wait until extruders and print bed stop moving. 3.When the process is finished as instructed on the display panel, press "OK"... -
Page 15: 5-1.3 Jog Mode
User Manual da Vinci 2.0 Duo 5-1.3 JOG MODE 1.Select a axis to be adjusted, then press "OK". Options: X-AXIS/Y-AXIS/Z-AXIS 2.Set a desired scale of the adjustment. ● Use Upper / Down button to adjust the scale of movement. ● Use Left / Right Button to apply a default scale. -
Page 16: 5-1.4 Build Sample
User Manual da Vinci 2.0 Duo 5-1.4 BUILD SAMPLE Apply glue to the print bed before printing. The area for where the glue needs to be applied is determined by where the object is to be printed. 1.Select a sample to be printed. -
Page 17: Settings
User Manual da Vinci 2.0 Duo 5-2 SETTINGS Function Directions Default BUZZER Buzzer for alerting 開啟 AUTO HEAT Automatically heat the extruders and printer when powered on LANGUAGE Set the language displayed on the panel. Available options: English & Japanese... -
Page 18: 5-3.1 Statistics
User Manual da Vinci 2.0 Duo 5-3.1 STATISTICS ● LIFETIME : Accumulated working hours of the printer. ● LAST TIME : Duration of last printing job of the printer. 5-3.2 SYSTEM VERSION Firmware version can be found in this section. -
Page 19: Monitor Mode
User Manual da Vinci 2.0 Duo 5-4 MONITOR MODE You can get the temperatures of information via Monitor mode function ● EXTRUDER1 & EXTRUDER2 :Proper working temperatures is 210 ° C (410 ° F ) ● PLATFORM: Proper working temperatures is 70 ° C (158° F ) -
Page 20: Print Bed Adjustment
User Manual da Vinci 2.0 Duo 5-5 Print Bed Adjustment Instructions This print bed has been factory calibrated before shipping. Recalibration is necessary if there are print issues when starting to print or the nozzle gets too close to the print bed. When in doubt, it is recommended to con- tact service center for more information. -
Page 21: Chapter 6 Q&A
User Manual da Vinci 2.0 Duo Chapter 6 Q&A Q1. Are there any suitable applications or software for this printer? A1. The packaged CD contains the XYZWare software. After installation it will use an available internet connection and look for the latest release to perform an automatic update. - Page 22 User Manual da Vinci 2.0 Duo Katrangi Electronics Trading P 22 w w w . e k t . c o m...
- Page 23 User Manual da Vinci 2.0 Duo Katrangi Electronics Trading P 23 w w w . e k t . c o m...
- Page 24 User Manual da Vinci 2.0 Duo Katrangi Electronics Trading P 24 w w w . e k t . c o m...
- Page 25 Important Notice Carefully read these instructions before using the product. Before using the printer, first remove packag- ing clips and fastener from the Extruder module and Print bed. This will include 2x Packaging clips on the Extruder and 1 fasten- er on the Print Bed.
Need help?
Do you have a question about the da Vinci 2.0 Duo and is the answer not in the manual?
Questions and answers