Table of Contents
Advertisement
Available languages
Available languages
Quick Links
EN ISO
9001
Quality
Herkules
international
level
Original-Betriebsanleitung
1
Sicherheitshinweise
Das Gerät darf nur an Schutzkleinspannung mit sicherer elektri-
scher Trennung betrieben werden. Lassen Sie Eingriffe und
Reparaturen nur durch Ihren Lieferanten vornehmen.
Vermeiden Sie generell Berührungen mit elektronischen
Bauteilen des Sensors.
2
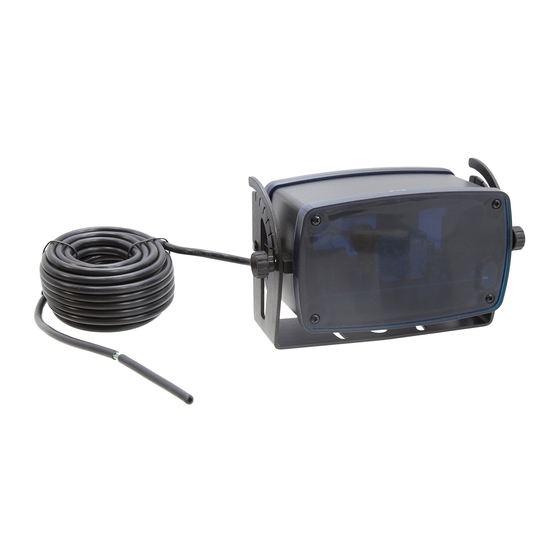
Beschreibung des Sensors
Herkules 2
Radar-Bewegungsmelder
für industrielle Tore
3
7
1
5
4
15
9
Gehäuse
1
Frontdeckel
2
Rückwand
3
Montagewinkel
4
Befestigung
5
Deckelschrauben
6
Kabel 8-polig
7
Radar Planarmodul
8
Schraubklemme
9
3
Installation
3.1
Vor der Montage
Feldgeometrie: Wahl ob schmale oder breite Feldgeometrie verwen-
det werden soll. Für das breite Feld muss der Clip eingesetzt werden.
Hinweis: Der Clip kann bis max. 4 m Montagehöhe eingesetzt
werden. Er ist bei Auslieferung nicht montiert. (Jedoch auf der
Rückseite der Antenne aufgesteckt.)
1
3
2
5
8
12
13
14
11
6
10
2
Taste
10
X
Taste
1 1
Y
Schalter Adressierung
12
13
LED rot
LED grün
14
Clip
15
2
WICHTIG:
Clip richtig einrasten!
Wenn das Gerät bereits angeschlossen ist, Speisung während 5 Sekun-
4
den unterbrechen!
5
Nach der Montage muss das breite Feld mit der Fernbedienung (B+1)
aktiviert werden.
Adressierung: Jedem Sensor kann eine Adresse (1–4 mit DIP-Schalter
und 5–7 mit Fernbedienung)
Adressen sind dann notwendig, wenn sich mehrere Sensoren in
Reichweite einer Fernbedienung befinden.
Weitere Adressen 5, 6 + 7 sind mit der Fernbedienung einstellbar
(F+8+5...7)
Mechanische Montage
3.2
– Der Sensor muss auf einer ebenen Fläche fest montiert
werden. (Vibrationen vermeiden)
– Objekte wie Pflanzen, Fahnen, Ventilatoren usw. dürfen
nicht in das Detektionsfeld hineinragen.
– Der Sensor darf nicht durch Abdeckungen/Schilder verdeckt sein
– Fluoreszenzlampen in unmittelbarer Nähe des Detektionsfeldes
müssen vermieden werden
– Gerät in der Mitte über dem Tor montieren
73.5 (2.89")
1. Bohrschablone an Wand oder Decke kleben und gemäss Angaben
bohren.
2. Kabel durch vorgesehene Öffnung des Montagebügels führen und
auf ausreichende Länge für die Verdrahtung achten.
3. Montagebügel festschrauben
4. Sensor im Montagebügel einhängen und gewünschter Winkel des
Sensors einstellen. Standardneigungswinkel: 30°
5. Kabel anschliessen gemäss Typenschild.
Wandmontage:
125
Radar-Bewegungsmelder
für industrielle Tore
zugeteilt werden. Unterschiedliche
Adresse 1*
Adresse 2
Adresse 3
Adresse 4
55 (2.17")
In Verpackung beigelegte
Bohrschablone verwenden!
Deckenmontage:
125
41
50
min. 50
Seite 1
Advertisement
Table of Contents

Related Manuals for Bircher Reglomat Hercules 2


Summary of Contents for Bircher Reglomat Hercules 2
- Page 1 EN ISO 9001 Quality Herkules international level Radar-Bewegungsmelder für industrielle Tore Original-Betriebsanleitung Wenn das Gerät bereits angeschlossen ist, Speisung während 5 Sekun- Sicherheitshinweise den unterbrechen! Das Gerät darf nur an Schutzkleinspannung mit sicherer elektri- Nach der Montage muss das breite Feld mit der Fernbedienung (B+1) scher Trennung betrieben werden.
-
Page 2: Betrieb
Der Konfigurationsmodus kann nur dann mittels Fernbedienung akti- Elektrische Anschlüsse viert werden, wenn zuvor ein Code gespeichert wurde (siehe Zugangscode) weiss 12–28 V AC / 12–36 V DC braun 12–28 V AC / 12–36 V DC 1. Starttaste G drücken grün Relais 1 ... - Page 3 Übersicht der Einstellungen Komfortfunktionen (siehe Kapitel 5.9) C+5* Tasten Standard Frontal Schnell Empfindlich Standard Frontal Schnell Empfindlich Personen/Fahrzeug-Identifizierung, Personen- Objekt-Erkennung Alle Unterdrückung Torart Standard Standard Schnelllauftor Standard Standard Standard Schnelllauftor Standard Hauptverkehr erkennt langs. Hauptverkehr erkennt langs. Anwendung Standard Schnelllauftor Standard Schnelllauftor frontal...
- Page 4 Konfiguration einzelner Parameter mit Fernbedienung «Reglobeam» Parameter Tastencode Stufe Kurzbeschreibung Anzeige 1 Code gespeichert Zugangscode abfragen Anzeige 2 Kein Code Code setzen XXXX+C Zahl zwischen 1111–9998 und mit C bestätigen Code eingeben XXXX+C Gewählten Code eingeben und mit C bestätigen Code löschen 9999+C Code gelöscht...
- Page 5 Verbindungsaufbau Erklärung der Funktionen und Einstellungen Drücken Sie die Starttaste G auf dem Reglobeam Allgemeine Beschreibung der Fernbedienung Bei erfolgreichem Verbindungsaufbau leuchtet G sowie eine der Herkules 2 kann einfach und bequem mit der Fernbedienung Reglobeam Tasten 1 bis 7 (Adresse des Sensors) vom Boden aus programmiert werden.
- Page 6 Einstellen des Sensors 5.13 Relais-Parametrierung E+2 Die Einstellungen sind folgendermassen gekennzeichnet: Fernbe- Funktion Tasten dienung z.B. D+… Menü Fernbedienung E + 2 + 1 Standard-Tor, Personen/Fahrzeug-Unterscheidung P.3 + 1 z.B. P.1… Primärer Programmiermodus über E + 2 + 2 Standard-Tor, Personen-Unterdrückung P.3 + 2 Tasten, Funktion Nr.
- Page 7 Nach dem Einschalten des Sensors ist der Konfigurationsmodus akti- Fernbedienung Funktion Tasten viert. 30 Minuten nach der letzten Einstellung wird dieser automatisch F + 3 + 1 S.5 + 1 verlassen. F + 3 + 2…5 Empfindlichkeit abfallend S.5 + 2… 5 Der Konfigurationsmodus kann aktiviert werden durch: F + 3 + 6…9 Empfindlichkeit konstant...
-
Page 8: Störungsbehebung
Bestimmungen nicht berührt. treffen und der Bircher Reglomat AG Gelegenheit geben, den Mangel zu behe- 6. Bircher Reglomat AG entwickelt ihre Produkte zum Nutzen ihrer Kunden stetig wei- ben. ter. Bircher Reglomat AG behält sich das Recht vor, ohne vorherige Ankündigung, an 3. - Page 9 EN ISO 9001 Quality Herkules international level Microwave motion detector for industrial doors Translation of the original operation instruction If the device is already connected, interrupt the power supply for Safety instructions 5 seconds. The unit may only be operated from a protection low-voltage After mounting, activate the wide field with the remote control (B+1).
-
Page 10: Operation
Configuration mode can only be activated with the remote control if a Electrical connections code has been stored previously (see access code). white 12–28 V AC / 12–36 V DC 1. Press start key G brown 12–28 V AC / 12–36 V DC ... - Page 11 Overview of settings Enhanced functions (refer to chapter 5.9) C+5* Keys Standard Frontal High-speed Sensitive Standard Frontal High-speed Sensitive Object detection Person/vehicle identification, people suppression Industrial door High-speed High-speed Standard Standard Standard Standard Standard Standard type industrial door industrial door Main traffic High-speed Detects slow...
- Page 12 Configuration of individual parameters with «Reglobeam» remote control Parameter Key code Level Short description Display 1 Code saved Request access code Display 2 No Code Set Code XXXX+C Number from 1111–9998 and confirm with C Enter Code XXXX+C Enter selected code and confirm with C Delete Code 9999+C Code deleted...
- Page 13 Establishing the connection Explanation of functions and settings General description of the remote control Press start key G on the Reglobeam If the connection has been established successfully, G and one of the The Reglobeam remote control allows you to program Herkules 2 easily keys 1 to 7 light up (address of the detector) and conveniently from the ground.
- Page 14 Adjusting the detector 5.13 Relay parameter settings E+2 Remote Function Keys The settings are identified as follows: control Standard industrial door, differentiation between E + 2 + 1 P.3 + 1 e.g. D+… Remote control menu people and vehicles e.g. P.1… Primary programming mode with keys, function no. 1 E + 2 + 2 Standard industrial door, people suppression P.3 + 2...
- Page 15 Configuration mode is activated when the detector is switched on. This is Remote Control Function Keys deactivated automatically 30 minutes after the last setting has been F + 3 + 1 S.5 + 1 made. F + 3 + 2…5 Decreasing sensitivity S.5 + 2…...
-
Page 16: Troubleshooting
Bircher Reglomat AG a chance for remedying the said fault. ucts further. Bircher Reglomat AG reserves the right to make changes to any of the 3. The warranty and liability shall exclude any damage for which there is no products described in this document without prior notice. - Page 17 EN ISO 9001 Quality Herkules international level Radar HF détecteur de mouvement pour portes industrielles Traductiondu mode d'emploi original Si l'appareil est déjà raccordé, couper l'alimentation pendant 5 Consignes de sécurité secondes! L'appareil ne doit fonctionner que sur basse tension de Après le montage, le champ large doit être activé...
- Page 18 Le mode de configuration ne peut être activé avec la télécommande Connexions électriques que lorsqu'un code a été au préalable mémorisé (voir Code d'accès). blanc 12–28 V AC / 12–36 V c.c. 1. Appuyer sur la touche de démarrage G marron 12–28 V AC / 12–36 V c.c.
- Page 19 Synoptique des réglages Fonctions de confort (voir paragraphe 5.9) C+5* Touches standard frontal rapide sensible standard frontal rapide sensible Détection identification de personnes/véhicules, pas d'identification tous d'objet de personnes porte porte Type de porte standard standard rapide standard standard standard rapide standard industrielle...
- Page 20 Configuration de certains paramètres avec la télécommande «Reglobeam» Combinaison Paramètre Degré Description abrégée de touches Affichage 1 Code mémorisé Demander code d'accès Affichage 2 Pas de code Définir le code XXXX+C Entrer un chiffre entre 1111 et 9998 et confirmer avec C Entrer le code XXXX+C Saisir le code sélectionné...
- Page 21 Établissement de la communication Explication des fonctions et des paramètres Description générale de la télécommande Appuyer sur la touche de démarrage G sur la Reglobeam Lorsque la communication est établie, la touche G, ainsi qu'une des Il est possible de programmer le Herkules 2 depuis le sol de manière touches 1 à...
- Page 22 Réglage du détecteur 5.13 Paramétrage de relais E+2 Télécom Fonction Touches Les réglages sont marqués comme suit: mande Porte industrielle standard, distinction personnes E + 2 + 1 P.3 + 1 par ex. D+… Menu télécommande /véhicules par ex. P.1… Mode de programmation primaire via touches, Porte industrielle standard, pas de détection E + 2 + 2...
- Page 23 Le mode de configuration devient actif quand le détecteur est mis sous Télécommande Fonction Touches tension. Ce mode est automatiquement quitté 30 min. après le dernier F + 3 + 1 Inactive S.5 + 1 réglage. F + 3 + 2…5 Sensibilité...
-
Page 24: Caractéristiques Techniques
à Bircher Reglomat AG de réparer la défectuosité. 6. Bircher Reglomat AG développe continuellement ses produits dans l'intérêt de ses 3. Sont exclus de la garantie et de la responsabilité de Bircher Reglomat AG les clients. Bircher Reglomat AG se réserve le droit d'apporter des modifications sur dommages pour lesquels il n'est pas prouvé...
Need help?
Do you have a question about the Hercules 2 and is the answer not in the manual?
Questions and answers