Table of Contents
Advertisement
Quick Links
Advertisement
Table of Contents

Related Manuals for GSS STI 1932 CT


Summary of Contents for GSS STI 1932 CT
- Page 1 STI 1932 CT Default access data: 192.168.0.120 User: admin Password: geheim...
-
Page 2: Table Of Contents
Overview window ...............18 Perform changes .................19 Number format................19 Configuration menus ..............20 Input ..................20 Redundant Input (Software option) ..........22 Output ..................25 Filter ..................28 NIT ..................31 LCN – Logical Channel Numbering ..........35 System menus ................37 Logbook ................37 - 2 - STI 1932 CT... - Page 3 - Backup: ................45 - Manager: ................45 - Reset to factory defaults: ............46 - System restart: ..............46 - Software Options (fee-based): ..........46 - Ping (Network Diagnostic Tool): ..........47 User ..................47 5 Channel and frequency tables ..............48 - 3 - STI 1932 CT...
-
Page 4: Safety Regulations And Notes
• Do not cover the ventilation openings! • Do not install the head end in cabinets or recesses which are not ventilated. • Do not place any vessels containing liquids on the head-end station. - 4 - STI 1932 CT... - Page 5 January 27, 2003 which addresses old electronic and electrical devices, such devices must be disposed of at a designated collection facility. At the end of its service life, please take your device to one of these public collection facilities for proper disposal. - 5 - STI 1932 CT...
-
Page 6: General Information
2.1 P aC k i n g C o n t e n t s 1 STI 1932 CT 1 LAN cable 1 Brief assembly instructions 2 Mains cable 2.2 m... -
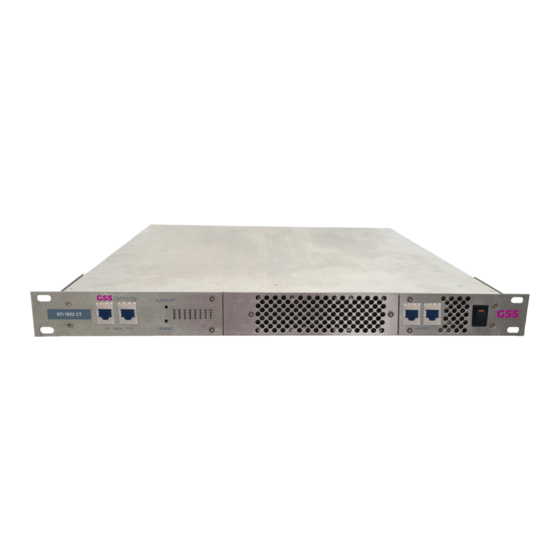
Page 7: Description
The station is equipped with two LAN inputs, one RF output and one test output (–25 dB). The MPTS input data streams of lines 1-16 are fed to the left LAN input that the lines 17-32 at the right LAN input. - 7 - STI 1932 CT... - Page 8 – by PC, tablet or smart phone with OpenVPN Server Internet access. —> When using mobile terminals – dependent on your mobile contract – additional connection costs / data transfer costs may also be incurred here. - 8 - STI 1932 CT...
-
Page 9: User
The user gast has access to (almost) all menus, but may not make any changes. —> The default password for the user gast is gast. A guest access is shown in all menus: The button has no function! - 9 - STI 1932 CT... -
Page 10: Assembly
Green = good signal; red = no signal; red/green blinking = data overflow; off = modulator off Power off + no fault –> LED blinks green Power on + no fault –> LED lights green Power on + fault –> LED blinks red - 10 - STI 1932 CT... -
Page 11: Installing The Device
We recommend the use of lateral slide rails/component carriers in order to relieve the front panel. • Screw the unit with the mounting screws and the washer to the four cage nuts - 11 - STI 1932 CT... -
Page 12: Potential Equalisation (Pe)
Ensure that the mains plugs can be pulled out without difficulties. • Configure the device (page 15). • If the configuration is finished connect the RF output to the cable network. - 12 - STI 1932 CT... -
Page 13: Changing A Power Module
• Insert the new power module. —> Make sure that it is locked. • Connect the new power module to the mains cable and check whether the status LED lights green. - 13 - STI 1932 CT... -
Page 14: Changing A Case Fan
– the red wire to the middle terminal (3 x plus terminal – the yellow wire on the upper terminal (3 x monitoring terminal • Mount the fan panel (2 screws —> Make sure that no wires will be clamped between fan and housing. - 14 - STI 1932 CT... -
Page 15: Configuration / Updates
P d a t e s The configuration of the STI 1932 CT is to be done via an HTML user interface via a PC and a standard HTML browser. - Page 16 > Internet Protocol Version 4 (TCP/IPv4) > Properties • Activate point "Use the following IP address". • Enter e.g. 192.168.0.2 for the IP address. • Enter for the Subnet mask 255.255.255.0. • Confirm the setting with "OK". - 16 - STI 1932 CT...
- Page 17 First, an "empty" table is displayed (as with all menus). While the data is read from the device ... … is displayed. —> Changes in the menus are only transmitted to the head-end station when you click the button! - 17 - STI 1932 CT...
-
Page 18: Overview Window
This location text can be modified arbitrary in menu System/User. —> If you remote control head-end station at different locations, herein you can enter the location and a local contact person. Select menu language (English/German) - 18 - STI 1932 CT... -
Page 19: Perform Changes
For entering/indication of the different IDs the number format can be set to hexadecimal or decimal in menu System > Firmware. - 19 - STI 1932 CT... -
Page 20: Configuration
—> If you delete a transponder name, the name of the first station of this data stream is entered. If the data stream will be changed, the transponder name will NOT be changed automatically! - 20 - STI 1932 CT... - Page 21 "OK". Before leaving the menu, changes must be transferred to the head-end station! • Therefore click on button —> After that is displayed for a short time in the upper right corner. - 21 - STI 1932 CT...
-
Page 22: Input
System > Firmware > Software Options menu item under Item (page 46). In column Input you can deactivate the input of not used lines. This pre- vents unwanted/unnecessary data traffic on the network. - 22 - STI 1932 CT... - Page 23 102 103 104 With these selectors you can select whether you want to use the "normal" or the "redundant" input signal as the main signal. The blue marker shows the active signal. - 23 - STI 1932 CT...
- Page 24 "OK". Before leaving the menu, changes must be transferred to the head-end station! • Therefore click on button —> After that is displayed for a short time in the upper right corner. - 24 - STI 1932 CT...
-
Page 25: Output
Line indicates an output data overflow. In this case change the output settings or remove stations from the data stream using the station filter. In column Modulator, switch on or off the modulators of the individual lines. - 25 - STI 1932 CT... - Page 26 —> COFDM: SAT transponders can transmit higher data rates than DVB-T transponders. If complete SAT transponders are present as MPTS data streams at the input, you must remove services from the data stream via the "Filter" menu! - 26 - STI 1932 CT...
- Page 27 Balance here the master output level of the station to the level of the ca- ble network (0…-31dB; off). 0dB = unchanged level; -31dB = 31dB attenuation off = Level 0 (no output signal) —> Changes must be transmitted to the head-end station! Therefore click on button - 27 - STI 1932 CT...
-
Page 28: Filter
= previously achieved peak value Indication of TS-/ON-ID. In column Filter you can individually switch on or off the filter. In column Pass Service you select the stations (services) which you would like to play out. - 28 - STI 1932 CT... - Page 29 PID address of "tone A" in ; PID address of "tone B" in Instead of "tone B", "tone A" is transmitted, "tone B" is removed. —> After that an additional field appears to enter an additional PID. - 29 - STI 1932 CT...
- Page 30 ( "hold"). Before leaving the menu, changes must be transferred to the head-end station! • Therefore click on button —> After that is displayed for a short time in the upper right corner. - 30 - STI 1932 CT...
-
Page 31: Nit
Herein you can enter a NIT version. —> The maximum possible value is 1F/31. Herein you can enter a network name. Button Load resets the network ID, the version and the network name to default. - 31 - STI 1932 CT... - Page 32 , all related LCNs will also be deleted. Indication of Code rate, Guard interval, Bandwidth and Mode of COFDM transponders Create the NIT —> Manually added ( ) or imported ( ) transponders will not be deleted. - 32 - STI 1932 CT...
- Page 33 (*.bin). —> You can also add an "*.oni" file, which you had generated with a PSW 1000 (from version 61 on) or a PSW 160 (from version 17 on). - 33 - STI 1932 CT...
- Page 34 • Click on button Before leaving the menu, changes must be transferred to the head-end station! • Therefore click on button —> After that is displayed for a short time in the upper right corner. - 34 - STI 1932 CT...
-
Page 35: Lcn - Logical Channel Numbering
Herein you can switch on or off the "Private Data Specifier". —> If you use HD-LCN, this must be switched on. "Private Data Specifier" value —> For "Private Data Specifier" IEC 62216-1 recommends the value 0x00000028. - 35 - STI 1932 CT... - Page 36 PSW 1000 (from version 61 on) or a PSW 160 (from version 17 on). Before leaving the menu, changes must be transferred to the head-end station! • Therefore click on button —> After that is displayed for a short time in the upper right corner. - 36 - STI 1932 CT...
-
Page 37: System Menus
Via this button you can refresh the indication. —> Please also note the items in the Notification menu (page 38) —> The logbook is included in the protocol file (page 18)! - 37 - STI 1932 CT... -
Page 38: Notification
Herein enter the password for the outgoing mail server of your e-mail account. Herein enter the outgoing mail server of your e-mail account. Herein enter the port of the outgoing mail server of your e-mail account. - 38 - STI 1932 CT... - Page 39 —> The default port for Syslog server is 514. Before leaving the menu, changes must be transferred to the head-end station! • Therefore click on button —> After that is displayed for a short time in the upper right corner. - 39 - STI 1932 CT...
-
Page 40: Network
You can use the Hostname to call up the user interface without entering the IP address. To do this, enter the host name followed by ".local" in the browser (e.g. gss.local). If you operate sev- eral head stations in the network, you must enter different names here. -
Page 41: Openvpn
—> Via the ON/OFF button you can deactivate the OpenVPN service. —> Before leaving the menu, changes must be transferred to the head- end station! Therefore click on button —> After that is displayed for a short time in the upper right corner. - 41 - STI 1932 CT... -
Page 42: Security
—> If you have forgotten your admin password, you can reset the network settings and the admin password by the reset button ( page 10)! - 42 - STI 1932 CT... - Page 43 (warm start) can be done. The manager allows you to store different configurations in the head-end sta- tion. Under Software Options you can unlock software options that are subject to a fee. - 43 - STI 1932 CT...
-
Page 44: Firmware
—> Therefor the firmware must be previously stored on your PC. The current firmware version can be found at "www.mygss.eu". Unzip the *.zip file *.tar update file + added notes —> A firmware update may take a long time to complete. - 44 - STI 1932 CT... -
Page 45: Backup
In the "Saved configurations:" field, select a saved configuration and load it with the Load config button. Delete a configuration stored in the manager: In the "Saved configurations:" field, select a saved configuration and de- lete it with the Delete config button. - 45 - STI 1932 CT... -
Page 46: Reset To Factory Defaults
Use this button to load a software key file into the head-end station. We need the information shown here in order to generate a software key for your station. —> The software key is bound to the MAC address. - 46 - STI 1932 CT... -
Page 47: Ping (Network Diagnostic Tool)
—> Before leaving the menu, changes must be transferred to the head- end station! Therefore click on button —> After that is displayed for a short time in the upper right corner. - 47 - STI 1932 CT... -
Page 48: Channel And Frequency Tables
C 48 690.00 C 58 770.00 C 68 850.00 C 29 538.00 C 39 618.00 C 49 698.00 C 59 778.00 C 69 858.00 C 30 546.00 C 40 626.00 C 50 706.00 C 60 786.00 - 48 - STI 1932 CT... - Page 49 Declaration of CE conformity GSS Grundig Systems GmbH • Beuthener Straße 43 • D-90471 Nuremberg Phone: +49 (0) 911 / 633 240 0 • Fax: +49 (0) 911 / 633 240 98 www.gss.de/en • info@gss.de CLASS CLASS Service: Phone: +49 (0) 911/ 633 240 90 • service@gss.de Alterations reserved.
Need help?
Do you have a question about the STI 1932 CT and is the answer not in the manual?
Questions and answers