
Related Manuals for ELTEX WOP-2ac


Summary of Contents for ELTEX WOP-2ac
- Page 1 Wireless access point WOP-2ac User manual Firmware version 1.19.0 IP address: 192.168.1.10 Username: admin Password: password...
-
Page 2: Table Of Contents
WOP-2ас. User manual Contents Introduction ..............................3 Annotation ..............................3 Symbols ..............................3 Device description ............................4 Purpose ..............................4 Device specification..........................4 The device technical parameters......................5 Design ................................7 Light indication............................8 The device schematic structure.......................9 Delivery package .............................10 Installation order .............................10 Safety rules..............................10 2.10 Installation recommendations .......................10 2.11 Calculating the number of required access points................11... -
Page 3: Introduction
WOP-2ac device is a Wi-Fi access point of Enterprise class. The device enclosed into hermetic case which allows to use the access point outdoor in different climatic conditions – at temperatures from –40 to +65 °С. -
Page 4: Device Description
2 Device description 2.1 Purpose WOP-2ac wireless access point (hereinafter the device) is designed for provision of users' access to high-speed safe network. The device provides high-speed and safe wireless network combining a lot of opportunities and services that are necessary for comfortable users' access to operator services in crowded areas. -
Page 5: The Device Technical Parameters
2.3 The device technical parameters Table 1 – The device main technical parameters WAN interface parameters Number of ports 1 (2 for WOP-2ac SFP) Connector 1 port of Ethernet 10/100/1000Base-T (RJ-45, optionally); 1 port of Ethernet 100/1000Base-X (SFP, optionally); 1 port of 1000 PON (GPON, optionally) - Page 6 WOP-2ас. User manual Security Centralized authorization via RADIUS server (WPA Enterprise) WPA/WPA2 data encryption Captive Portal IPsec Selection of antenna model depends on access point usage Support for 2x2 MIMO 2 integrated WLAN controllers Broadcom BCM43217 Control Remote control Web interface, Telnet, SSH, SNMP, EMS management system.
-
Page 7: Design
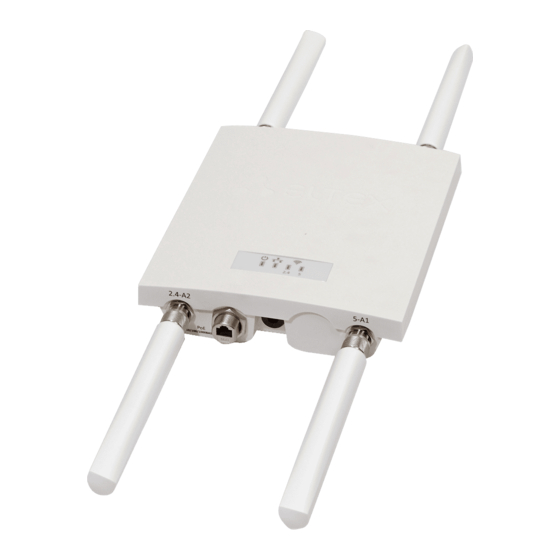
WOP-2ас. User manual 2.4 Design WOP-2ac enclosed in plastic case. The layout of WOP-2ac is shown in the figure below. Figure 1 – WOP-2ac side panel layout Connectors and controls located on the device panels are listed in Table 2. Table 2 – Description of ports and controls... -
Page 8: Light Indication
WOP-2ас. User manual 2.5 Light indication The current device state is displayed by Wi-Fi, LAN, Power indicators. The list of indicators’ possible states is given below. Table 3 – Light indication of device state LED status Device state Wi-Fi solid green Wi-Fi network is enabled flashing green... -
Page 9: The Device Schematic Structure
WOP-2ас. User manual 2.6 The device schematic structure Figure 2 shows WOP-2ac schematic structure. Figure 2 – WOP-2ac schematic structure • 5-A1, 5-A2, 2.4-A1, 2.4-A2 – connectors for external antennas; • Radio 5 GHz, Radio 2.4 GHz – radio interfaces that performs reception and transmission of data in wireless networks;... -
Page 10: Delivery Package
Install the device at the center of a wireless network; Minimize the number of obstacles (walls, roof, furniture and etc.) between WOP-2ac and other wireless network devices; Do not install the device near (about 2 m) electrical and radio devices;... -
Page 11: Calculating The Number Of Required Access Points
WOP-2ас. User manual 2.11 Calculating the number of required access points Table 4 – Attenuation values Material Change of signal level, dB 2.4 GHz 5 GHz Organic glass -0,3 -0,9 Brick -4,5 -14,6 Glass -0,5 -1,7 Plaster slab -0,5 -0,8 Wood laminated plastic -1,6... - Page 12 WOP-2ас. User manual Example of channel allocation scheme among neighboring access points in frequency range of 2.4 GHz when channel width is 20 МHz, see Figure 4. Figure 4 – Scheme of channel allocation among neighboring access points in the frequency range of 2.4 GHz when channel width is 20 MHz Similarly, the procedure of channel allocation is recommended to save for access point allocation between floors, see Figure 5.
-
Page 13: The Device Installation
WOP-2ас. User manual 2.13 The device installation The device should be attached to mast/pole or wall in accordance with the safety instruction and recommendations listed above. The device delivery package includes required mounting kit to attach the device to a mast/pole and wall. The device installation order: Mount brackets to the device;... - Page 14 WOP-2ас. User manual 2) Attach the bracket to a mast/pole: Figure 8 – Mounting bracket on a mast/pole a) Fix bracket on mast/pole by using clamps, see Figure 8 Figure 9 – Mounting screws to the device b) Install DIN7985 M6 screws in the top holes. Do not screw them fully. Leave at least 3 mm gap, see Figure 9.
- Page 15 WOP-2ас. User manual 3) Attach the device to a mast/pole: Figure 10 – Mounting the device on a mast/pole a) Install the device on the top untwisted screws of a bracket attached to a mast/pole, see Figure 10. b) Install screws to the bottom bolthole, see Figure 10. c) Tight up the top and bottom screws by using screwdriver.
-
Page 16: Order For Wall-Mounting Brackets
WOP-2ас. User manual 2.13.2 Order for wall-mounting brackets 1) Fix the bracket (included in the delivery package) to the wall: Figure 11 – Mounting bracket on a mast/pole a) Figure 11 shows the position of brackets on the device. b) Align four boltholes on bracket with the same boltholes on the device. Attach brackets with screws to the device by using screw-driver. - Page 17 WOP-2ас. User manual Figure 13 – Device dimensions corresponding mounting holes...
-
Page 18: The List Of Changes
WOP-2ас. User manual 3 The list of changes Document version Issue date Revisions Version 1.10 24.02.2020 Synchronization with firmware version 1.19.0 Version 1.9 01.10.2019 Synchronization with firmware version 1.18.1 Version 1.8 05.06.2019 Synchronization with firmware version 1.17.0 Version 1.7 12.02.2019 Synchronization with firmware version 1.16.0 Version 1.6... - Page 19 29 Okruzhnaya Str., Novosibirsk, Russian Federation, 630020 E-mail: techsupp@eltex-co.ru You are welcome to visit ELTEX official website to get the relevant technical documentation and software for ELTEX products or consult a Service Center Specialist on our technical forum. https://eltex-co.com/ https://eltex-co.com/support/downloads/...
Need help?
Do you have a question about the WOP-2ac and is the answer not in the manual?
Questions and answers