
Subscribe to Our Youtube Channel
Related Manuals for Amico LightMaster Multifunction Switch


Summary of Contents for Amico LightMaster Multifunction Switch
- Page 1 Operating and Maintenance Instructions LightMaster Multifunction Switch w w w . a m i c o . c o m...
-
Page 2: Table Of Contents
Contents Introduction Symbols Used in This Manual Safety Instructions Tool and Material Required Installing the LightMaster Multifunction Switch Mounting Drawings 10-11 Wiring Drawing 12-13 Disinfecting, Cleaning and Sterilization Technical Data of the LightMaster Multifunction Switch Warranty... -
Page 3: Introduction
Thank you for your purchase of the Light Master Multifunction Switch. This installation manual gives you instructions on how to install the Light Master Multifunction Switch. Please read the following instructions very carefully and follow the safety instructions and requirements. www.amico.com... -
Page 4: Symbols Used In This Manual
In combination with the following signal words the warning symbols means: Can lead to death or serious injury. DANGER Can lead to injury. WARNING ETL certification mark Trademarks: All trade names mentioned in these instructions are the exclusive property of the relevant manufacturers. Amico Lighting Solutions... -
Page 5: Safety Instructions
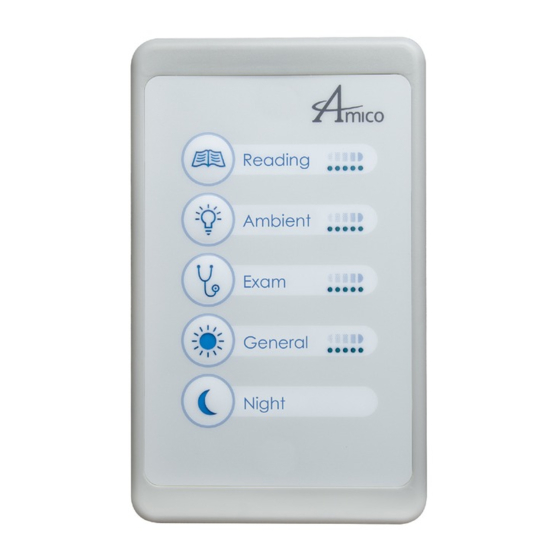
Incorporated in a single gang space, the LightMaster keypad can control the Reading, Ambient, Direct Light and Spot Lights that may be in the room. With infection control in mind, Amico uses a Mylar Overlay on each keypad for ease of cleaning. The LightMaster keypad is also designed as a low voltage device to ensure the highest levels of safety are met. - Page 6 NOTE: Before proceeding with the installation, make sure to remove the power to the electrical power supply. Light Master Controller is mounted in electrical box or light fixture as per the mounting drawing shown in this manual. Amico Lighting Solutions...
- Page 7 Installing LightMaster Multifunction Switch Remove 3 screws and take the cover off. Connect the Master Controller input wires (Black= Line/White=Neutral) to the line voltage using silicone wire nuts. NOTE: Do not turn the power on during the wiring work. Connect the ground wire from the main line power to the ground wire in the fixture.
-
Page 8: Installing The Lightmaster Multifunction Switch
Installing the LightMaster Multifunction Switch NOTE: Correct Polarity must be observed in order for the switch to operate. The Master Controller can be severely damaged by reverse polarity. Ensure that all electrical connections are secured properly and have proper connection. - Page 9 Installing the LightMaster Multifunction Switch Connect two wires from the nurse call to the bottom terminal block in the keypad in order to operate two functions through the pillow speaker. (Optional) NOTE: The nurse call should be connected to only one keypad in the room.
-
Page 10: Mounting Drawings
Mounting Drawings # 6 screws can be used to mount the Light Master controller and keypad. 6.63" 6.24" Ø0.17" LightMaster Controller 3.82" 3.43" Ø0.17" Security Power Unit Amico Lighting Solutions... - Page 11 Mounting Drawings # 6 screws can be used to mount the Light Master controller and keypad. 2.74" Ø0.17" Ø0.28" 3.28" 4.50" Key Pad www.amico.com...
-
Page 12: Wiring Drawing
Wiring Drawings NOTE: Standard Wiring Diagram is shown. Contact factory for custom requirement. LightMaster System Amico Lighting Solutions... - Page 13 Wiring Drawings NOTE: Standard Wiring Diagram is shown. Contact factory for custom requirement. LightMaster System with Secondary Power Unit www.amico.com...
-
Page 14: Disinfecting, Cleaning And Sterilization
Only keypad can be disinfected with the following diluted products: • Lysoformin • Dismozon • Hexaquart plus • Sagrotan- fast disinfecting cleaner NOTICE: The local government regulations for disinfection must also be observed in addition to these instructions. Amico Lighting Solutions... -
Page 15: Technical Data Of The Lightmaster Multifunction Switch
Technical Data of the LightMaster Multifunction Switch Input Voltage 120- 277 Volts, 50/60Hz Output Voltage 120- 277 Volts, 50/60Hz Maximum Load 2.5 amps Resistive, 1.8 amps Ballast at 120 Volts, 0.975 amps Resistive, 1.0 amp Ballast at 277 Volts Low Voltage Circuit... - Page 16 Amico Lights Corporation warrants its products against defective materials and workmanship for twelve (12) months from the date of shipment. Within this period, Amico Lights Corporation will repair or replace any part on site or at the factory which is proven to be defective at Amico Lights Corporation’s cost.
- Page 17 Notes...
- Page 18 Notes Amico Lighting Solutions...
- Page 19 Notes www.amico.com...
- Page 20 Amico Lighting Solutions | 55 East Wilmot Street, Richmond Hill Ontario, L4B 1A3, Canada Toll Free Phone: 1.877.462.6426 | Toll Free Fax: 1.866.440.4986 | Tel: 905.764.0800 | Fax: 905.763.8587 Email: info@amico.com | www.amico.com LT-INSTAL-INSTR-LMS 11.15.19...
Need help?
Do you have a question about the LightMaster Multifunction Switch and is the answer not in the manual?
Questions and answers