Advertisement
Advertisement

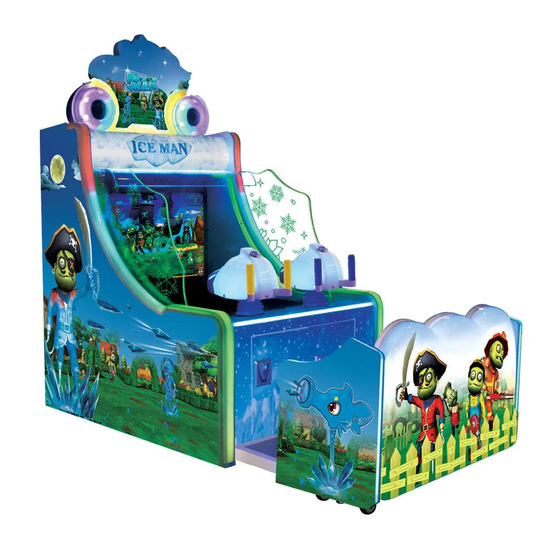
Related Manuals for Coastal Amusements ICE MAN


Summary of Contents for Coastal Amusements ICE MAN
-
Page 2: Table Of Contents
catalog Product parameters…………………………………………2 Part list…………………………………………………………3 Inner part……………………………………………………4-5 How to play……………………………………………………6 Game setting………………………………………………7-9 Game instructions………………………………………7-15 Fault detection and troubleshooting……………………15-16... -
Page 3: Product Parameters
Game Specifications Size: 93” (2362 mm) D x 43” (1100 mm) W x 83” (2112 mm) H Weight: 661 lbs. (300 kg) Voltage: 110 V frequency: 60 Hz Power: 1200 W light box Speaker box 42” LCD Small lightbox Side lamp Start Seat back pvc LED light... -
Page 4: Part List
Parts list Part name quantity remark manual AC power screw multiple... -
Page 5: Inner Part
Inner part 1. lightbox PVC Front door interior: Service button Tes t button Ticket dispens er Coin acceptor ticket box... - Page 6 Top and bottom back doors removed: Motherboard Power supply Power sup ply fuse Leakage protection switch plug Wate Water 30 de grees 45de grees Standard factory setting...
-
Page 7: How To Play
How to play Insert coin, then enter the select screen Shoot at the map to choose the scene When playing, shoot all the monster, be careful, they will attack you! Beat the boss to start another level... -
Page 8: Game Setting
Game settings Press TEST button to game setting menu, menu options as below: A) “Game Volume”: to set game standby volume, setting range is “0 ~ 100” “0” means no game st andby volume, this setting can only set standby volume B) “Background Volume”: to set game playing volu me. - Page 9 1. IO Test: enter this page to test potentiometer, light and guns are working well or not. The below optio ns only have OPEN or CLOSED option. When you want to test potentiometer, lig ht or guns are working well or not, press TEST button up / down to choose test option that you want to test, then press SERVICE button to set OPEN or CLOSED.
- Page 10 can press TEST button to exit gun adjustment page and stop gun adjustment. b )Adjustment finished Test:After adjustment , the game system to go to Cursor Micro Adjust Menu, as below photo. This menu page is to test the guns are adjusted well or not. Move the gun’s curser to any zone on screen to test(zone A to zone N).
-
Page 11: Game Instructions
Game instructions 1. When hardware testing is completed, the game begi ns to load. Progress bar shows the loading progress; 2. The game finished loadi ng into t he game L O G O screen, and wait for the player put the coin to start the game 3. - Page 12 4. Level selection: according to the prompt information on the screen, select any le vel, shoot box image into the game. 5.Six levels of the game screen are as below: cemetery desert...
- Page 13 street Snow garden Coming soon Warning screen: the enemy and the props attack will appear red border; 6. Continue screen: when the blood is close to the end, the continue screen will appear:...
- Page 14 7. The result of the screen: Successfully pass through the screen Failed to pass through the level screen 8. Game over screen: 9. Props Description...
- Page 15 big water flow props: Increase the amount of water, increase the ability to attack the zombies, as shown below 1P big water flow Normal water flow 10. Eat gold Description: Destroy a large number of zombie siege after the release of a large number of gold coins 11.
-
Page 16: Fault Detection And Troubleshooting
Fault detection and troubleshooting Fault Detection and troubleshooting Check for power 110V, the fuse may be A. The game won’t power up blown. 1. check whether the host audio output audio plug is a good contact. Is there a B. No sound output power amplifier, rheostat is broken. - Page 17 Check whether the cable is loose or the G. No signal host is working properly. 1. Clean muzzle: muzzle when there is not fluent scale, the available wire muzzle into the inside, drag back and forth to the gun out of the mouth of the scale. 2.
Need help?
Do you have a question about the ICE MAN and is the answer not in the manual?
Questions and answers