Advertisement
Quick Links
John Lewis
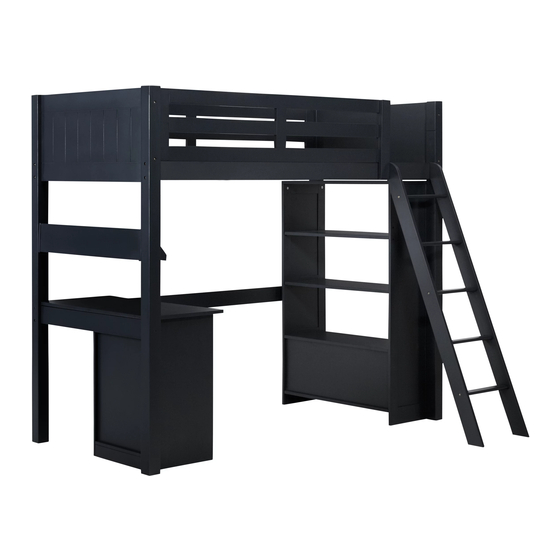
Thank you for purchasing this Ashton High Sleeper. Please read the instructions carefully before use
to ensure safe and satisfactory operation of theis product.
Pre-assembly Preperation
Please ensure that instructions are read in full before attempting to assemble this product.
Please check the pack contents before attempting to assemble this product. A full
checklist of components are given in this leaflet. If any components are missing,
please contact the John Lewis helpline.
This product is HEAVY, it should be assembled as near as possible to the point of
use. TAKE CARE WHEN LIFTING to avoid personal injury and (or) damage to the
product.
This product takes approximately 150 MINUITES to assemble with 2 PEOPLE.
The fittings pack contains SMALL ITEMS which should be KEPT AWAY FROM
YOUNG CHILDREN.
If you require any additional information or have any issues with this product please
call the John Lewis helpline on 01244 689949 or email mail@fwgroup-uk.com
Stock Code 803/60512, 803/60813
Advertisement

Related Manuals for John Lewis Ashton High Sleeper Bed


Summary of Contents for John Lewis Ashton High Sleeper Bed
- Page 1 This product takes approximately 150 MINUITES to assemble with 2 PEOPLE. The fittings pack contains SMALL ITEMS which should be KEPT AWAY FROM YOUNG CHILDREN. If you require any additional information or have any issues with this product please call the John Lewis helpline on 01244 689949 or email mail@fwgroup-uk.com...
- Page 2 Fittings Checklist Allen Key M4 Barrel Nut Camfix Minifix Minifix Bolt M6 x 100mm Bolt M6 x 50mm Bolt M6 x 35mm Bolt M6 x 30mm CSK Wooden Screw M4 x 50mm CSK Wooden Screw M4 x 32mm CSK Wooden Screw M3.5 x 16mm Handle Bolt Pan Head Wooden...
-
Page 3: Parts Checklist
Parts Checklist Headboard Panel Headboard Bottom Panel Leg Pole (Left) Leg Pole (Right) Short Guard Rail Long Guard Rail Ladder Support Ladder Vertical Rail Ladder Horizontal Rail I Ladder Horizontal Rail II Side Rail Front Side Rail Back Bottom Side Rail Slats... - Page 4 Step 1 Insert Dowel M10 x 50mm (S) and Barrel Nut M6 (B) into the Headboard Panel (1) and Headboard Bottom Panel (2) as shown. Attach Headboard Panel (1) and Headboard Bottom Panel (2) to the Leg Pole Left (3) and Leg Pole Right (4) using A Phillips Head Screwdriver and Allen Key M4 (A). Please use a Phillips Head Screwdriver to align the Barrel Nut M6 (B) into the hole position to ensure Bolt M6x 100mm (F) is fully secured.
- Page 5 Step 3 Lay out the Horizontal Rail I (9), Ladder Horizontal Rail II (10) and Ladder Vertical Rail (8) as shown below. Step 4 Insert Barrel Nut M6 (B) into Ladder Horizontal Rail II (10) then push the Ladder Horizontal Rail II (10) into the pre-drilled grooves in the Right Ladder Vertical Rail (8) and secure with Bolt M6 x 50mm (G) with Allen Key M4 (A) as shown in the diagram below.
- Page 6 Step 5 Attach the ladder to Side Rail Front (11) using Bolt M6x 35mm (H) and tighten it using Allen Key M4 (A) as shown below. WARNING Maximum height of the mattress. DO NOT EXCEED THIS LINE. Note: Ladder can be placed either end of High Sleeper.
- Page 7 Step 7 Insert Dowel M8 x 30mm (T) into the bottom of Short Guard Rail (5) and Long Guard Rail (6). Attach Long Guard Rail (6) to Side Guard Rail Back (12) and use bolt M6 x 100mm (F) to secure to Leg Pole Left (3) and tighten bolts using Allen Key M4 (A).
- Page 8 Parts Checklist for Book Rack Horizontal Rail Vertical Rail Side Rail...
- Page 9 Step 1 Step 2 Insert Dowel M8 x 30mm (T) to Horizontal Rail Attach Vertical Rail (2) to Horizontal Rail (1) and (1) and Vertical Rail (2) in pre-drilled holes. tighten using Camfix (C) with a Phillips Head Then insert Minifix (D) to Side Rail (3) as shown Screwdriver as shown in the diagram below.
- Page 10 Parts Checklist for Desk Table Top Side Panel Left and Right Table Top Support Rail Support Rail Front Bottom Rail Back Bottom Panel Bottom Panel Table top Side Rail Door Panel Shelf Back Panel...
- Page 11 Step 1 Insert Dowel M8 x 30mm (T) to the Support Rail (4), Table Top Support Rail (3), Front Bottom Rail (5), Back Bottom Rail (6) and Bottom Panel(1), as shown below. Then insert Minifix (D) into Side Panels Left and Right (2), as shown below Please Note: The mini x (D) used in parts 2 below are 11mm not 9mm.
- Page 12 Step 3 Step 4 Attach Bottom Panel (7) to Side Panel (2) and Attach Side Panel (2) to assembly as shown in the tighten it using Camfix (C) with a Phillips diagram below and secure it using Camfix (C) Head Screwdriver as shown in the diagram with a Phillips Head Screwdriver.
- Page 13 Step 8 Attach assembled Desk to Ashton High Sleeper Bed as shown below. Using bolt M6 x 30 (I) and tighten it using Allen Key (A) as shown below.
- Page 14 Step 9 Attach Top Panel (1) to assembled Desk and tighten it using Spring Washer (Q) and bolt M6 x 30mm (I) with Alllen Key M4 (A) as shown in diagram below. Step 10 Attach Table Top Panel (8) to the Side Table Top (1) and tighten it using bolt M6 x 50mm (G) with the Allen Key M4 (A) as shown in the diagram below.
- Page 15 Parts Checklist for Shelf and Storage Top panel Side Panel Left and Right Middle Panel Bottom Panel Fixed Shelf Door Panel Bottom Rail Front Bottom Rail Front Back Panel Adjustable Shelf...
- Page 16 Step 1 Insert Dowel M8 x 30mm (T) to Bottom Rail Front (8), Bottom Rail Back (7), Bottom Panel (4), Middle Panel (3), Fixed Panel (5) and Side Panel (2). Insert Minifix (D) to Top Panel (1) and Side Panel (2), as shown below.
- Page 17 Step 3 Atach Bottom Panel (4), Middle Panel (3) and Fixed Panel (5) to Side Panel (2) using Camfix (C) and tighten using a Phillips Head Screwdriver as shown in the diagram below. Step 4 Step 5 Insert Back Panel (9) as shown in the Attach Side Panel (2) to assembly using Camfix (C) and diagram below.
- Page 18 Step 6 Step 7 Secure Bottom Rail Back (7) with CSK Wooden Attach Top Panel (1) to assembly and lock the Screw M4 x 50mm (J) using Phillips Head Side Panel with Camfix (C) to the Top Panel Screwdriver. Secure Bottom Rail Front (8) and using a Phillips Head Screwdriver, as shown in the tighten using CSK Wooden Screw M4 x 32mm (K) diagram below.
- Page 19 Step 9 Attach assembled Book Case inside the Ashton High Sleeper as shown Below. Using bolt M6 x 35mm (H) tighten the screw using a Allen Key (A). Step 10 Insert Adjustable Shelf (10) to the Assembled Book Case on the Shelf Pin (R) as shown in the diagram below.
- Page 20 This product complies with BS EN 747-1:2012 - Safety, strength and durability requirements. If you require any additional information or have any issues with this product please call the John Lewis helpline on 01244 689949 or email mail@fwgroup-uk.com John Lewis Partnership 171 Victoria Street London SW1 5NN...
Need help?
Do you have a question about the Ashton High Sleeper Bed and is the answer not in the manual?
Questions and answers