Table of Contents
Advertisement
Quick Links
WIDOS
W. Dommer Söhne GmbH D-71254 Ditzingen-Heimerdingen
Working Instructions
Headquarters: D-71254 Ditzingen-Heimerdingen Country Court Stuttgart HRB 200973 Managing director: Jürgen Dommer
Einsteinstr. 5
Website: www.widos.de
Translation
Sheet welding machine
WIDOS PSM 20
Keep for further use!
Phone
+49 (0) 71 52 99 39 - 0
Fax
+49 (0) 71 52 99 39 - 40
Email: info@widos.de
Kunststoffschweißtechnik
Advertisement
Table of Contents

Related Manuals for widos PSM 20


Summary of Contents for widos PSM 20
- Page 1 W. Dommer Söhne GmbH D-71254 Ditzingen-Heimerdingen +49 (0) 71 52 99 39 - 40 Website: www.widos.de Email: info@widos.de Kunststoffschweißtechnik Working Instructions Translation Sheet welding machine WIDOS PSM 20 Keep for further use! Headquarters: D-71254 Ditzingen-Heimerdingen Country Court Stuttgart HRB 200973 Managing director: Jürgen Dommer...
- Page 2 Telephone: ++49 (0) 3 71 / 8 15 73 - 0 Telephone: ++41 (0) 71 / 388 89 79 Fax: ++49 (0) 3 71 / 8 15 73 - 20 Fax: ++41 (0) 71 / 388 89 73 10.12.2013 Working instructions WIDOS PSM 20 Page 2 of 31...
- Page 3 Therefore the searched information can be easily found. 10.12.2013 WIDOS W. Dommer Söhne GmbH Einsteinstraße 5 D-71254 Ditzingen-Heimerdingen All rights reserved Reprinting only allowed with permission of the corporation. Any changes are subject to technical innovations. 10.12.2013 Working instructions WIDOS PSM 20 Page 3 of 31...
-
Page 4: Table Of Contents
1.2. Safety measures ........................6 1.3. Conformity ..........................6 1.4. Designation of the product ....................7 1.4.1. Technical data ........................7 1.4.1.1. WIDOS PSM 20 General data ................7 1.4.1.2. Heating element......................7 1.4.1.3. Hydraulic aggregate....................8 1.4.2. Accessories (optional) ......................8 1.4.3. Wear parts ..........................8 SAFETY RULES......................9 2.1. - Page 5 Checking of the level of the hydraulic oil.................26 7.4.1. Used hydraulic oil ......................27 7.5. Service unit..........................27 7.6. Transport ..........................27 7.7. Disposal ..........................27 ELECTRIC DIAGRAM ....................28 DECLARATION OF CONFORMITY ................31 10.12.2013 Working instructions WIDOS PSM 20 Page 5 of 31...
-
Page 6: Description Of Product
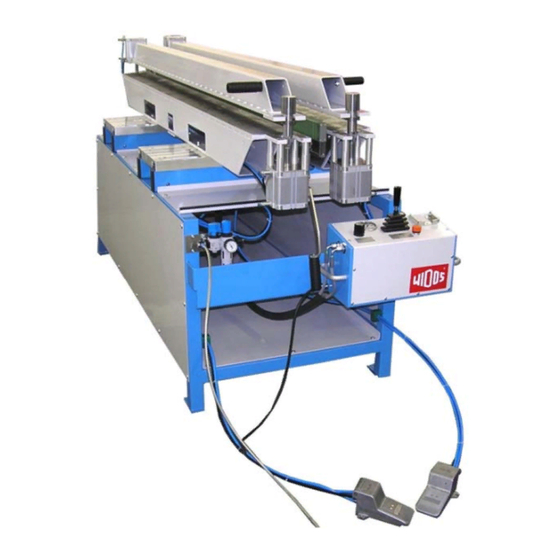
Usage and non-intended use The WIDOS PSM 20 is a workshop machine for the heating element butt welding of sheets made out of PE and PP for the thickness range up to 20 mm and width of plate up to 2000 Any other use of this machine is non-intended. -
Page 7: Designation Of The Product
The product is designated by a type label. It contains the type of the machine, the serial number and the year of construction. 1.4.1. Technical data 1.4.1.1. WIDOS PSM 20 General data Welding pressure: maximum 59 kN with 250 bar - length up to 2000 mm Sheet size max.:... -
Page 8: Hydraulic Aggregate
Heating plate complete 8215800 Heating cartridge Ø 10 x 1060; 1,8 kW; 230 V on request Temperature probe PT1000 H09082 For article numbers and single parts, please contact the WIDOS Company. 10.12.2013 Working instructions WIDOS PSM 20 Page 8 of 31... -
Page 9: Safety Rules
T h e r e g u l a t i o n s f o r t h e p r e v e n t i o n o f a c c i d e n t s a r e v a l i d ( U V V ) . 10.12.2013 Working instructions WIDOS PSM 20 Page 9 of 31... -
Page 10: Obligations Of The Operator
Only skilled and trained persons are allowed to work at the machine. A person who is being trained may only work at the machine under supervision of an experienced person. 10.12.2013 Working instructions WIDOS PSM 20 Page 10 of 31... -
Page 11: Dangers While Handling The Machine
Kunststoffschweißtechnik 2.7. Dangers while handling the machine The WIDOS PSM 20 is constructed according to the latest technical standard and the acknowledged technical safety rules. However, dangers for the operator or other persons standing nearby may occur. Also damages of the machine itself or of other parts are possible. -
Page 12: Danger Of Crushing Between And Near The Clamping Beams
Machine parts which are not in a perfect condition are to be immediately replaced. Only use original WIDOS spare and wear parts. In case of purchase orders please always indicate the machine number! 2.10. Cleaning of the machine... -
Page 13: Functional Description
The welding joint can be clamped out and the welding process is completed. Image of a heating element butt welding: heating element heats the sheets up to welding temperature completed weld joint with bead on top and below 10.12.2013 Working instructions WIDOS PSM 20 Page 13 of 31... -
Page 14: Operating And Indicating Elements
(optional) giving a good view on it. Oil dipstick oil filler neck / checking the oil level. Oil level must be between the two marks Pressure gauge Indicating of the hydraulic pressure 10.12.2013 Working instructions WIDOS PSM 20 Page 14 of 31... -
Page 15: Components At The Heating Element
- cable for the connection with the local power supply 230 V / 50 Hz, covering 16 A Welding position Basic position Lever The heating element is brought to welding position by swiveling the lever. 10.12.2013 Working instructions WIDOS PSM 20 Page 15 of 31... -
Page 16: How To Clamp The Sheet
Detach the threaded bolts at the rear cylinder and disconnect the pneumatic hoses from the cylinder (left image). Slightly lift the clamping beams at the front and swing the piston rods forwards out (right image). 10.12.2013 Working instructions WIDOS PSM 20 Page 16 of 31... -
Page 17: How To Clamp Sheets For Angle Welding
4.3. How to clamp sheets for angle welding You may weld an angle out of two plastic sheets on the WIDOS PSM 20. The horizontal sheet of 10 - 20 mm is clamped onto the left side (chapter: 4.2). -
Page 18: How To Open The Clamping Beam To Remove The Pieces
Lift the clamping beam at the front, remove the space and swing the piston rod in again; the beam must rest on the washer afterwards. 10.12.2013 Working instructions WIDOS PSM 20 Page 18 of 31... -
Page 19: How To Weld A Pipe Out Of Sheets
Kunststoffschweißtechnik 4.5. How to weld a pipe out of sheets The PSM 20 allows you to weld a plastic sheet together to get a pipe. For this purpose clamp the plastic sheet on one side. Now bend the sheet and fix it on the opposite side. -
Page 20: Starting And Operating
The welding process may not take place in case of direct insolation. If local temperature is under 5° C the following measures have to be taken: if necessary heat-up sheet ends. Take measures against rain, wind and dust. 10.12.2013 Working instructions WIDOS PSM 20 Page 20 of 31... -
Page 21: Welding Process
Slew in the cleaned heating element when it has reached the desired temperature. If necessary wait until the control lamp smoothly blinks. You must insert the spacer now during angle welding (chapter: 4.3). 10.12.2013 Working instructions WIDOS PSM 20 Page 21 of 31... - Page 22 While welding angles or pipes, open the front clamping beams (chapter: 4.4) and remove the welded piece to the front. Afterwards, necessarily shut the open clamping beams again. open the slides <valve lever> on: “BACKWARDS“. 10.12.2013 Working instructions WIDOS PSM 20 Page 22 of 31...
-
Page 23: Welding Tables
The aligning pressure = welding pressure can be calculated for all sheets with special measures by the following formula. Sheets out of PE: L * W * 0,15 / 23 Sheets out of PP: L * W * 0,10 / 23 10.12.2013 Working instructions WIDOS PSM 20 Page 23 of 31... - Page 24 Welding Table Chapter 6 Kunststoffschweißtechnik 10.12.2013 Working Instructions WIDOS PSM 20 page 24 / 1 of 31...
- Page 25 Welding Table Chapter 6 Kunststoffschweißtechnik 10.12.2013 Working Instructions WIDOS PSM 20 page 24 / 2 of 31...
-
Page 26: Maintenance / Storage / Transport
Welding Table Chapter 6 Kunststoffschweißtechnik 10.12.2013 Working Instructions WIDOS PSM 20 page 24 / 3 of 31... - Page 27 Welding Table Chapter 6 Kunststoffschweißtechnik 10.12.2013 Working Instructions WIDOS PSM 20 page 24 / 4 of 31...
- Page 28 Welding Table Chapter 6 Kunststoffschweißtechnik 10.12.2013 Working Instructions WIDOS PSM 20 page 24 / 5 of 31...
- Page 29 Welding Table Chapter 6 Kunststoffschweißtechnik 10.12.2013 Working Instructions WIDOS PSM 20 page 24 / 6 of 31...
- Page 30 Welding Tables Chapter 6 Kunststoffschweißtechnik 10.12.2013 Working Instructions WIDOS PSM 20 Page 25 / 1 of 31...
- Page 31 Welding Tables Chapter 6 Kunststoffschweißtechnik 10.12.2013 Working Instructions WIDOS PSM 20 Page 25 / 2 of 31...
- Page 32 Welding Tables Chapter 6 Kunststoffschweißtechnik 10.12.2013 Working Instructions WIDOS PSM 20 Page 25 / 3 of 31...
- Page 33 Welding Tables Chapter 6 Kunststoffschweißtechnik 10.12.2013 Working Instructions WIDOS PSM 20 Page 25 / 4 of 31...
- Page 34 Welding Tables Chapter 6 Kunststoffschweißtechnik 10.12.2013 Working Instructions WIDOS PSM 20 Page 25 / 5 of 31...
- Page 35 Welding Tables Chapter 6 Kunststoffschweißtechnik 10.12.2013 Working Instructions WIDOS PSM 20 Page 25 / 6 of 31...
-
Page 36: General
Machines which are loaded above the average, the checking cycle should be shortened. The work have to be executed by company WIDOS GmbH or by one of its authorized representatives. The linear guides must be cleaned every week, e.g. with a brush. -
Page 37: Used Hydraulic Oil
The machine and wear parts have to be disposed of at the end of their useful life according to the common Waste Management Laws in a proper and environmentally sound manner. 10.12.2013 Working instructions WIDOS PSM 20 Page 27 of 31... - Page 38 +49 (0) 71 52 99 39 - 0 W. Dommer Söhne GmbH D-71254 Ditzingen-Heimerdingen +49 (0) 71 52 99 39 - 40 Website: www.widos.de Email: info@widos.de Kunststoffschweißtechnik 8. Wiring diagrams 10.12.2013 Working instructions WIDOS PSM 20 Page 28 of 31...
- Page 39 Wiring diagrams Chapter 8 Kunststoffschweißtechnik 10.12.2013 Working instructions WIDOS PSM 20 Page 29 of 31...
- Page 40 Wiring diagrams Chapter 8 Kunststoffschweißtechnik 10.12.2013 Working instructions WIDOS PSM 20 Page 30 of 31...
-
Page 41: Declaration Of Conformity
Safety technology requirements at fluid technical devices and components (pneumatic part) The technical documentation is completely available. The working instructions are available in the language German and English. Ditzingen-Heimerdingen, the 10.12.2013 Martin Dommer (Technical director) 10.12.2013 Working instructions WIDOS PSM 20 Page 31 of 31...
Need help?
Do you have a question about the PSM 20 and is the answer not in the manual?
Questions and answers