Table of Contents
Advertisement
Installation Guide
For Model:
CWF18BNK3
LISTED
For
Damp Location
E192641
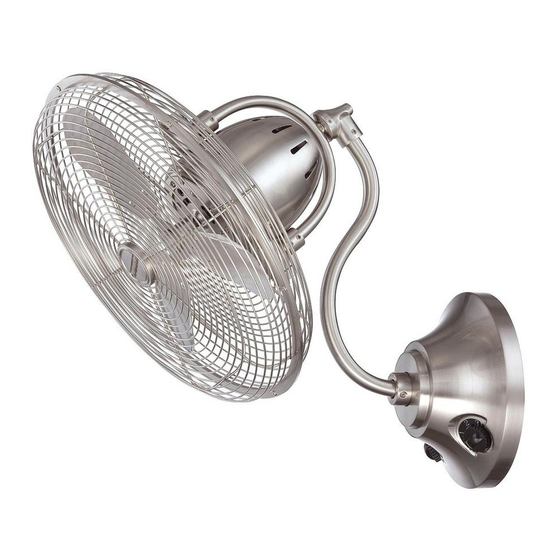
net weight of fan: 16.39 lb (7.42 kg)
READ THESE INSTRUCTIONS AND
SAVE THEM FOR FUTURE USE
Table of Contents:
Safety Tips. pg. 1
Unpacking Your Fan. pg. 2
Parts Inventory. pg. 2
Installation Preparation. pg. 3
Installation of Fan. pgs. 5 - 8
Wiring. pg. 9
Testing Your Fan. pg. 10
Troubleshooting. pg. 10
Warranty. pg. 10
Parts Replacement. pg. 10
PRINTED IN CHINA
Advertisement
Table of Contents

Related Manuals for Litex CWF18BNK3


Summary of Contents for Litex CWF18BNK3
-
Page 1: Table Of Contents
READ THESE INSTRUCTIONS AND SAVE THEM FOR FUTURE USE Installation Guide For Model: CWF18BNK3 Table of Contents: Safety Tips. pg. 1 Unpacking Your Fan. pg. 2 Parts Inventory. pg. 2 Installation Preparation. pg. 3 Installation of Wall Bracket. pgs. 3 - 4 Installation of Fan. -
Page 2: Safety Tips
SAFETY TIPS. WARNING: To reduce the risk of electrical shock, turn off the electricity to the fan at the main fuse box or circuit panel before you begin the fan installation or before servicing the fan or installing accessories. READ ALL INSTRUCTIONS AND SAFETY INFORMATION CAREFULLY BEFORE INSTALLING YOUR FAN AND SAVE THESE INSTRUCTIONS. -
Page 3: Unpacking Your Fan
1. Unpacking Your Fan. Carefully open the packaging. Remove items from Styrofoam inserts. Remove fan assembly and place on carpet or Styrofoam to avoid damage to finish. Do not discard fan carton or Styrofoam inserts should this fan need to be returned for repairs. -
Page 4: Installation Preparation
3. Installation Preparation. To prevent personal injury and damage, ensure that the hanging location allows the fan a clearance of 7 feet (2.13m) from the floor to 7 feet prevent accidental contact with the fan. (2.13m) This fan can only be mounted on an indoor wall or on an enclosed porch or enclosed patio wall. - Page 5 4. Installation of Wall Bracket. (cont.) stud Determine the approximate position of where you want the fan to be located on the wall. [Remember that the fan must be mounted at least 7 feet (2.13m) from the floor.] Then, locate the stud in the wall.
-
Page 6: Installation Of Fan. Pgs
5. Installation of Fan. wall mounting Remove set screw at bottom of fan assembly. bracket hook With the wall mounting bracket secured to the wall and able to support the fan assembly, you assembly are now ready to hang your fan. Grab the fan assembly firmly with two hands. - Page 7 5. Installation of Fan. (cont.) Install 4 back cage screws (provided in one of motor hardware packs) into each of the 4 holes in the center of the back cage to secure back cage to motor. back cage screws back cage Turn blade assembly nut clockwise to remove from fan motor shaft.
- Page 8 5. Installation of Fan. (cont.) blade assembly Place blade assembly over motor shaft, making lock sure to align gap on the blade assembly with the lock pin on the shaft. Using the Allen wrench, located in one of the hardware packs, turn preassembled set screw located on the blade assembly clockwise to secure blade assembly to fan motor.
- Page 9 5. Installation of Fan. (cont.) Place hook at top of front cage over edge at top back of back cage. Note: Make sure hook engages hook cage with vertical rib and that all front and back cage font cage holes match up; this will allow the front cage and the back cage to hang together while back cage inserting the front cage screws (provided in one...
-
Page 10: Wiring
6. Wiring. Make sure all electrical connections comply with Local Codes or Ordinances and the National Electrical Code. If you are unfamiliar with electrical wiring, please use a qualified electrician. WARNING: If using this fan in a DAMP location, this fan must be connected to a supply circuit that is protected by a Ground Fault Circuit Interrupter (GFCI) to reduce the risk of personal injury, electrical shock or death. -
Page 11: Testing Your Fan
Service at 1-800-527-1292 to arrange for return of fan. to LOW (L). If fan does not function properly, Return fan, shipping prepaid, to Litex Industries, Ltd. We will please refer to "Troubleshooting" section to repair or ship you a replacement fan, and we will pay the solve any issues before contacting Customer return shipping cost.
Need help?
Do you have a question about the CWF18BNK3 and is the answer not in the manual?
Questions and answers