Table of Contents
Advertisement
Advertisement
Table of Contents

Related Manuals for ADC ADView 2


Summary of Contents for ADC ADView 2
- Page 1 ® ® ADView 2 Modular Diagnostic Station User Manual...
- Page 2 93-9005-00 ADView 2 User Manual | 2 September 1, 2016...
-
Page 3: Copyright Information
ADView 2. This manual and the ADView 2 described herein are protected under copyright law under which states they may not be copied, in whole or in part, without written consent of ADC. The information in this manual is furnished for guidance only, is subject to change without notice, and should not be construed as a commitment by ADC. -
Page 4: Welcome T O T He A Dc ® A Dview ® 2
RJ11 Ethernet port for network connectivity, and a mini-USB port used to connect the device to a PC or laptop for advanced device configuration. Note: For purposes of this manual, the ADView 2 (Model 9005) may be referred to as “the ADView 2, or “the device.”... -
Page 5: Table Of Contents
.. 26 General P rinciple o f O peration: ........ 26 System D escription: ............ 28 93-9005-00 ADView 2 User Manual | 5 September 1, 2016... -
Page 6: 1. Safety Considerations
3 years of age to adults. This device is intended for use by a qualified clinician when it is necessary to take a single or a series of vital signs measurements on a patient. The ADView 2 is only for measurement, recording and display. -
Page 7: Possible Adverse Reactions
Wireless Networking When connecting this device to a wireless network, it is important to use only the hardware specified by ADC (see Accessories section for details). Unsupported USB accessories, including unsupported wireless adapters, have been intentionally disabled and will not function with this device. - Page 8 Inspect the sensor site as directed in the sensor Directions for Use to ensure skin integrity and correct positioning and adhesion of the sensor. WARNING: Do not use high frequency surgical equipment with the ADView 2 as this may cause loss of stored data WARNING: No modification of this equipment is allowed.
-
Page 9: Icons, Symbols And Abbreviations
Icons, Symbols and Abbreviations Icons and Symbols The following icons and symbols are used in this guide, on the ADView 2 equipment, and in packaging. Warning message Caution message Manufacturer Manufacture date Authorized representative in the European Community ... -
Page 10: Commonly Used Abbreviations
Systolic BP 2. Setting Up the ADView 2 Your ADView 2 comes ready to use. The battery and any optional modules purchased were installed prior to shipping. Unpacking the Monitor As you unpack your ADView 2, check to make sure you have all the proper components. -
Page 11: Rear Panel Configuration
Rear Panel Configuration ADView 2 connections on the back of the device: AC power cord Wi-Fi USB dongle (optional) Printer or barcode scanner USB cable (optional) Ethernet cable (optional) Mini USB cable to connect to PC or laptop 93-9005-00... -
Page 12: Side/Temperature Panel Configuration
To install an SpO2 module, use the included Phillips head screwdriver to remove the cover on the left side of the unit (the left side when the screen is facing the user). Attach the module and fasten in place. 93-9005-00 ADView 2 User Manual | 12 September 1, 2016... -
Page 13: Install Batteries
Flush eyes immediately with water, and seek medical attention. Battery Disposal The ADView 2 has a lithium-ion battery that contains materials which may be hazardous to human health. Do NOT dispose of battery in domestic waste! Instead, please dispose of in an environmentally responsible way, or return the battery to ADC. -
Page 14: Attach Connections To The Device
Mounting Options The ADView 2 is designed to be used on a tabletop or mounted to a wall or mobile stand. Your device may be delivered with the appropriate mounting kit, depending on the configuration your facility ordered. Please see the separate mounting hardware instructions. -
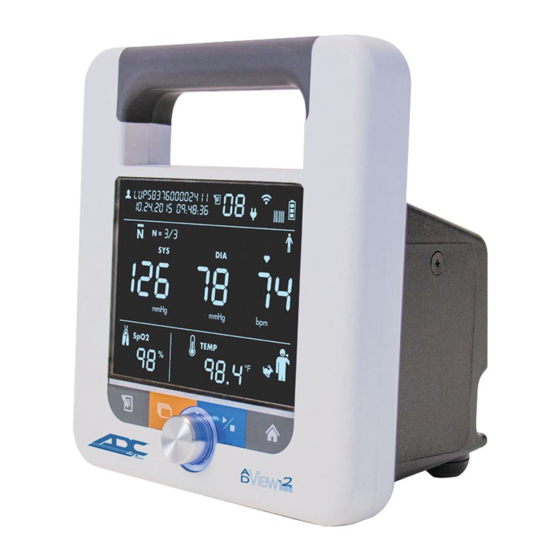
Page 15: G Etting T O K Now T He A Dview 2
3. Getting to Know the ADView 2 Measurement Display Patient Identification and Date/Time Stamp Patient ID Memory Mode Information Memory icon Memory Delete icon Connections to Ancillary Devices and Networks Wi-Fi radio on (segments will illuminate in series) - Page 16 Selected icon will blink after 1 second. Press the selection knob to confirm the selection. Adult BP Mode icon. This icon is illuminated when the Adult BP mode is selected. The ADView 2 will remain in the selected patient mode until a new mode is set.
- Page 17 Pediatric BP Mode icon. This icon is illuminated when the Pediatric BP mode is selected. The ADView 2 will remain in the selected patient mode until a new mode is set. Heart Rate and MAP Measurements Measured in BPM (beats per minute) is illuminated when a heart rate is shown in the heart rate display.
-
Page 18: Control Panel
Selection Knob This round knob rotates clockwise and counterclockwise and can be pressed in to select different options on the ADView 2. This button can be used to change parameters and to set the intended parameter. Start/Stop Button Press this button to start or stop a BP measurement. -
Page 19: 4. Good To Know Before You Begin
With a Barcode Scanner If your ADView 2 is connected to a barcode scanner, you can scan your patient’s barcode ID and it will show at the top left of your screen. Then, the patient ID will remain attached to all measurements taken, saved in memory, and/or sent to your facility’s EMR. -
Page 20: Saving Measurements
Selection Knob. The measurements will be saved to the device memory only. Without EMR Connectivity The ADView 2 does not have to be connected to an EMR system to save measurements. You can save them to the device’s own memory. With the patient’s current measurements displayed on the screen:... -
Page 21: U Sing A Dview 2 F Or B P M
Step 2: Select Between Adult Vs Pediatric Mode The ADView 2 offers two different measurement modes for two very different types of patients: Adults and Pediatric patients (children between the ages of 3 and 12). To switch between Adult and Pediatric modes:... -
Page 22: Step 3: Select Measurement Mode
Manual Mode. Single Measurement Mode This is the device’s default mode. The ADView 2 will be in this mode each time it is powered up. Pressing the Home button will also revert to single measurement mode. ... - Page 23 **Note: All values selected during the Averaging Measurement Mode will be displayed the next time that this mode is used, so that the same customized averaging protocol can be set and used each time that Averaging Measurement Mode is used. 93-9005-00 ADView 2 User Manual | 23 September 1, 2016...
-
Page 24: Step 4: How To Measure Bp In Each Mode
The timer will then count down the seconds until the first reading. After all measurements are taken and averaged, results will display. A long beep will sound to indicate measurement is complete. 93-9005-00 ADView 2 User Manual | 24 September 1, 2016... -
Page 25: Step 5: Record Results
If you have the optional pulse oximetry module on your device, you can measure HR through the SpO sensor. See next section (section 7) for more on use of this option. The ADView 2 uses BP as the default HR source. HR source can be selected using the Advanced Configuration Application. 93-9005-00... -
Page 26: U Sing A Dview 2 F Or P Ulse O
7. Using ADView 2 for Pulse Oximetry An optional SpO module allows you to measure the oxygen saturation of arterial bloodflow and display the reading on the ADView 2. There are two different types of optional SpO modules: ChipOx and Masimo SET General Principle of Operation: The pulse oximeter directs red and infrared light into a capillary bed and measures the change in light absorption during the pulsatile cycle. - Page 27 NOTE: This device does not include an alarm system that detects an SpO2 or pulse rate physiological alarm condition. This device is not designed for long-term monitoring and should only be used for spot-check measurements. 93-9005-00 ADView 2 User Manual | 27 September 1, 2016...
-
Page 28: System Description
System Description: The ADView 2 spot check device with pulse oximetry module consists of a base ADView 2 device for the display of SpO2 measurement data and other user information, either a ChipOx or Masimo SET SpO2 module which is attached to the ADView 2 base unit as described in Section 2, and the specific reusable pulse oximeter probe and/or cable that comes packaged with each module. - Page 29 Masimo Graphical Plot: Below is a graphical plot of discreet A values measured with Masimo SET Oximetry in a clinical study using DCI/DCIP pulse oximetry sensors: 93-9005-00 ADView 2 User Manual | 29 September 1, 2016...
- Page 30 Special Notes for ChipOx SpO module: NOTE: Use only SpO2 sensors from ADC approved for use on the ADView 2 ChipOx SpO2 module. NOTE: A functional tester cannot be used to assess the accuracy of a ChipOx pulse oximeter sensor or pulse oximeter.
- Page 31 . The accuracy is not specifed below 70% SaO . In addition, here are detailed measured A values over the specified discreet ranges: Range 1.54% 90-100% 2.10% 80-90% 2.56% 70-80% 93-9005-00 ADView 2 User Manual | 31 September 1, 2016...
-
Page 32: Measurement
8. Using ADView 2 for Temperature Measurement The ADView 2 has several options for measuring a patient’s body temperature. Covidien Filac 3000 Thermometry Module Your device may come equipped with a Covidien Filac 3000 digital thermometer capable of taking an oral, axillary (under arm) or rectal temperature reading. -
Page 33: Axillary Temperature Taking
33°C (91°F). The accuracy and measurement time of Cold Mode measurements are equivalent to standard prediction measurements at the respective body sites. 93-9005-00 ADView 2 User Manual | 33 September 1, 2016... -
Page 34: Functions
9. Using ADView 2 EMR and Memory Functions Section 4, “Good to Know Before You Begin,” provides some basic information about the ADView 2’s EMR and memory functions. Here are more details about how these work. Memory Mode When you power up the unit, the memory identifier appears at the top of the display beside the Memory Icon This is the number that will be associated with the next set of measurement results that are sent to the device memory. -
Page 35: Emr Transmissions
NOTE: The Patient ID must be validated by the EMR before any vital signs measurements can be sent to the EMR. Sending Measurements to EMR Sending measurements to an EMR will work only if your ADView 2 has been configured to connect to an EMR. After scanning a valid Patient ID, and taking vital signs measurements, press the Memory Button . -
Page 36: T Aking C Are O F Y Our A Dview 2
“No response (time out).” This message occurs when the device is connected to the network but the EMR is not responding. It also can occur if network connectivity is lost. If there is a network connection, the ADView 2 will continue to try to transmit the message every 10 seconds. -
Page 37: Preventative Maintenance
Preventative Maintenance System Self Checks The ADView 2 performs a range of system checks during normal operation. If the device detects a problem, it will display an error code.Replaceable Parts On a routine basis, inspect the monitor, cuffs, and hoses for cracks, fraying, or kinks. Immediately replace any damaged part. -
Page 38: 11. Accessories & Replacement Parts
1.631.273.9600 Fax: 1.631.273.9659 Email: customerservice@adctoday.com Web: www.adctoday.com 11. Accessories & Replacement Parts Contact your ADC sales representative to purchase the following accessories or items: Complete Modules (when purchased separately) Part Number Description 9005TO Temperature Module, Oral/Axillary 9005TR Temperature Module, Rectal... -
Page 39: Power Supplies
9005TRK Rectal Temperature Kit (Probe, Well, Probe Covers) SpO2 Accessories Part Number Description 9005SP SpO2 ChipOx Finger Sensor, Adult 9005SPDYS SpO2 ChipOx Finger Sensor, Pediatric Other Accessories Part Number Description 93-9005-00 ADView 2 User Manual | 39 September 1, 2016... -
Page 40: 12. Status Messages & Alarms
12. Status Messages & Alarms If the ADView 2 has a problem taking a measurement, you may see a code on the display screen. icon will blink with the measurement display result and code. Below are common error codes. Take action as directed on the screen, or as suggested in the table below. - Page 41 150-156 ensuring proper protocol as described in Section 7. Unplug sensor and reconnect. If issue persists, power off and repower on the ADView 2. Retry reading. If issue persists, call Customer Service. 126-132 Power off and repower on the ADView 2.
-
Page 42: Out Of Range Measurements
If repower attempt does not work, plug in power source and power off and repower on ADView 2 again. Retry reading. If issue persists, call Customer Service. 203-211 Clear the error and power off and repower on the ADView 2. Replace battery. 212-214 Call Customer Service. -
Page 43: Service Centers
13. Frequently Asked Questions What is the expected battery life for the ADView 2? When batteries are fully charged, the ADView 2 is designed to run on internal battery power for 200 measurement cycles (BP, temperature and SpO measurements) before requiring recharge. When only the bottom segment of the battery symbol is illuminated, there is between 11 percent and 40 percent battery power remaining. -
Page 44: 14. Technical Information
Can pulse oximetry, temperature measurement, a barcode scanner or printer be added later too? Yes, you can add vital signs modules and accessories to the ADView 2 at any time. Can EMR connectivity be established at a later date if not enabled as part of initial configuration? Yes, EMR settings can be accessed via the Advanced Configuration Application at any time. - Page 45 WARNING: The ADView 2 should not be used adjacent to or stacked with other equipment. If adjacent or stacked use is necessary, the ADView 2 should be observed to verify normal operation in the configuration in which it will be used.
- Page 46 Compliance Electromagnetic environment – guidance test level level Portable and mobile RF communications equipment should be used no closer to any part of the ADView 2, including Conducted RF 3 Vrms 3 Vrms cables, than the recommended separation distance IEC 61000-4-6...
- Page 47 To assess the electromagnetic environment due to fixed RF transmitters, an electromagnetic site survey should be considered. If the measured field strength in the location in which the ADView 2 is used exceeds the applicable RF compliance level above, the ADView 2 should be observed to verify normal operation. If abnormal performance is observed, additional measures may be necessary, such as re-orienting or relocating the ADView 2.
-
Page 48: Specifications, General
Heart Rate: 30-220 BPM (beats per Range: mmHg (pediatric). Systolic: 40-260 mmHg (adult), 40- minute) 230 mmHg (pediatric) Accuracy (BP): Meets or exceeds ANSI/AAMI/ISO 81060-2:2013 standard for noninvasive accuracy (±5mmHg 93-9005-00 ADView 2 User Manual | 48 September 1, 2016... -
Page 49: Notes On Blood Pressure Data
Std. Mode (Axillary/Rectal): ± 0.1°C Direct Mode: ± 0.1°C Response Time 3-10 sec (Oral Quick Mode) 6-10 (Oral Standard Mode) 8-12 sec.(Axillary Mode) 10-14 sec.(Rectal Mode) 60-120 sec.(Direct Mode all sites) Resolution 0.1°C 93-9005-00 ADView 2 User Manual | 49 September 1, 2016... -
Page 50: Limited Warranty
This limited warranty is void if the device has been damaged by accident, misuse, negligence, or act of God, or serviced by any person not authorized by ADC. This limited warranty contains the entire obligation of ADC and no other warranties expressed, implied, or statutory are given. - Page 51 93-9005-00 ADView 2 User Manual | 51 September 1, 2016...
Need help?
Do you have a question about the ADView 2 and is the answer not in the manual?
Questions and answers
Monitor is dark. How do I increase the illumination on the monitor?