Advertisement
Quick Links
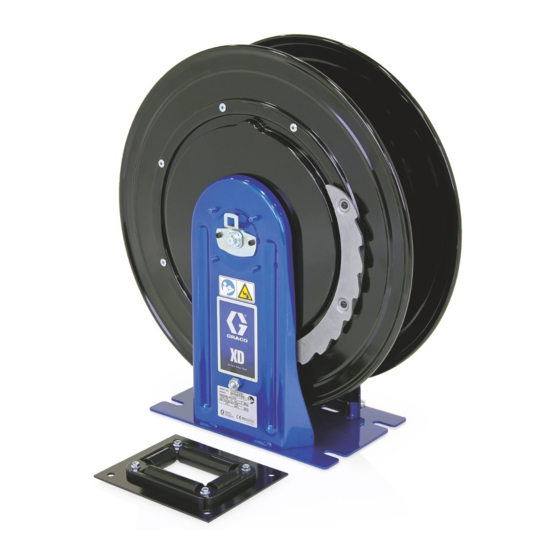
Instructions
Ratchet and Latch
Replacement Kit for XD30
High Capacity Hose Reels
Instructions for Replacing Ratchet and Latch XD Series High Capacity Hose Reels.
Part No: 24C995
Important Safety Instructions
Read all warnings and instructions in this man-
ual. For complete Warnings and instructions
see the XD30 High Capacity Hose Reel
Instruction Manual. Save all instructions.
Ref No. Description
40
NUT, lock
41
BUSHING, pawl
42
PAWL, ratchet
43
BOLT, 10 x 40
44
SPRING
48
SCREW
59
RATCHET
Related Kits:
The following optional replacement kits are available for use when replacing the ratchet and latch. Contact your Graco
Distributor or Graco Customer Service at 612-623-6928 or 1-800-533-9655 (toll free).
Swivel Replacement Kit: 24C993 or 24C994
Swivel Seal Replacement Kit: 24D134
Spool Replacement Kit: 24C998
Hose Replacement Kit: 24C986, 24C987, 24C988, 24C989, 24C990, 24C991, 234C992
41
40
Qty
1
1
1
1
1
4
1
3A0142A
44
43
42
48
59
ENG
Advertisement

Related Manuals for Graco XD30


Summary of Contents for Graco XD30
- Page 1 SCREW RATCHET Related Kits: The following optional replacement kits are available for use when replacing the ratchet and latch. Contact your Graco Distributor or Graco Customer Service at 612-623-6928 or 1-800-533-9655 (toll free). Swivel Replacement Kit: 24C993 or 24C994 Swivel Seal Replacement Kit: 24D134...
-
Page 2: Pressure Relief Procedure
Warnings Warnings WARNING SKIN INJECTION HAZARD High-pressure fluid from dispense valve, hose leaks, or ruptured components will pierce skin. This may look like just a cut, but it is a serious injury that can result in amputation. Get immediate surgical treatment. •... - Page 3 . 4). NOTE: Part numbers provided in these instructions cor- respond to the part numbers used on the assembly drawing provided in the XD30 High Capacity Hose Reel Instruction Manual. Unless otherwise noted, do not discard removed parts. They will be reused for reassembly.
- Page 4 Swivel Assembly (24C993 or 24C994) or just the Swivel Seals (24D134) are available. Contact your local Graco Distributor or Graco Customer Service to order this kit. 10. Remove snap ring (25). 11. Remove guide arm and pedestal base (24 / 30) as one piece.
- Page 5 Warnings 12. Remove nut (40) and bolt (43), bushing (41), pawl Reassembly (42) and spring (44) from arm (F . 8). Discard these parts. Use new parts included in the kit for 1. Install new pawl (42), bushing (41), spring (44), reassembly.
- Page 6 Warnings 3. Install ratchet (59) to side of spool using screws (48) . 12). . 13 10. Tighten bolt (18). 11. Align pedestal assembly (26) to base (24). Install 2 screws (27). Tighten and torque screws to 20-30 ft. . 12 lbs (89 - 133 N.m).
-
Page 7: Adjusting Spring Tension
Adjusting Spring Tension Adjusting Spring Tension IMPACT HAZARD The spring is always under great tension and could be propelled or uncoil with enough force to cause serious injury. • The hose reel spring is not a serviceable part. Do not attempt to replace or service the spring. •... - Page 8 Adjusting Spring Tension 5. Replace one screw (B). Leave ratchet (C) in place 7. Pull hose to test tension. Repeat 3 - 7 if necessary . 19). . 21). . 21 . 19 8. Replace and tighten screws (B) and (A) (F .
- Page 9 Adjusting Spring Tension Increasing Spring Tension 1. Loosen, but DO NOT REMOVE, bolt (A) (approxi- 3. Insert ratchet (C) in slot (D) first, then entirely mately 3 to 5 turns) (F . 23). remove screws (B) (F . 25). . 23 2.
- Page 10 Install meter or dispense device to end of hose. All written and visual data contained in this document reflects the latest product information available at the time of publication. Graco reserves the right to make changes at any time without notice. This manual contains English. MM 3A0142...
Need help?
Do you have a question about the XD30 and is the answer not in the manual?
Questions and answers