Advertisement
Quick Links
6026-2415 Natural Wood Drying Rack
A
5 ea
Long hanging bar
B
1 ea
Medium hanging bar
C
2 ea
Short hanging bar
D
3 ea
Center hanging bar
STEP 1 Begin with the right side
frame (F) and place it on a hard,
flat surface like the floor. Make
sure all locking collars (G) are
inserted correctly as it came from
the box. Place 3 collar rings (H)
over exposed locking collars on
right side frame. Snap five long
hanging bars (A), one medium
hanging bar (B) and two short
hanging bars (C) into locking
collars (G) in right side frame.
Place the three center hanging
bars (D) into center axis of side
frame. Secure center hanging
bars with three screws (I) using a
Phillips screwdriver (not
included).
STEP 2 Next, place 3 remaining
collar rings (H) over exposed
locking collars on left side frame
(E). Place left side frame (E) onto
each hanging bar snapping in place
just like the right side was done.
Secure center hanging bars with
three screws (I) using a Phillips
screwdriver.
Page 1
E
1 ea
Left side frame
F
1 ea
Right side frame
NOTE: Make
sure the tabs on
end of hanging
D
bars (A, B, & C)
line up with
notch in locking
collar (G).
I
D
2012 Whitmor, Inc.
©
A
D
A
A
I
I
I
E
D
This product is intended
for drying laundry.
G
16 ea
Locking collar
(Inserted into parts E & F)
H
6 ea
Collar ring
Tools Needed:
Phillips Screwdriver,
I
6 ea
and Coin or Standard
Screw
Screwdriver
A
A
C
D
C
B
F
I
I
H
H
H
D
H
H
H
Advertisement

Subscribe to Our Youtube Channel
Related Manuals for Whitmor 6026-2415


Summary of Contents for Whitmor 6026-2415
- Page 1 6026-2415 Natural Wood Drying Rack 2012 Whitmor, Inc. © This product is intended 5 ea for drying laundry. Long hanging bar 16 ea 1 ea 1 ea Locking collar Medium hanging bar (Inserted into parts E & F) Left side frame...
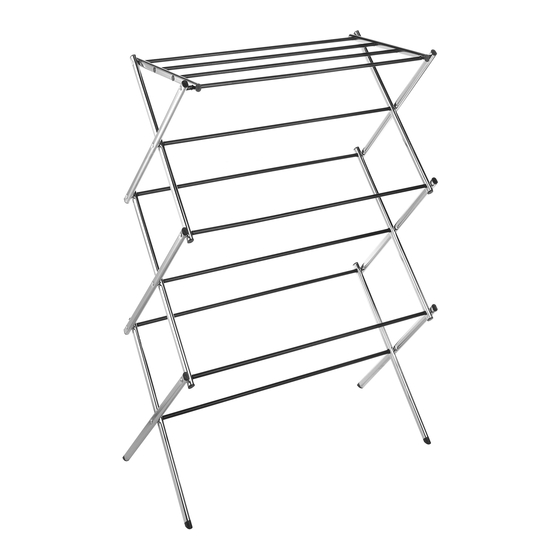
- Page 2 6026-2415 Natural Wood Drying Rack 2012 Whitmor, Inc. © STEP 3 Your final Whitmor Natural Wood Drying Rack should look like this. Enjoy its use. Parts Breakdown: Left and right side frames should already be assembled from the box, but this parts breakdown should help if any questions still remain.
Need help?
Do you have a question about the 6026-2415 and is the answer not in the manual?
Questions and answers