Table of Contents
Advertisement
Quick Links
ASSEMBLY AND INSTALLATION INSTRUCTIONS
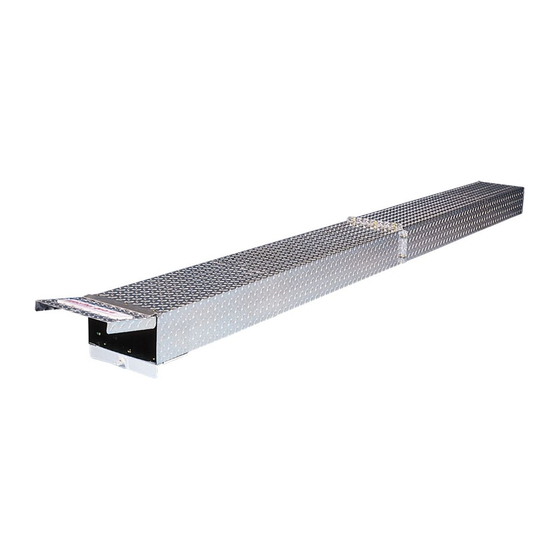
Aluminum Conduit Carrier - Model 237
IMPORTANT
BEFORE YOU BEGIN
Read these instructions and
warnings completely before
installation.
BOLT KIT
Bolt Kit #32-0237 is provided with
your Conduit Carrier. Check this
bolt kit to be sure the following
parts are included:
Quan.
Description
4
#12-24 Nylon Lock Nuts
(black dichromate)
10
1/4-20 x 3/4" Hex Hd. Bolt
3
1/4-20 x 5/8" Hex Hd. Bolt
13
1/4-20 Nylon Lock Nuts
20
1/4" Flat Washers
This product is only intended for, and only safe for, storing and
transporting tubing, pipe and conduit. Any modifications made
to this product, or use of this product for any other purpose than
its intended use, could create a hazardous condition that can
cause serious personal injury or property damage.
PARTS LIST
• 1- Front Body
• 1- Rear Body Assembly
• 1- Door Assembly
• 1- Door Stop
• Weatherstripping (bulk)
• 2- "U" Clamps
• 4- Clamp Brackets
WARNING
TOOLS REQUIRED
· 7/16" Open or Box End Wrench (2)
· 3/8" Open or Box End Wrench
· Razor knife or scissors
Advertisement
Table of Contents

Subscribe to Our Youtube Channel
Related Manuals for Weather Guard 237


Summary of Contents for Weather Guard 237
- Page 1 ASSEMBLY AND INSTALLATION INSTRUCTIONS Aluminum Conduit Carrier - Model 237 WARNING IMPORTANT BEFORE YOU BEGIN This product is only intended for, and only safe for, storing and Read these instructions and transporting tubing, pipe and conduit. Any modifications made warnings completely before to this product, or use of this product for any other purpose than installation.
- Page 2 "U" Clamp Front Body p/n 21-0085 p/n 23-0241C Weatherstrip Door Assembly p/n 25-0037C 1/4-20 x 5/8" Rear Body Assembly Hex Hd. Bolt p/n 25-0035C Weatherstrip Door Stop 1/4-20 x 3/4" p/n 20-2376C Hex Hd. Bolt 1/4" Flat Washer Weatherstrip 1/4-20 Nylon Lock Nut Clamp Bracket p/n 20-2390...
- Page 3 3. Open the Door, cut and adhere 4. Cut and adhere Weatherstripping to Weatherstripping to fit inside the Door fit the attaching flanges on the Front where it touches the Rear Body Assem- Body ( see Figure 5. ). bly ( see Figure 4. ). Be sure you don’t cover the latch hole.
- Page 4 Any modification or unintended use of this product shall immediately void all manufacturers warranties. Manufacturer disclaims all liability for injuries to persons or property resulting from any modification to, or unintended use of this product. Looking for dependable commercial van equipment? Rely on Weather Guard for quality and long-lasting products.
Need help?
Do you have a question about the 237 and is the answer not in the manual?
Questions and answers