
Related Manuals for Exsys EX-1329


Summary of Contents for Exsys EX-1329
- Page 1 Anleitung EX-1329 USB 3.1 (Gen1) zu 4 Port Gigabit Ethernet USB 3.1 (Gen1) to 4 Port Gigabit Ethernet Vers. 1.2 / 20.02.18 Manual...
-
Page 2: Table Of Contents
Layout, Connections & DIP-Switch ···················································· 12-14 3.1 Layout ····································································································· 12 3.2 Connections ····························································································· 13 3.3 DIP-Switch ······························································································· 14 Hardware Installation ······································································ 14-15 Driver Installation ··········································································· 16-17 Technical Information ·········································································· 17 Technical Drawing ·············································································· 18 © Copyright 2018 by EXSYS Vertriebs GmbH. All Rights Reserved... -
Page 3: Beschreibung
Deutsch 1. Beschreibung Die EX-1329 ist mit einer USB 3.1 (Gen1) C-Buchse zum Anschluss an den PC und vier RJ45 Ports zum Anschluss für Endgeräte ausgestattet. Die EX-1329 ermöglicht Ihnen auf einfachste Weise Ihren Desktop PC oder Ihr Notebook in ein 10/100/1000Mbps Netzwerk einzubinden oder mehrere Endgeräte anzuschließen. -
Page 4: Aufbau, Anschlüsse & Dip-Schalter
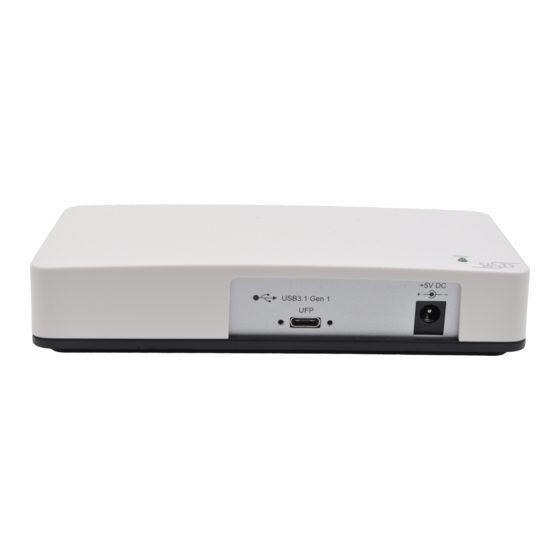
Deutsch EX-1329 3. Aufbau, Anschlüsse & DIP-Schalter 3.1 Aufbau Vorderseite: Betriebs LED 4x RJ45 Anschluss DIP-Schalter Rückseite: 1x USB 3.1 (Gen1) 5V DC Anschluss Upstream C-Buchse für optionales Netzteil © Copyright 2018 by EXSYS Vertriebs GmbH. All Rights Reserved... -
Page 5: Anschlüsse
USB 3.1 (Gen1) C-Buchse: Hinweis! Durch die Doppelbelegung der Pins, kann der USB Typ-C Stecker beidseitig in die Buchse gesteckt werden. 5 Volt Buchse: Achtung!!! Nur zur Verwendung mit optional erhältlichem Netzteil! © Copyright 2018 by EXSYS Vertriebs GmbH. All Rights Reserved... -
Page 6: Dip-Schalter
1329 geben. Bei Unklarheiten halten Sie sich bitte an die Bedienungsanleitung Ihres Computersystems. 1. Falls Sie die EX-1329 an einer Wand montieren möchten oder die EX-1329 auf ei- ner Trägerschiene installieren wollen, befolgen Sie als erstes die Punkte 5, 6 & 7 auf Seite 7, bevor Sie mit Punkt 2 fortfahren. - Page 7 5. Installieren Sie die zwei DIN-Rail Clips an der Wandmontagehalterung. Wandmontagehalterung Löcher für die Löcher für die Wandmontage Wandmontage DIN-Rail Clips 6. Anbringung der Wandmontagehalterung an der Unterseite der EX-1329. 7. Installation der EX-1329 auf einer Trägerschiene. © Copyright 2018 by EXSYS Vertriebs GmbH. All Rights Reserved...
-
Page 8: Treiber Installation
Nach Abschluss der Hardwareinstallation müsste nun der DIP-Schalter 1 auf aktiv und DIP-Schalter 2, 3 & 4 auf inaktiv stehen und die EX-1329 mit dem PC verbunden sein. Die Stellung der DIP-Schalter ist aus diesem Grund wichtig, da das Betriebssystem die Ports nicht in der korrekten Reihenfolge installiert wenn alle DIP-Schalter auf aktiv ge- setzt sind. -
Page 9: Technische Daten
Deutsch 5. Treiber Installation ÜBERPRÜFEN DES INSTALLIERTEN TREIBER Öffnen Sie den >Geräte-Manager<. Jetzt müssten Sie unter „USB-Controller“ folgen- de Einträge sehen: Sind diese oder ähnliche Einträge vorhanden, ist die EX-1329 richtig installiert. 6. Technische Daten Chipsatz: Realtek RTL8153B Datentransfer-Rate: USB 3.0: bis zu 5Gbit/s Netzwerk: 10/100/1000Mbit/s Anschlüsse:... -
Page 10: Technische Zeichnung
Deutsch EX-1329 7. Technische Zeichnung © Copyright 2018 by EXSYS Vertriebs GmbH. All Rights Reserved... -
Page 11: Description
Supports: Windows XP/ Vista/ 7/ 8.x/ 10/ Server 20xx/ Linux 2.6.x & MAC OS 10.x • Certificate for 2. Extent of Delivery Before you connect the EX-1329 to your PC, you should first check the contents of the delivery: • EX-1329 •... -
Page 12: Layout, Connections & Dip-Switch
English EX-1329 3. Layout, Connections & DIP-Switch 3.1 Layout Front: Power LED 4x RJ45 Connector DIP-Switch Back: 1x USB 3.1 (Gen1) 5V DC Connector for Upstream C-Port optional Power Supply © Copyright 2018 by EXSYS Vertriebs GmbH. All Rights Reserved... -
Page 13: Connections
By dual assignment of the pins, the USB Type-C plug can be plugged into the port on both sides. 5 Volt Connector: ATTENTION!!! Use only with the optional power supply! © Copyright 2018 by EXSYS Vertriebs GmbH. All Rights Reserved... -
Page 14: Dip-Switch
Please refer your computer’s reference manual whenever in doubt. 1. If you want to install the EX-1329 on a wall or on a DIN-Rail, then please go ahead with the steps 5, 6 & 7 on page 15 before proceeding to step 2. - Page 15 Wall Mounting Bracket Holes for Holes for Wall Mounting Wall Mounting DIN-Rail Clips 6. Assemble the Wall Mounting Bracket at the bottom of the EX-1329. 7. Assemble the EX-1329 on the DIN-Rail. © Copyright 2018 by EXSYS Vertriebs GmbH. All Rights Reserved...
-
Page 16: Driver Installation
After completion of the hardware installation, the DIP-Switch 1 should be set to enabled and DIP-Switches 2, 3 & 4 to disabled and the EX-1329 should be connected to the PC. The position of the DIP-Switches is therefore important because the operating sys- tem does not install the ports in the correct order when all DIP-Switches are set to ac- tive at the same time. -
Page 17: Technical Information
5. Driver Installation CHECK INSTALLED DRIVER Open the >Device manager<. Now you should see at „USB-Controller“ the following new entry's: If you see this or a similar information the EX-1329 is installed correctly. 6. Technical Information Chip-Set: Realtek RTL8153B Data Transfer Rate: USB 3.0: up to 5Gbit/s... -
Page 18: Technical Drawing
English EX-1329 7. Technical Drawing © Copyright 2018 by EXSYS Vertriebs GmbH. All Rights Reserved...
Need help?
Do you have a question about the EX-1329 and is the answer not in the manual?
Questions and answers