GCX M Series Installation & Operating Manual
Hide thumbs
Also See for M Series:
- Assembly installation manual (20 pages) ,
- Installation manual (4 pages) ,
- Mounting assembly installation manual (3 pages)
Table of Contents
Advertisement
Quick Links
INSTALLATION & OPERATING MANUAL FOR M-SERIES MOUNTS
WARNING: Do not position support arm or device over a patient.
Before mounting the arm:
1. Verify that the Channel has been installed and approved in accordance with the GCX Wall Channel Installation
Instructions.
2. Check the weight of the device to be mounted. This arm is either rated for 30 lbs [13.6 kg] or 60 lbs [27.2 kg],
depending on the front-end mounting configuration. Refer to the duty rating label located on top of the arm at the Slide
pivot point. It is not recommended that you attempt to use the arm for weights outside of this range.
3. If you are unsure of your application, please contact a GCX product specialist at (800) 228-2555 for assistance.
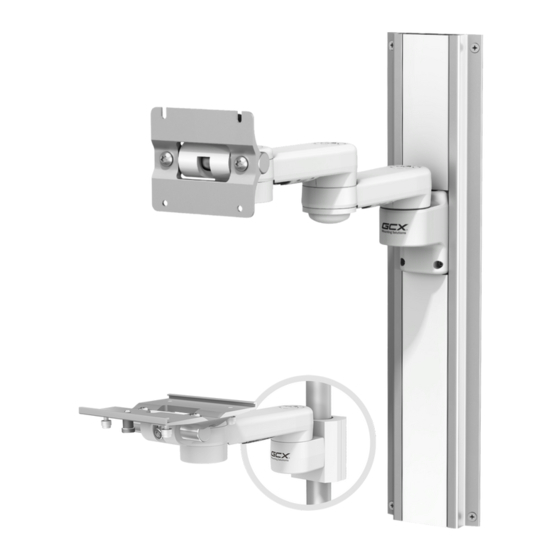
Installing Arm in Channel
1. Install Adjustable Stop in top of Channel, slide
to bottom of Channel and tighten center screw.
2. While supporting the bottom of the Arm with one hand,
guide the Slide (rear of the arm) into top of the Channel.
3. Guide Arm to desired height and tighten two (2) set
screws with 1/8" [3 mm] hex wrench (provided).
Mounting a Device on the Arm
•
Most devices will require the attachment of device-
specific mounting hardware provided by GCX.
Please attach this hardware in accordance with
instructions provided with the Mounting Adapter.
•
Most arms will have either a "slide-on" or a "VESA Standard"
Mounting Plate at the front of the arm. The arm may
have either a Tilt Adjustment Lever installed for rear
mounted devices or a Tilt Limit Screw for bottom
mounted devices.
•
The Tilt Limit Screw may be removed with the ¼" hex wrench provided.
•
The Tilt Adjustment Lever may be removed by rotating
the Lever counterclockwise
Mounting Device on Slide-on Mounting Plate
1. Pull Spring Plunger at the front of the Mounting Plate.
Slide the device laterally into the Mounting Plate until the
Plunger snaps into the clearance hole at the front of the
Mounting Adapter.
2. Tighten the Nylon Locking Screws located on bottom or rear of
the Mounting Plate.
Adjustable Stop
Set Screws (2)
Wall Channel
Tilt Limit Screw
"Slide-on" Mounting Plate
Plunger
Locking Screws (4)
DU-WMM-0001 Rev B 4/12/07 GCX Corp. Page 1 of 3
Slide
Tilt Adjustment Lever
Mounting Plate
Advertisement
Table of Contents

Related Manuals for GCX M Series


Summary of Contents for GCX M Series
- Page 1 It is not recommended that you attempt to use the arm for weights outside of this range. 3. If you are unsure of your application, please contact a GCX product specialist at (800) 228-2555 for assistance. Adjustable Stop Installing Arm in Channel 1.
- Page 2 2. To adjust the swivel tension, remove bolt cap from front end of the Arm and use a ½” [13 mm] socket wrench to tighten or loosen the Swivel Tension Bolt. DU-WMM-0001 Rev B 4/12/07 GCX Corp. Page 2 of 3...
- Page 3 Dry the arm thoroughly after cleaning. CAUTION: GCX makes no claims regarding the efficacy of the listed chemicals or processes as a means for controlling infection. Consult your hospital’s infection control officer or epidemiologist. To clean or sterilize mounted devices or accessory equipment, refer to the specific instructions delivered with those products.
Need help?
Do you have a question about the M Series and is the answer not in the manual?
Questions and answers