Table of Contents
Advertisement
Quick Links
Wooden Frame Type
Thank you for selecting our product. Before starting installation,
please read this manual thoroughly to ensure correct installation.
Please keep this manual at hand for future reference.
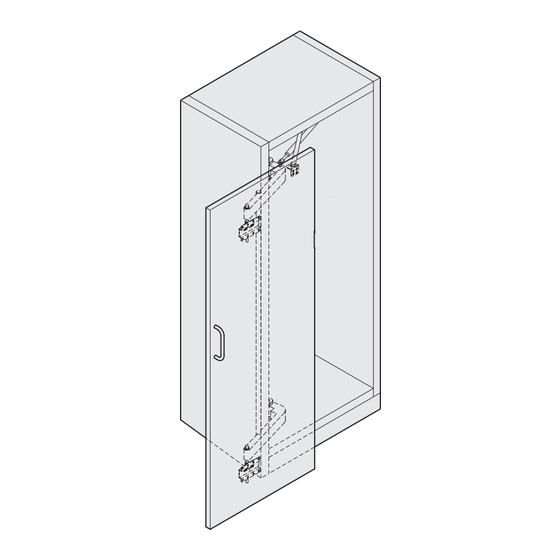
■ About this product.
Lateral swing mechanism hardware that can be installed in narrow
Ideal for tight from space applications
●
When placing cabinets next to each other the front will be
●
●
It is possible to adjust the door vertically (-3 to +7 mm), horizontally
(±7 mm), as well as in depth and parallel.
*In order to make it possible to adjust, make sure that the shelf board
can be detached for access.
■For your safety work and operation.
Meaning of symbols
Warning
Prohibited
Caution
WARNING:
If these warnings are not followed, it may result in death or serious injury.
This (sliding door system) should be installed by an experienced person who has correct knowledge. If the system is not
installed correctly, the door will not operate smoothly, and or may cause injury.
opening/closing the door. Also make sure to only use the designated screws and to fasten them firmly. A frame with poor
strength or loose screws might result in improper and slower movement of the door. In the worst case, the door might drop
down and cause injury.
Do not try to use this product for any other purposes than originally intended for. Do not use the parts for applications that are
Do not disassemble nor modify any parts other than those described in this document.
Caution
If these cautions are not followed, it may result in injury or damage.
well-functioning and safe.
frame and door are not warped nor bent, since it may affect the movement of the door.
If cutting any parts, make sure to remove any burr before installation.
recommended).
Do not slam open/close the door. It may cause a failure.
Notes on works
■
Handling of product
●
The door is not supplied.
●
After unpacking the product, check for damages on the parts.
FAD-44、FAD-44L
Required
Instruction Manual
Video Link
R
1
Advertisement
Table of Contents

Related Manuals for SUGATSUNE LAMP MonoFlat FAD Series


Summary of Contents for SUGATSUNE LAMP MonoFlat FAD Series
- Page 1 Video Link FAD-44、FAD-44L Instruction Manual Wooden Frame Type Thank you for selecting our product. Before starting installation, please read this manual thoroughly to ensure correct installation. Please keep this manual at hand for future reference. ■ About this product. Lateral swing mechanism hardware that can be installed in narrow Ideal for tight from space applications ●...
-
Page 2: Table Of Contents
●Specifications From 750 mm to 800 mm* Door thickness From 24 to 38 mm Cabinet inside * If the overlay distance on both sides of side plate is measurement Door weight Max. 35 kg 25 mm, the door width should be 800 to 850 mm. Door height Max. - Page 3 Working in Door and Cabinet Have a fixing screw pilot hole drilled in the cabinet or have that position marked precisely beforehand. Set core material of which strength is enough for secure fixing to this part. Prepare hole for 4.5 x 20 cross-recessed bind self-tapping screw 6 8 5 3 7 8...
-
Page 4: Hinge Base X
Installing Parts to Cabinet (750−800) Channel rail Support arm Gas spring holder Bearing housing Upper arm (w/ stopper) (See Fig. on P.5.) Hinge base Hinge base Lower arm Bearing housing Symbols from shown in the figure indicate the locations described below. - Page 5 Installing hinge base Use the provided screws to fix each hinge base temporarily to six drilled holes on the cabinet. Torque the screws in a criss-cross pattern to prevent the hinge Hinge base base to be warped. Countersunk self-tapping screw Installing upper and lower arms (1) Fix the lower bearing housing to each hinge base by using the provided screws and spring washers.
-
Page 6: Support Arm
Installing channel rail (1) Fix the channel rail to the top board with the provided screws. (2) When screwing, tighten in order of ① to ⑤ as shown in the right figure. ① ④ Channel rail ③ ⑤ ② Countersunk self-tapping screws 4×20 ... - Page 7 Installing Arm Connecting Pipe Cutting Arm connecting pipe Clamp (1) Pipe length = Cabinet inside height - 350 (This does not include the caps on both ends.) (2) Cut the pipe end without the clamp. (3) Remove burrs around the cutting edge to prevent injury and enable smooth insertion of the cap.
- Page 8 Installing Gas Spring Gas spring Gas spring holder Upper arm (w/ stopper)
-
Page 9: Screw Pin X
Fixing Gas spring (arm side) Installing Screw pin Tighten the Screw pin firmly into the tapped hole on the top face of Move the Upper arm to the full opening position where the the Upper arm. stopper touches the side board, then assemble the Gas spring to the Screw pin as shown in the below figure. -
Page 10: Unit
Installing parts to the door Fixing Positioning unit CAUTION Mount the Positioning unit on the rear face of the door with Set core material of which strength is enough for secure tightening of self-tapping the provided screws so that the LAMP logo can be seen screws to the locations that parts are to be installed. -
Page 11: Hexagon Head Bolt M10X150
Installing door Assembling Upper and Lower arms and Positioning unit Support arm 1. Open Upper and Lower arms to full opening position as below. Upper arm (w/ stopper) The figure shows the Upper arm from underneath. Upper Positioning unit Arm connecting pipe Upper arm Rear face of door 2. - Page 12 When positioning the door, be sure to loosen the hexagon socket head cap screw on the Support arm crank bracket (see P. 6 ④ ) to allow the bracket to move along the Channel rail. Vertical adjustment Vertical positioning of door Door Hexagon head boltM10×150 Gap is not...
- Page 13 Release Support arm crank bracket. Hexagon socket head cap screw M6 ×12 Support arm crank bracket Loosen the hexagon socket head cap screws on the Support Channel rail arm crank bracket, and allow the bracket to move along the Channel rail. Support arm Support arm L-type bracket...
- Page 14 Video Link Troubleshooting 【1】 Large friction sound when opening/closing door Hexagon head bolt M10×150 Possible cause: Positioning unit may touch the arm. Leave a Solution: clearance here Refer to P. 12 ② and make a clearance between the Positioning unit and arm. Positioning unit 【2】...
- Page 15 【4】 Gap between door and cabinet still remains Overview: This system controls the slant of the door by bowing the Connecting pipe. Simply try the following method unsuspectingly. Release the stress on Connecting pipe by Hexagon socket head loosening the 4 pcs of Hexagon socket head cap screw A M6×35 cap screws.
- Page 16 【5】 There are gaps on all four corners Possible cause: Large doors are likely to warp, and perfect adjustment is not Brush seal possible in case of a large warp. FAD-44 5000 mm :( )× Adjust the gap between the door and the cabinet by attaching FAD-44L 6000 mm :(...
Need help?
Do you have a question about the LAMP MonoFlat FAD Series and is the answer not in the manual?
Questions and answers