Table of Contents
Advertisement
Quick Links
3.3AT
TREADMILL OWNER'S MANUAL
MANUEL DU PROPRIÉTAIRE DU TAPIS ROULANT
MANUAL DEL PROPIETARIO DE LA CAMINADORA
Read the TREADMILL GUIDE before using this OWNER'S MANUAL.
Lisez le guide du TAPIS ROULANT avant de vous référer au MANUEL DU PROPRIÉTAIRE.
Lea la GUÍA DE LA CAMINADORA antes de utilizar este MANUAL DEL PROPIETARIO.
AFG14_OM_3.3AT_Rev1_2.indd 1
7/31/14 4:41 PM
Advertisement
Table of Contents

Related Manuals for AFG 3.3AT


Summary of Contents for AFG 3.3AT
- Page 1 3.3AT TREADMILL OWNER’S MANUAL MANUEL DU PROPRIÉTAIRE DU TAPIS ROULANT MANUAL DEL PROPIETARIO DE LA CAMINADORA Read the TREADMILL GUIDE before using this OWNER’S MANUAL. Lisez le guide du TAPIS ROULANT avant de vous référer au MANUEL DU PROPRIÉTAIRE. Lea la GUÍA DE LA CAMINADORA antes de utilizar este MANUAL DEL PROPIETARIO.
-
Page 2: Important Precautions
IMPORTANT PRECAUTIONS ENGLISH FRANÇAIS ESPAÑOL SAVE THESE INSTRUCTIONS When using an electrical product, basic precautions should always be followed, including the following: Read all instructions before using this treadmill. It is the responsibility of the owner to ensure that all users of this treadmill are adequately informed of all warnings and precautions. - Page 3 DANGER WARNING TO REDUCE THE RISK OF ELECTRICAL SHOCK: TO REDUCE THE RISK OF BURNS, FIRE, ELECTRICAL SHOCK OR INJURY TO PERSONS: • At NO time should children under the age of 13 or pets be within 10 feet of the machine. Always unplug the treadmill from the electrical outlet immediately after using, before cleaning, performing maintenance and putting on or •...
-
Page 4: Grounding Instructions
GROUNDING INSTRUCTIONS ASSEMBLY This product must be grounded. If a treadmill should malfunction or breakdown, grounding provides a path of least resistance for electrical current to reduce the risk of electrical shock. This product is equipped with a cord having an equipment-grounding conductor and a grounding plug. -
Page 5: Pre-Assembly
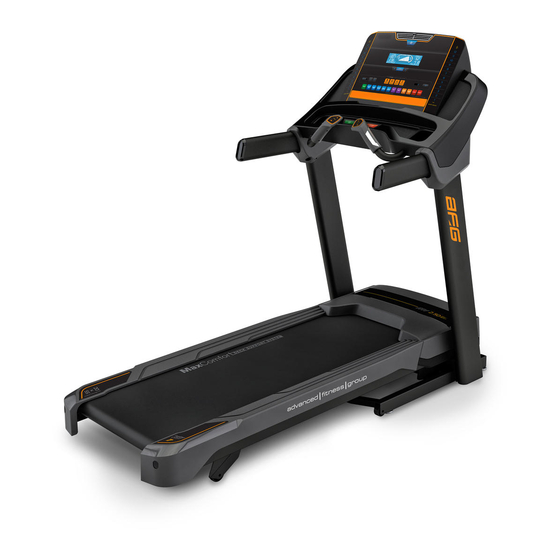
CONSOLE DISPLAY AND CONTROLS PRE ASSEMBLY TOOLS REQUIRED: F T-Wrench F L-Wrench CONSOLE UNPACKING F Screwdriver (not included) HEART RATE GRIP BARS SPEAKERS PARTS INCLUDED: Place the treadmill carton on a level flat surface. It is recommended that you place a protective covering on your floor. -
Page 6: Assembly Step
ASSEMBLY STEP 1 ASSEMBLY STEP 2 HARDWARE FOR STEP 1 HARDWARE FOR STEP 2 PART TYPE PART TYPE BOLT BUTTON HEAD BOLT SPRING WASHER FLAT WASHER Cut the yellow banding straps and lift the running deck upward to remove all contents from underneath the running deck. - Page 7 ASSEMBLY STEP 2 (continued) ASSEMBLY STEP 4 HARDWARE FOR STEP 2 HARDWARE FOR STEP 4 PART TYPE PART TYPE BUTTON HEAD BOLT BUTTON HEAD BOLT SPRING WASHER SPRING WASHER FLAT WASHER FLAT WASHER NOTE: Be careful not to pinch the console NOTE: Do not fully tighten bolts until step 6.
- Page 8 ASSEMBLY STEP 5 ASSEMBLY STEP 6 HARDWARE FOR STEP 5 HARDWARE FOR STEP 6 PART TYPE PART TYPE SCREW BUTTON HEAD BOLT SPRING WASHER FLAT WASHER Open HARDWARE FOR STEP 5. NOTE: Be careful not to pinch the console Slide both CONSOLE MAST COVERS (8) cables while attaching the console.
-
Page 9: Treadmill Operation
TREADMILL OPERATION This section explains how to use your treadmill’s console and programming. The BASIC OPERATION section in the TREADMILL GUIDE has instructions for the following: • LOCATION OF THE TREADMILL • USING THE SAFETY KEY • FOLDING THE TREADMILL •... -
Page 10: Console Operation
CONSOLE OPERATION Note: There is a thin protective sheet of clear plastic on the overlay of the console that should be removed before use. A) LCD DISPLAY WINDOW: time, incline, distance, LIVETRACK, speed, laps, calories, and heart rate. B) PROGRAMMING – / + KEYS: Used to cycle through programs and LIVETRACK workout statistics. C) ENTER: used to confirm a selection. - Page 11 GETTING STARTED 1) Check to make sure no objects are placed on the belt that will hinder the movement of the treadmill. 2) Plug in the power cord and turn the treadmill ON. 3) Stand on the side rails of the treadmill. 4) Attach the safety key clip to part of your clothing making sure that it is secure and will not become detached during operation.
-
Page 12: Program Information
PROGRAM INFORMATION 4) STRENGTH BUILDER: Time segments vary STRENGTH BUILDER - INCLINE ONLY from 30 to 90 segments long to challenge Segment Warm Up 10 11 12 Cool Down 1) MANUAL: Adjust your speed and incline manually during your workout. Seconds 4:00 30 60 90 60 90 45 60 45 90 90 30 30... - Page 13 PROGRAM INFORMATION CUSTOM PROGRAM INFORMATION Lets you create and reuse a perfect workout for you with specific speed, incline and time combination. The ultimate in 5K / 10K - INCLINE ONLY 7-8) 5K/10K: Programs that allow personal programming. Time-based goal. Segment Warm Up 15 Cool Down you to set and work toward...
-
Page 14: Livetrack™ Fitness Journal System
LIVETRACK™ FITNESS JOURNAL SYSTEM USING YOUR MEDIA PLAYER The integrated LIVETRACK software allows you to track your fitness progress over time without the need for paper journals or 1) Connect the included AUDIO ADAPTOR CABLE to the AUDIO IN JACK on the left of the console and the logs. -
Page 15: Limited Home-Use Warranty
LIMITED HOME-USE WARRANTY AFG14_OM_3.3AT_Rev1_2.indd 28-29 7/31/14 4:41 PM... -
Page 16: Weight Capacity
EXCLUSIONS AND LIMITATIONS SERVICE/RETURNS WEIGHT CAPACITY = 325 lbs (147 kilograms) or maintenance of the equipment. The manufacturer Who IS covered: • In-home service is available within 150 miles of the does not provide monetary or other compensation for nearest authorized Service Provider (Mileage beyond •... - Page 17 See our troubleshooting and maintenance videos online at: 3.3AT Rev. 1.2 | © 2014 Johnson Health Tech Veuillez regarder les vidéos de dépannage et de maintien sur le net au: Miren los videos de localización y resolución de problemas y el mantenimiento por internet al: Designed &...
Need help?
Do you have a question about the 3.3AT and is the answer not in the manual?
Questions and answers