
Related Manuals for BZB Gear BG-UHD-QVP-4X2


Summary of Contents for BZB Gear BG-UHD-QVP-4X2
- Page 1 BG-UHD-QVP-4X2 4x2 HDMI 2.0a Quad-View Video Processor with 4K2K60 4:4:4 & USB 3.0 FHD Video Capture Function User Manual...
-
Page 2: Table Of Contents
However, like all electronic equipment, the BG-UHD-QVP-4X2 should be used with care. Please read and follow the safety instructions to protect yourself from possible injury and to minimize the risk of damage to the unit. -
Page 3: Introduction
INTRODUCTION The BG-UHD-QVP-4X2 4x2 HDMI 2.0a Quad-View Video Processor with 4K2K60 4:4:4 & USB 3.0 FHD Video Capture Function provides the most flexible and cost effective solution in the market to route ultra-high definition video source from any of the four UHD HDMI sources to the remote display at the same time. -
Page 4: Package Contents
Compatible with most 3 party software such as OBS Studio and AMCap Supports USB 3.0 (MJPG/YUY2) and USB 2.0 (MJPG) *Cloud support is thru an encrypted communication to provide the best private protection when using BG-UHD-QVP-4X2 PACKAGE CONTENTS ⚫ 1x BG-UHD-QVP-4X2 ⚫... -
Page 5: Specifications
SPECIFICATIONS Model Name BG-UHD-QVP-4X2 Technical Role of usage Multiplexer / video processor Background picture update HDCP compliance 1.4 / 2.2 HDMI compliance HDMI 2.0a Video bandwidth HDMI [600MHz [18Gbps] Output Video Support Up to 4K2K@60 (4:4:4 8bits) Video support(USB) Up to 1080p60... -
Page 6: Hardware Installation
20~90% RH [no condensation] HARDWARE INSTALLATION BG-UHD-QVP-4X2 as master 1. Connect all sources to HDMI Inputs on the BG-UHD-QVP-4X2. 2. Connect the display to HDMI Output on the BG-UHD-QVP-4X2. 3. Connect the +12V 5A DC power supply to the BG-UHD-QVP-4X2. CONNECTION DIAGRAM... -
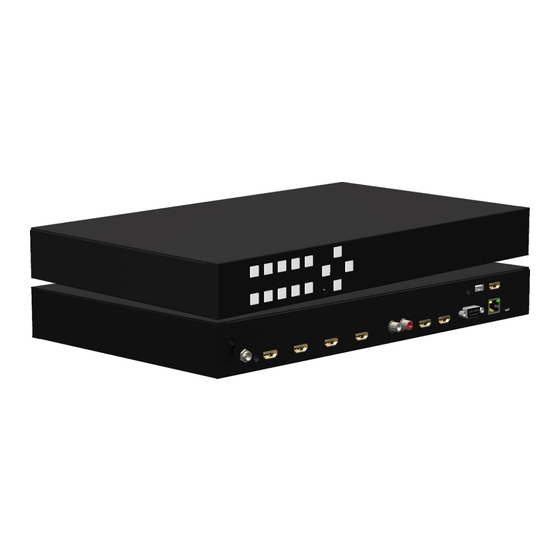
Page 7: Panel Descriptions
PANEL DESCRIPTIONS BG-UHD-QVP-4X2 Front Panel Windows Source Selection A-D: Window A-D source selection (from the left to the right is D, C, B, Presets: User preset 2 and user preset 1 Quad: Fast switch to quad-view mode Full Screen: Switch Window in full scree mode... -
Page 8: Operation Approach
OPERATION APPROACH Method A: IR Remote Control Button Function POWER Power on/off the device LOCK Lock/unlock the device ▲ Arrow button (up) MENU OSD menu AUDIO Select audio sources Arrow button (right) Trigger the setting Arrow button (left) MUTE Turn off the audio BACK Back to previous page of OSD menu ▼... - Page 9 Method B: Software Control through RS-232 / Ethernet port 1. System Requirement (1) OS information: MS Win XP/7/8/10 (2) Baud rates: 115200 (3) Software size: 10 MB (4) Minimum RAM requirement: 256MB 2. Control interface When clicking on the executable file, the following dialog will pop-up (under Microsoft Windows 7, please run as administrator) RS-232 serial Mode: Use RS-232 to connect the port on device and computer.
- Page 10 Control Interface 1. Connection Status: Show the connect information and status. If users use RS-232 serial Mode to connect device, the graph is . In contrast, the graph of Ethernet is . In addition, if users would link to change the control method, uses can click on the button to change.
- Page 11 2. Output Settings In this section, users can set up the coordinate for inputs, the source of window A~D, output resolution, layout setting (PAP or full screen) and switch mode. (1) Source Selection For each display window, you can assign arbitrary video source here. (2) Quick Selection We provide 9 default modes, 8 custom modes and 4 switching effects (Seamless, Fade in/out, Dissolve, Wipe) for user to select.
- Page 12 (3) Output Resolution Set the output resolution. (4) Save Layout We provide 8 custom layout space for users to save the frequently used scenarios into the flash memory.
- Page 13 (5) Display Panel In the left part of control interface, user can customize the display mode thru control. The different colors of frame represent the different input windows. The information of coordinate shows the position of input source screen. In addition, we provide display ratio for users to set the display panel sizes.
- Page 14 3. Advanced Setting (1) Label Text In here, users can input the texts to be shown with the video. (2) Sound To set up the audio source of the output and R/L channels.
- Page 15 (3) Window Label In this function, users can determine if the window’s label/border is turned on or off. (4) Background To set up the background of window. We provide 4 empty space for user to upload background pictures. User can click File button to load the picture which you want to use and click Start button to write this picture into the device.
- Page 16 4. EDID (Extended display identification data) (1) Learn EDID from Default ➢ Select Default EDID ➢ Select Input ➢ Click button to learn default EDID.
- Page 17 5. System Setting (1) Firmware Update ➢ Click button to do firmware update. ➢ The “Firmware update” window shows up as below. ➢ Please select the correct COM port or click “Scan” button to connect device.
- Page 18 ➢ Click “update” button to do firmware update. (2) Factory Reset ➢ Click button to do factory default reset. ➢ The process of default reset will take about 25 seconds.
- Page 19 6. IP Configure User also can use the WEB to control the mixer. Firstly, user should click on the button to setup network set. Next, users can setup the Ethernet for the unit as below example shows. After the step of IP configuration, please click the button.
- Page 20 Method C: Cloud Control (Eagleyes) through Ethernet Port Create Account The first time to use the Eagleyes service, please create a new account. 1. Access Eagleyes (http://www.eagleyes.io) and click “Create new account”. 2. The Registration page will pop up and please fill in your email and password information to create your private account.
- Page 21 Add Device to Eagleyes 1. Firstly, please make sure the device is connected to the Ethernet. Then please executing the software with device to get the register code (Note: the status of software is connected). 2. Access Eagleyes (http://www.eagleyes.io), and then log in your account on the right top corner.
- Page 22 4. After adding the device, the list of device related to your account will show on the right top corner. You can click the button to switch device for control.
-
Page 23: Usb Pin Definition
USB PIN DEFINITION VBUS SSRX- SSRX+ SSTX- SSRX+ SHELL SHELL Shield... -
Page 24: Warranty
WARRANTY The SELLER warrants the BG-UHD-QVP-4X2 4x2 HDMI 2.0a Quad-View Video Processor with 4K2K60 4:4:4 & USB 3.0 FHD Video Capture Function free from defects in the material and workmanship for 1 year from the date of purchase from the SELLER or an authorized dealer. Should this... -
Page 25: Second Year Assurance
SECOND YEAR ASSURANCE BZB Gear wants to assure you peace of mind. We're so confident in the quality of our products that along with the manufacturer's one-year limited warranty, we are offering free second-year warranty coverage upon registration*. Taking advantage of this program is simple, just follow the steps below: 1.
Need help?
Do you have a question about the BG-UHD-QVP-4X2 and is the answer not in the manual?
Questions and answers