
Related Manuals for Star Trac StairMaster Core Health & Fitness 15" Capacitive Touch OpenHub


Summary of Contents for Star Trac StairMaster Core Health & Fitness 15" Capacitive Touch OpenHub
- Page 1 Core Health & Fitness 15”-19” Capacitive Touch OpenHub Embedded Console OWNER’S MANUAL...
-
Page 2: Table Of Contents
TABLE OF CONTENTS PRODUCT SPOTLIGHT ............................. 2 IMPORTANT SAFETY INSTRUCTIONS ............................. 3 ..................5 SAFETY INSTRUCTIONS IMPORTANT LABEL LOCATIONS ..................17 INITIAL SETUP ............................18 OPERATION - OPENHUB TOUCHSCREEN CONSOLES ............................19 MENU MAP ............................26 GAUNTLET ..................26 TREADMILL ..................27 FREECLIMBER ..................28 BIKE/CROSSTRAINER ..................29... -
Page 3: Product Spotlight
PRODUCT SPOTLIGHT OpenHub Embedded Console 700-0463-XX 19” Tread-NTC 700-0466-XX 19” Tread-PAL-DMB Overall Weight Width Length Height 23 lbs (10.4 kg) 20.7 in (53 cm) 28.9 in (73 cm) 9.8 in (25 cm) 700-0471-XX 15” ST-BCS-ATSC 700-0472-XX 15” ST-BCS-ISDB-DMB-PAL 700-0468-XX 15” SM-ATSC 700-0469-XX 15”... -
Page 4: Important Safety Instructions
IMPORTANT SAFETY INSTRUCTIONS WARNING! Before using this product, it is essential to read the ENTIRE operations manual and ALL installation instructions. The Owner’s manual describes equipment setup and instructs members on how to use correctly and safely. Read all warnings posted on the machine. Health related injuries may result from incorrect or excessive use of exercise equipment. - Page 5 examined for damage and wear and repaired. It is the sole responsibility of the owner of this equipment to ensure that regular maintenance is performed. Worn or damaged parts must be replaced immediately or the equipment removed from service until the repair is made. WARNING: Heart rate monitoring systems may be inaccurate.
-
Page 6: Safety Instructions
SAFETY INSTRUCTIONS This chapter includes precautions and fitness safeguards for the installation and use of the product. Please read this chapter carefully before installing or using your equipment. Safety instructions are provided in the following languages (in the order shown): •... - Page 7 PRECAUTIONS CAUTION: READ THE OWNER’S CAUTION: MOVING PARTS, KEEP MANUAL COMPLETELY BEFORE HANDS AND FEET FROM UNDER OPERATING THIS MACHINE. THE TREADMILL WHEN OPERATING. CAUTION: BEFORE CLEANING OR SERVICING, DISCONNECT POWER STOP (OF ACTIVITY) SUPPLY. These safety notes are directed to you as the owner of the equipment. For safety purposes, it is your responsibility to train all your members and fitness staff to follow these safety instructions.
- Page 8 VOORZORGSMAATREGELEN WAARSCHUWING: LEES DE WAARSCHUWING: BEWEGENDE GEBRUIKERSHANDLEIDING ONDERDELEN, HOUD HANDEN VOLLEDIG VOORDAT UDIT TOESTEL EN VOETEN NIET ONDER HET IN GEBRUIKT NEEMT. TOESTEL TIJDENS GEBRUIK. WAARSCHUWING: HAAL DE STEKKER UIT HET STOPCONTACT STOP (ACTIVITEIT) VOORDAT U HET TOESTEL REINIGT OF ONDERHOUDT. Deze veiligheidsmaatregelen zijn aan u als eigenaar van de apparatuur gericht.
- Page 9 PRÉCAUTIONS MISE EN GARDE : PRENDRE MISE EN GARDE : PIÈCES MOBILES MARCHE CONNAISSANCE DU MODE ; NE PAS METTRE LES MAINS NI D’EMPLOI AVANT DE SE SERVIR LES PIEDS EN DESSOUS DE ARRÊT DE L’APPAREIL. L’APPAREIL LORSQU’EN FONCTIONNEMENT. MISE EN GARDE : DÉBRANCHER L’APPAREIL DU SECTEUR AVANT ARRÊT (DE L’ACTIVITÉ) TOUTE PROCÉDURE DE...
- Page 10 PRECAUZIONI ATTENZIONE: PRIMA DI UTILIZ- ATTENZIONE: PRESENZA DI PARTI ZARE LA MACCHINA LEGGERE IL IN MOVIMENTO, TENERE MANI MANUALE DI ISTRUZIONI. E PIEDI LONTANI DALLA PARTE INFERIORE DELLA MACCHINA MENTRE QUESTA È IN FUNZIONE. ATTENZIONE: PRIMA DI EFFETTUARE LA PULIZIA O INTERVENTI DI ARRESTO (DELL’ATTIVITÀ) MANUTENZIONE, TOGLIERE TENSIONE ALLA MACCHINA.
- Page 11 PRECAUÇÕES CUIDADO: LEIA POR COMPLETO CUIDADO: PARTES MÓVEIS, LIGA O MANUAL DO PROPRIETÁRIO MANTENHA AS MÃOS E OS PÉS ANTES DE OPERAR ESTA AFASTADOS DA PARTE SOB A DESLIGA MÁQUINA. MÁQUINA DURANTE A OPERAÇÃO. CUIDADO: ANTES DA LIMPEZA OU MANUTENÇÃO, DESCONECTE A PARADA (DA ATIVIDADE) ALIMENTAÇÃO.
- Page 12 PRECAUCIONES CUIDADO: LEA COMPLETAMENTE CUIDADO: CUENTA CON PARTES ENCENDIDA EL MANUAL DEL PROPIETARIO MÓVILES, AL OPERARLA ANTES DE OPERAR ESTA MANTENGA LAS MANOS Y PIES APAGADA MÁQUINA. ALEJADOS DE DEBAJO DE LA MÁQUINA. CUIDADO: ANTES DE LIMPIAR O DAR SERVICIO, DESCONECTE EL DETENER (EL FUNCIONAMIENTO) SUMINISTRO DE ENERGÍA.
- Page 13 FÖRSIKTIGHETSÅTGÄRDER VARNING: LÄS HELA VARNING: DET FINNS RÖRLIGA PÅ ÄGARHANDBOKEN INNAN DU DELAR. HA INTE HÄNDER ELLER ANVÄNDER DEN HÄR MASKINEN. FÖTTER UNDER MASKINEN NÄR DEN ANVÄNDS. VARNING: kOPPLA UR ELKABELN FÖRE RENGÖRING OCH STOPPA (AKTIVITETEN) UNDERHÅLL. Dessa säkerhetsföreskrifter är riktade till dig som är ägare av utrustningen. Av säkerhetsskäl är det ditt ansvar att utbilda alla medlemmar och träningspersonal så...
- Page 14 预防措施 注意:操作机器前请通读用户手 注意:活动部件,操作时请将手 开启 册。 脚远离机器下方。 关闭 注意:清洗或维修前,请断开电 源。 停止(活动) 这些安全须知专为机器所有者编写。安全起见,您应负责培训所有会员及健身教练,使之遵守相关安全说明。 应做事项 禁止事项 在开始任何锻炼项目之前通知会员进行健康检查。使用 请勿让儿童操作机器。病人或残疾人士使用机器时需有 • • 过 程 中如出现头晕目眩或疼痛感,请立即停止并咨询 人监管。 医生 请勿超过使用者体重的最大容许值 • 使用前请务必通读、理解并严格遵守机器及本手册上的 450 磅/204 千克)。 • 所 有警告、说明及程序。 请勿在未穿运动鞋时使用机器。 • 仅可将该机器用于本手册所述的预期用途。 • 使用机器时,请勿穿着宽松、悬垂的衣物。 • 请务必将本机器置于平坦坚实的表面上。 • 请勿在机器运转时进行踩踏或跳上跳下。 • 使用前请务必检查机器是否出现错误、磨损或部件松动 • 请勿在潮湿的环境中使用本机器。 • 的 情 况,并及时校正、替换或紧固部件。...
- Page 15 使用上の注意 注意:本機を操作する前に、取 注意:本機の稼働中は、可動部 オン 扱説明書全体に目を通してくだ に注意し、本体の下側に手足を さい。 差し込まないでください。 オフ 注意:清掃や保守を行う前に、電 源を切断してください。 エクササイズの)中止 これらの安全上の注意は、機器の所有者に向けられています。安全手順が守られるよう、すべてのフィットネス会 員やスタッフにトレーニングを提供することは所有者の責任です。 次のことを確実に実施してください。 次のことは絶対に避けてください。 何らかのエクササイズ プログラムを開始する前に、健 子供達に本機を操作させる。病人や障害者に本機を使 • • 康診断を受けるよう会員に促す。運動中にめまい、脱力 用させる。 感、痛みなどを感じた場合は、ただちに使用を停止して 204 kg(450 ポンド)の最大許容体重を超える。 • 医師に相談する。 運動靴を履かずに本機を使用する。 • 本機上に貼られていたり、本取扱説明書に含まれていた • ぶかぶかな服や、垂れている服を着て本機を使用す • りする警告、指示や手順をすべて読んで理解し、注意し る。 て従う。 本機の作動中に、上に乗ったり、飛び乗ったり、飛び • 取扱説明書に記載されている使用目的でのみ、本機を使 • 降りたりする。 用する。...
- Page 16 ПРАВИЛА ТЕХНИКИ БЕЗОПАСНОСТИ ВНИМАНИЕ. ПЕРЕД ВНИМАНИЕ. ДВИЖУЩИЕСЯ ВКЛ. ИСПОЛЬЗОВАНИЕМ ТРЕНАЖЕРА ЧАСТИ - УБИРАЙТЕ РУКИ И ВНИМАТЕЛЬНО ПРОЧИТАЙТЕ НОГИ ИЗ-ПОД ТРЕНАЖЕРА ПРИ ВЫКЛ. РУКОВОДСТВО ПОЛЬЗОВАТЕЛЯ. ЭКСПЛУАТАЦИИ. ВНИМАНИЕ. ПЕРЕД ОЧИСТКОЙ ИЛИ ОБСЛУЖИВАНИЕМ ОСТАНОВ (РАБОТЫ) ТРЕНАЖЕРА ОТКЛЮЧИТЕ ЕГО ОТ ИСТОЧНИКА ПИТАНИЯ. Настоящие примечания по технике безопасности предназначены для вас как для владельца тренажера. В целях безопасности...
- Page 17 ARABIC SAFETY INSTRUCTIONS Page 16...
-
Page 18: Important Label Locations
IMPORTANT LABEL LOCATIONS Page 17... -
Page 19: Initial Setup
INITIAL SETUP After powering the unit for the first time, the com- puter will boot up and the Select Device screen will appear in the display. If for any reason the screen does not appear, on the top of the touchscreen, tap the upper left corner, then upper right, then upper left again. -
Page 20: Operation - Openhub Touchscreen Consoles
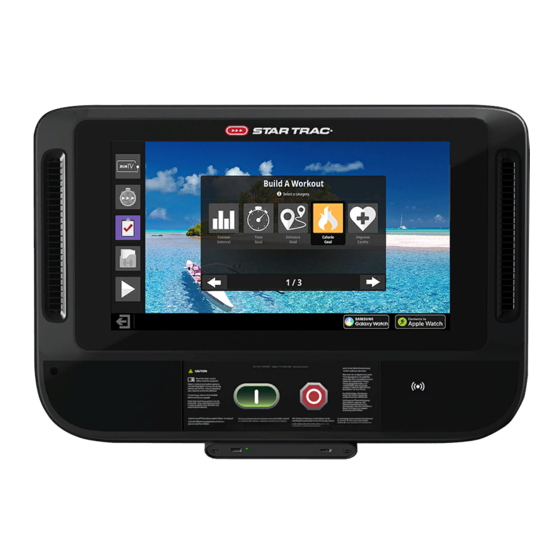
OPERATION - OPENHUB TOUCHSCREEN CONSOLES CONSOLE & HOTBAR (WHERE APPLICABLE) FUNCTIONS Enables manual operation using a default weight, SPEED and a default time limit. QUICK START Key NOTE: Default time and weight are adjustable through Maintenance Mode. Press the STOP button to enter pause mode. Workout will be suspended and a count- STOP Button down timer will begin counting down from 2 minutes. - Page 21 Incline Adjustment Allows user to increase/decrease incline (Treadmill/Treadclimber Only) Level Adjustment Allows user to increase/decrease program level (8G and 10G Only) RunTV ST20 H.I.I.T. Main Menu Workout controls, varies by unit. See the Menu Map for complete details. Build A Workout Existing Workouts...
- Page 22 SCREEN VIEWS 3.65mi 37:45 20:00 KCAL Total Distance Total Time Pace (Min/Mi) 0.15 15.0 15.0 MILES During most workouts, users can select from multiple screen view options by tapping the icons at the bottom of screen. Screens vary by unit, all screens are shown in the Service Manual. Simple Key workout stats in a large and easily readable format Progress...
- Page 23 Other controls vary by unit: Fan Button Cycles the fan between three settings: High, Low and Off Bluetooth Button is grayed out if no device is connected to the console. Adjustment Allows user to increase/decrease speed, level or incline depending on unit. Buttons This button has the same function as pressing stop button on hot bar, puts Exit/Back...
- Page 24 & muscular power. The Star Trac TWENTY curriculum was created specifically to allow exercisers of all fitness levels to reap the benefits of interval training, in a time efficient manner, with a varied approach to keep it fun and engaging! ...
- Page 25 PROGRAM UPLOAD Prior to starting a workout, a BlueTooth connected device can be used to upload a program to display on the console from a compatible app. The upload may contain user info such as age and weight. RunTV 1. In an App interface, select the option to Upload Program to ST20 H.I.I.T.
- Page 26 3. Once the program has loaded, press the green start button to RunTV progress to the setup screen. ST20 NOTE: Console will return to H.I.I.T. home screen after 30 seconds or if Build A cancel is pressed. Workout 4. If program fails to load, an error Existing Workouts screen is displayed for 5 seconds...
-
Page 27: Menu Map
MENU MAP GAUNTLET Spartan RunTV SM20 H.I.I.T. Power Program Landmark Challenge Build A Workout Build A Workout Custom Time Floor Calorie Training Interval Goal Goal Goal Tools Quick Start Training Tools Constant HR Dynamic HR CPAT Dutch FF Control Control HR Check - Gauntlet Menu Map Page 26... -
Page 28: Treadmill
TREADMILL RunTV ST20 H.I.I.T. Build A Workout Build A Workout Custom Time Distance Calorie Improve Interval Goal Goal Goal Cardio HR Training Constant HR Dynamic HR Control Control Existing Workouts Existing Workouts Manual Random Hill Alpine Pass 5K time trial Evaluate Fitness Quick Start... -
Page 29: Freeclimber
FREECLIMBER RunTV SM20 H.I.I.T. Landmark Challenge Build A Workout Build A Workout Custom Time Floor Calorie Improve Interval Goal Goal Goal Cardio Quick Start HR Training Constant HR Dynamic HR Control Control - Freeclimber Menu Map Page 28... -
Page 30: Bike/Crosstrainer
BIKE/CROSSTRAINER RunTV ST20 H.I.I.T. Build A Workout Build A Workout Custom Time Distance Calorie Improve Interval Goal Goal Goal Cardio HR Training Constant HR Dynamic HR Control Control Existing Workouts Existing Workouts Manual Random Hill Alpine Pass Autopilot Training Tools Quick Start Training Tools... -
Page 31: Maintenance Mode
MAINTENANCE MODE Maintenance Mode allows access to service and diagnostic information, as well as provides the ability to adjust certain program default parameters. To enter Maintenance Mode: On the top of the touchscreen, tap the upper left corner, then upper right, then upper left again. Password Screen will display. - Page 32 . 10 - Maintenance Mode TM (default values shown) MAINTENANCE MODE While in Maintenance Mode, the following information can be accessed and/or modified: • SW versions - The latest software version loaded in the system. • Serial Number - The last five digits of the display serial number. •...
- Page 33 . 11 - Manager Mode (default values shown) MANAGER MODE While in Manager Mode, the following information can be access and/or modified: • SW versions - The latest software version loaded in the system. • Serial Number - The last five digits of the display serial number. •...
- Page 34 . 12 - Network Mode (Ethernet Connected) NETWORK MODE Internet connection information and network settings are shown and changed in this screen. Connecting to WIFI Tap Enable RF if not active. . 13 - Network Mode (WiFi Available) Page 33...
- Page 35 Tap Scan Wireless Select the correct network then tap Add Network. . 14 - Network: Select Network Enter the key in the PSK field then tap Connect . 15 - Network: Enter Key Once connected, current connection information appears in the upper right and the active connection is green.
- Page 36 . 17 - Diagnostic Mode DIAGNOSTIC MODE Allows the test of all hard keys, and the telemetry and contact heart rate. Page 35...
- Page 37 . 18 - Usage Statistics USAGE STATISTICS Displays the total number of times a program has been used (programs will differ by equipment type. Page 36...
- Page 38 . 19 - Last Error List LAST ERROR LIST MODE The top row displays the last 5 recorded errors with corresponding data below. Page 37...
- Page 39 . 20 - Calibration & Setup Main Screen CALIBRATION & SETUP The Calibration and Setup screen allows you to calibrate your equipment, update software, custom- ize the user interface and setup the TV. Note: the Calibration and Setup screen is different for each product type. Speed Calibration Procedure Select Speed Calibration on the Calibration and Setup screen.
- Page 40 Incline Calibration Procedure Select Incline Calibration on the Calibration and Setup screen. Press START to begin the calibration. After the Speed Calibration is completed, press EXIT; The Calibration And Setup screen appears. Press to exit and go back to the Home Screen. The Incline Calibration has been completed.
- Page 41 App Selection Select App Selection on the Calibration and Setup screen. Press an app icon to select or deselect an app. If app is deselected, it will not be available to the user. Once changes are made, press to save and exit or press to cancel and exit.
- Page 42 Import Images Using the integrated USB port, it is possible to upload custom graphics and images. Upload up to 7 custom images to be used as the background for the home and setup screens Upload a custom logo for the top center of the home screen .
- Page 43 File Location It is important to place the files on the USB drive in a specific location. If the files are not placed in /images/ as shown, the image files will not upload to the console. The total size of all images combined cannot exceed 20 MB.
- Page 44 . 30 - Tuner Main Screen TUNER Select entertainment input. Selecting Tuner will open up the channel dialog: Channel Scan Procedure Select the “Mode” and tap on either “HDMI” (if using HDMI) or “Tuner” (if using coaxial). . 31 - Select Tuner Select Channel Scan on the Tuner Setup screen.
- Page 45 Select the signal type from the Scan Mode option (Both, Analog or Digital). Select the region. Select Cable Standard (depends on the country of installation). Press Start to begin the scan. After the channel scan is completed, press Exit. The Calibration and Setup screen appears. Press to exit and go back to the Home Screen.
- Page 46 . 34 - Set Top Box Main Screen Set Top Box Select entertainment input. Selecting STB will open up the STB screen. Preset STB’s are selected from the dropdown and by default include the following options (may change without notice): •...
-
Page 47: Error Codes
ERROR CODES Error Codes for Treadmill, Treadclimber, Bike, Crosstrainer, and Versastrider machine configurations Error Name Meaning/Definition Code Model Mismatch Invalid equipment configuration is currently selected. LCB Comms Lost Communications with the Lower Control board has been lost Stuck key The key switch circuit has been closed for an excessive period of time. Speed has exceeded the maximum specified speed of the machine by 3.0 miles per Over Speed hour. - Page 48 Error Codes for Gauntlet and Freeclimber machine configurations Error Name Meaning/Definition Code Invalid Model Invalid equipment configuration is currently selected. EEPROM failure A failure of the system’s non-volatile memory has been detected. Stuck key The key switch circuit has been closed for an excessive period of time. LCB Com Error Communications with the Lower Control board has been lost App CRC Failed...
- Page 49 LOGGED DATA When an error occurs, additional system data that represents the state of the system at the instance the error occurs is recorded as an entry into a list of error log entries visible from the maintenance mode. The total number of error log entries is 10. The makeup of the logged entry data that is com- mon to all equipment configurations is defined in the following table: Description Meaning/Definition...
- Page 50 Treadmill Unique Error Logged Data In addition to the data listed in the Machine Error Common Logged Data and the Treadmill/Tread Climber Common Error Logged Data sections above, the treadmill equipment configuration in- cludes the following unique data: Description Meaning/Definition Deck Grade Elevation Grade of the Deck in units of 0.1 percent elevation.
-
Page 51: Tm Frame
INSTALLATION TM FRAME 1. Use a #2 phillips screwdriver to secure the console back shroud to the mast using eight (8) pieces each of the #8-18 x 3/4” pan head screw (#110-3402) and M4 washer #120-3307 . Note: On 8-TR or 8-TRx with a Gen 1 Hotbar only, install grommet 020-7884-XX as shown to the right. - Page 52 GROUND TO MAST GROUND TO MAST E and F are pre-wired to the back console shroud in the location shown below: Page 51...
- Page 53 3. Use a #2 phillips screwdriver to secure the console front to the back shroud using eight (8) pieces of the #8-18 x 3/4” pan head screw. Note: For 8-TR with a 19” screen only, follow directions on page 55. 4.
- Page 54 6. Power the unit on and wait for the console to load into the main workout screen. Once on the main workout screen, tap the upper left corner of screen, then the upper right corner of the screen, then the upper left corner of the screen.
- Page 55 12. Tap on Speed Calibration. 13. Ensure no one is standing on the belt then tap on Start. 14. Once the calibration has passed, press to return to the Calibration and Setup screen. 15. Tap on Incline Calibration. 16. Ensure no one is standing on the belt then tap on Start.
-
Page 56: 8-Tr Only
8-TR ONLY 1. Use a #2 phillips screwdriver to remove the screw securing the audio PCB to the hotbar audio mount. 2. Disconnect the cables attached to the HDMI panel. 3. Use a #2 phillips screwdriver to remove the two screws securing the HDMI panel to the console, then remove the panel. - Page 57 5. Secure the audio PCB into the HDMI panel using the screw removed in Step 1. 6. Reinstall the HDMI panel using the screws removed in Step 3. 7. Reconnect the cables to the HDMI panel. 8. Connect the audio PCB to the console using the male-to-male 3.5mm audio cable.
-
Page 58: B/Ct Frame
B/CT FRAME 1. Use a #2 phillips screwdriver to secure the console back shroud to the mast using eight (8) pieces each of the #8-18 x 3/4” pan head screw and M4 washer. 8-VS ONLY TO FRAME FOR 3RD MAST PARTY ACCESSORY 2. - Page 59 GROUND TO MAST GROUND TO MAST E and F are pre-wired to the back console shroud in the location shown below: Page 58...
- Page 60 3. Use a #2 phillips screwdriver to secure the console front to the back shroud using seven (7) pieces of the #8-18 x 3/4” pan head screw. 4. Power the unit on and wait for the console to load into the main workout screen. Once on the main workout screen, tap the upper left corner of screen, then the upper right corner of the screen, then the upper left corner of the screen.
- Page 61 7. Select the model that the console is installed onto, then press 8. Once the model has been selected, press to return to the Service Menu. 9. To complete installation, press to exit and go back to the Home Screen. Page 60...
-
Page 62: G/Fc Frame
G/FC FRAME 1. Use a #2 phillips screwdriver to secure the console back shroud to the mast using eight (8) pieces each of the #8-18 x 3/4” pan head screw and M4 washer. 8/10-G 8-VS ONLY ONLY FOR 3RD TO FRAME PARTY MAST ACCESSORY... - Page 63 GROUND TO MAST GROUND TO MAST E and F are pre-wired to the back console shroud in the location shown below: Page 62...
- Page 64 3. Use a #2 phillips screwdriver to secure the console front to the back shroud using seven (7) pieces of the #8-18 x 3/4” pan head screw. Note: For 8-G follow directions on page 65. 4. Power the unit on and wait for the console to load into the main workout screen.
- Page 65 7. Select the model that the console is installed onto, then press 8. Once the model has been selected, press to return to the Service Menu. 9. To complete installation, press to exit and go back to the Home Screen. Page 64...
-
Page 66: 8-G Only
8-G ONLY 1. Use a #2 phillips screwdriver to remove the screw securing the headphone PCB to the USB-HDMI panel, then remove the headphone PCB. 2. Install the headphone PCB into the hotbar insert using the screw removed in the previous step. NOTE: Ensure that the headphone PCB is installed into the hotbar insert that matches the correct generation of hotbar present on the unit. - Page 67 Install the Gen 1 audio insert, then se- cure with the screw removed above. 4. For 8-G (9-5270) Only: Install the Gen 2 Audio Insert Use a #2 phillips screwdriver to re- move the screw securing the hotbar cap into the hotbar, then remove the cap.
- Page 68 5. Apply the USB-HDMI decal to the front of the USB- HDMI panel that covers the 3.5mm audio port hole. Page 67...
- Page 69 SUPPORT & SERVICE CORE Get world class support for all brands with our new support portal, Core Connect. Get help with your general inquiries, warranty registration, preventative maintenance, service requests and parts orders. You can CONNECT also make seamless service requests, get real time updates, manage your assets and intuitively order parts for all brands direct from the site.
- Page 70 GET ALL ACCESS! Quickly retrieve information from our product catalog, calendar of events, educational webinars, Core Connect and more! How to Get Started: Scan the QR code above with your smartphone. Navigate to the menu icon, in the top left corner of your screen Select the menu item you want to access, for items accessed through a web browser, select “OK”...
- Page 71 THIS PAGE INTENTIONALLY LEFT BLANK Page 70...
- Page 72 © 2019 CORE HEALTH & FITNESS, LLC PART NUMBER 620-8642, REV C...
Need help?
Do you have a question about the StairMaster Core Health & Fitness 15" Capacitive Touch OpenHub and is the answer not in the manual?
Questions and answers